

Are you looking to add a new user to your WordPress site but don’t know where to start? Whether you want to invite a collaborator, give access to a writer, or simply share admin duties, adding a new user is easier than you think.
In this guide, you’ll discover clear, step-by-step instructions that anyone can follow—no technical skills needed. By the end, you’ll feel confident managing users and keeping your site secure. Keep reading, and you’ll unlock a simple trick that saves you time and helps your site run smoothly.
Accessing The WordPress Dashboard
Accessing the WordPress Dashboard is the first step to add a new user. The dashboard is the control center of your website. It lets you manage content, settings, and users easily.
To reach the dashboard, you need to log in to your WordPress site. This process is simple and takes only a few moments.
Open Your Website Login Page
Start by typing your website address in the browser. Add “/wp-admin” at the end of the URL. For example, www.yoursite.com/wp-admin. This link leads directly to the login page.
Enter Your Username And Password
Use your WordPress username and password to sign in. These credentials were created during website setup. Keep them safe and private.
Navigate To The Dashboard
After logging in, the dashboard appears. It shows a menu on the left side. This menu has all the tools for site management.
Credit: www.greengeeks.com
Navigating To The Users Section
Navigating to the Users section in WordPress is the first step to adding a new user. This area helps manage who can access your website. Finding it is simple and quick.
Start by logging into your WordPress dashboard. The dashboard is the control center for your website. It shows all the main options you need to manage your site.
Access The WordPress Dashboard
After logging in, you will see the WordPress dashboard. This screen has a menu on the left side. The menu lists different sections to manage your site.
Locate The Users Menu
Look down the left menu for the “Users” option. It usually appears below “Posts” and “Pages”. The Users menu controls user roles and permissions.
Click On The Users Link
Click the “Users” link to open the user management page. Here, you can see all existing users on your site. This page allows you to add, edit, or delete users.
Starting The Add New User Process
Starting the process to add a new user on WordPress is simple. It lets you give others access to your site. You control what they can do. This helps keep your site safe and organized.
Before adding a new user, log into your WordPress dashboard. You need admin rights to add users. Once logged in, the process is quick and clear.
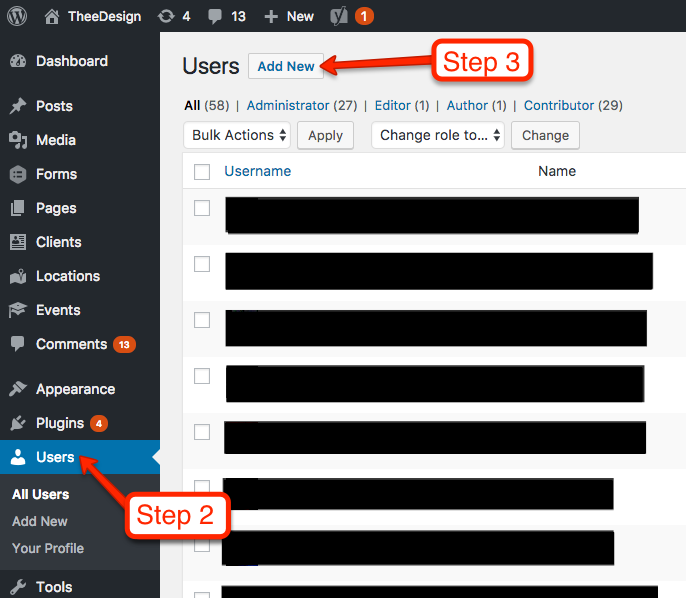
Access The Users Menu
Look at the left side of your dashboard. Find the “Users” option in the menu. Click it to open the user management area. This area shows all current users on your site.
Choose Add New
Inside the Users section, find the “Add New” button. It is usually at the top of the page. Click this button to start adding a new user.
Prepare User Details
Have the new user’s information ready. You need their username and email address. You will also set their role and password here. This step is key to giving proper access.
Credit: www.theedigital.com
Filling Out User Information
Filling out user information is a key step when adding a new user on WordPress. This process helps create a unique profile for the user. Each detail you enter shapes how the user interacts with your site.
Clear and correct information makes managing users easier. It also helps keep the site secure. Let’s explore the main parts of filling out this form.
Choosing A Username
The username is the user’s main ID on your site. Pick a name that is easy to remember. It should not contain spaces or special characters. Avoid using personal information like full names for privacy.
Make sure the username is unique. WordPress will not allow duplicates. This step helps prevent confusion between users.
Entering Email And Personal Details
Enter a valid email address for the user. This email is important for notifications and password resets. Double-check the spelling to avoid mistakes.
Other personal details like first name and last name are optional. These help personalize the user’s profile. Filling them out can improve communication on your site.
Setting A Password
Create a strong password to protect the user’s account. Use a mix of letters, numbers, and symbols. Avoid simple passwords like “password123.”
WordPress shows a strength meter. Use it to check password security. You can also let WordPress generate a secure password automatically.
Assigning User Roles
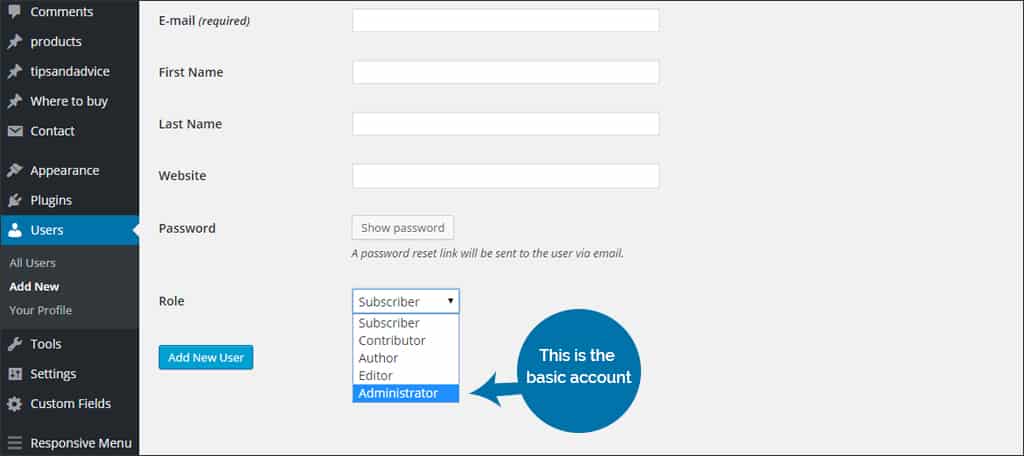
Assigning user roles in WordPress is a key step when adding a new user. It controls what the user can and cannot do on your site. Choosing the right role helps keep your website safe and organized. Each role has specific permissions. Knowing these roles helps you make the best choice.
Overview Of User Roles
WordPress has several default user roles. Each role has a different level of access. The main roles are Administrator, Editor, Author, Contributor, and Subscriber. The Administrator has full control over the site. Editors can publish and manage posts. Authors can write and publish their own posts. Contributors can write but cannot publish posts. Subscribers can only manage their profiles. Understanding these roles helps you assign tasks clearly.
Selecting The Appropriate Role
Think about what the new user will do. If they need full control, choose Administrator. For content management, Editor is best. Authors suit people who write regularly. Contributors are good for guest writers. Subscribers fit users who only comment or read. Assign the smallest role needed for their tasks. This keeps your site secure and easy to manage.
Sending The New User Notification
Sending the new user notification is an important step in WordPress user management. It informs the new user about their account details and login information. This notification helps users access the site quickly and start their work without delay.
WordPress can send an automatic email to the new user after creating their account. This email contains the username and a link to set the password. It saves time and ensures users receive the correct information directly in their inbox.
How WordPress Sends The Notification
When you add a new user, WordPress offers an option to send the notification email. You can check a box to enable this feature. If selected, WordPress sends the email automatically after you save the new user.
Customizing The Notification Email
By default, WordPress sends a basic email. You can use plugins to change the email content. Custom messages make the email more friendly and clear. Personalized emails improve communication with new users.
Troubleshooting Notification Issues
Sometimes, users may not receive the email. Check the spam folder first. Ensure your website’s email system works well. Plugins like SMTP can help fix sending problems. Always test the notification feature after adding a user.
Saving And Verifying The New User
Saving and verifying a new user on WordPress is a crucial step to ensure proper access and security. This process confirms that the new user is correctly added and ready to use their account. Taking time to verify helps avoid errors and access problems later.
After filling in the user details, saving the information correctly is important. Verification follows to confirm the new user is active and has the right permissions.
Saving The New User
Click the “Add New User” button at the bottom of the form. This action saves the new user data into your WordPress database. Wait for the confirmation message that shows the user was added successfully. Avoid closing the page too soon to prevent losing entered details.
Verifying The User Account
Check the new user list from the WordPress dashboard. Locate the username or email to confirm the account appears. You can also check the user’s role to ensure it matches your settings. This verification step confirms the user can log in with the right access.

Credit: www.youtube.com
Managing User Permissions Later
Managing user permissions is key to keeping your WordPress site safe and organized. User roles control what each person can do on your site. You can change these roles anytime after adding a user. This helps you keep control and adjust access as needed.
Changing permissions is simple and does not require coding skills. It helps you limit access to sensitive parts of your site. Also, it allows trusted users to have more control when needed.
How To Edit User Roles In WordPress
Go to your WordPress dashboard. Click on “Users” in the menu. Find the user you want to edit and click “Edit”. Scroll down to the “Role” section. Choose a new role from the dropdown menu. Click “Update User” to save changes. The user now has the new permissions.
Understanding Different User Roles
WordPress has several default roles. Administrator has full control over the site. Editor can manage and publish posts. Author can write and publish their own posts. Contributor can write but not publish posts. Subscriber can only read content and manage their profile.
Best Practices For Managing Permissions
Give users only the access they need. Avoid giving admin rights unless necessary. Review roles regularly to keep your site secure. Remove users who no longer need access. Use plugins for more detailed permission control if needed.
Troubleshooting Common Issues
Adding a new user to WordPress is usually simple. Sometimes, issues arise that slow the process down. This section helps solve common problems quickly. Clear steps and easy fixes make adding users smooth again.
Incorrect User Role Selection
Choosing the wrong user role can cause access problems. Check the role before saving the new user. Select the role that fits the user’s tasks. For example, choose Editor for content managers or Subscriber for readers.
Email Address Issues
Every new user needs a unique email address. Using an email already in the system blocks adding the user. Confirm the email is correct and not used before. Ask the user for a different email if needed.
Missing Required Fields
WordPress requires certain fields to add a user. These include username and email. Leaving these blank causes errors. Fill in all required fields carefully. Double-check for typos before submitting the form.
Permission Problems
Your own WordPress account needs permission to add users. Lacking admin rights stops user creation. Check your role in the Users section. Contact the site owner if you cannot add users.
Frequently Asked Questions
How Do I Add A New User In WordPress?
To add a new user, go to your WordPress dashboard. Click “Users” then “Add New. ” Fill in the required details and assign a role. Finally, click “Add New User” to save.
What Are WordPress User Roles And Permissions?
User roles define what actions users can perform. Common roles include Administrator, Editor, Author, Contributor, and Subscriber. Assign roles based on the access level needed for each user.
Can I Add Multiple Users At Once In WordPress?
By default, WordPress doesn’t support adding multiple users simultaneously. You can use plugins like “Bulk User Management” to add users in bulk efficiently.
How To Assign Roles When Adding A New WordPress User?
While adding a user, use the “Role” dropdown menu to select the appropriate user role. This controls their access and capabilities on your site.
Conclusion
Adding a new user on WordPress is quick and simple. Just follow the steps carefully. Choose the right role for your user to keep your site safe. Always check the information before saving. Managing users helps your website grow smoothly.
Practice these steps to get comfortable with the process. Keep your site organized by adding users as needed. This guide makes adding users easy for everyone. Try it today and see how it works.


