
Have you ever felt lost on your own WordPress site, or struggled to guide your visitors to the right places? A well-structured navigation menu can be your best friend, helping you and your audience find what you need quickly and effortlessly.
Imagine your website as a bustling city; without clear signposts, visitors would end up wandering aimlessly. By adding a navigation menu to your WordPress theme, you’re not just enhancing user experience but also boosting your site’s performance. With the right guidance, creating a streamlined, user-friendly menu is simpler than you might think.
Stick around, and you’ll discover a step-by-step process to transform your site’s navigation, keeping your visitors engaged and coming back for more.

Credit: wpmudev.com
Choosing The Right Location
The header is a popular place for menus. Users first see it here. This makes it very important. Easy to spot and helps users find pages fast. Always keep important links here. Keep it simple and clear for quick access.
The footer is at the bottom of your page. Useful for extra links. Add contact, privacy, and terms links here. It helps users when they scroll down. Many users look here for site info. Don’t overload it with too many links.
Sidebars are on the side of your page. Great for extra options. Use them for less important links. They are not the main focus. Good for blog categories or social media links. Keep it tidy and not too full.
Creating A Custom Menu
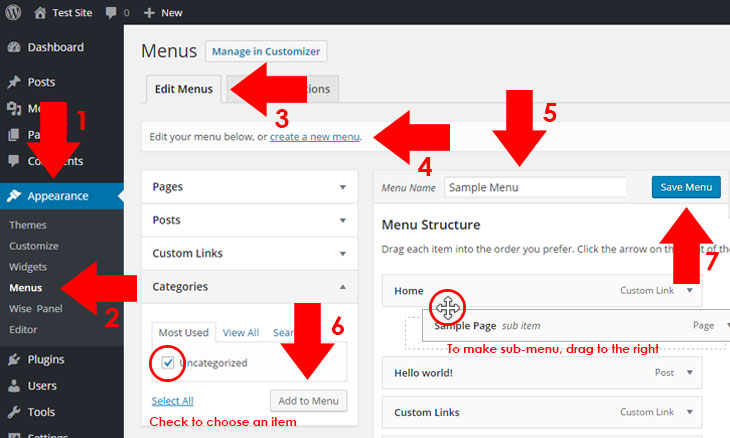
Accessing the Menu Editor is simple. First, go to your WordPress dashboard. Click on “Appearance”. Next, choose “Menus”. This opens the menu editor. Here, you can create new menus. You can also edit existing ones. The editor is easy to use.
Adding Menu Items is the next step. You can add pages, posts, and categories. Just check the boxes next to the items. Then, click “Add to Menu”. Your items will appear on the right. You can add custom links too. Just type the URL and label.
Organizing Menu Structure is important. You can drag items to rearrange them. Make a parent item by dragging one below another. Indent it slightly. This creates a dropdown menu. Save changes by clicking “Save Menu”. Your menu is ready to use.
Integrating Menu In Theme
WordPress has built-in functions for menus. Use register_nav_menus() to register a menu. This tells WordPress where the menu goes. Next, use wp_nav_menu() to display it. Add these functions in your theme’s functions.php file. This helps make the menu work.
Edit your theme files to add the menu. Open the header.php file. Find the spot where you want the menu. Insert the wp_nav_menu() code there. This places the menu on the site. Always keep a backup of your files. This saves your work if something goes wrong.
Style the menu using CSS. Go to your style.css file. Add CSS rules to make the menu look nice. Use background-color for colors. Use padding to add space. Try different styles until you like the look. This makes your site unique and pretty.
Credit: elementor.com
Testing The Navigation Menu
Testing the navigation menu ensures smooth user experience on your WordPress site. Check each link for accurate destinations. Verify responsiveness on various devices for seamless browsing.
Verifying Menu Links
Check each menu link. Click on them to see if they work. Ensure all links go to the right page. A broken link can confuse users. Fix any wrong or broken links. It’s important for a smooth user experience.
Checking Responsiveness
Open the website on different devices. Check on a phone, tablet, and computer. The menu should look good everywhere. It should fit the screen size. Users might leave if the menu is not responsive.
Ensuring Accessibility
Make sure everyone can use the menu. Check if it’s easy to read. Use colors that everyone can see. Text should be clear and big enough. Some users need screen readers, so test that too. Everyone should enjoy using your site.
Troubleshooting Common Issues
Adding a navigation menu to your WordPress theme can be tricky. Ensure your theme supports menus, then go to Appearance > Menus in your dashboard. Assign a menu location, save changes, and refresh your site to see updates.
Menu Not Displaying
The menu might not show up if it’s not assigned to a location. Go to your WordPress dashboard. Click on Appearance, then Menus. Check if the menu is set to a theme location. Make sure your theme supports menus. Some themes have limited options. If the menu still doesn’t appear, switch to a default theme. This helps test if the issue is with the theme.
Broken Links
Broken links can confuse visitors. Double-check each link in the menu. Go to Appearance, then Menus. Click on each menu item. Ensure the URL is correct. Sometimes, the link structure changes. Update your links if needed. Use a plugin to find broken links. Fix them to improve user experience.
Styling Problems
Menus may look odd due to CSS issues. First, check your theme’s style settings. Go to Appearance, then Customize. Look for Menus or Colors. Adjust settings to match your design. If problems persist, add custom CSS. Go to the Additional CSS section. Test different styles. Always preview changes before saving.
Credit: www.probewise.com
Enhancing Menu Features
Dropdowns make your menu neat and tidy. They help users find pages quickly. Group similar pages under one menu item. This reduces clutter. Organized menus improve user experience. Setting up a dropdown is simple. Use the “Appearance” and then “Menus” in WordPress. Drag items to create a dropdown. Save changes to see them live.
A search bar helps users find content faster. Add a search bar in your menu. Go to “Customize” in WordPress. Choose “Widgets” and then “Add a Widget.” Select “Search” and place it in your menu area. Visitors will now find content easily. A search bar boosts site usability.
Icons make your menu look attractive. They make items easy to identify. Use plugins for adding icons. “Menu Icons” is a popular choice. Install and then activate the plugin. Go to “Menus” in your dashboard. Choose an icon for each menu item. Icons help users navigate better. They add a visual touch to your menu.
Frequently Asked Questions
How Do I Add A Navigation Menu In WordPress?
To add a navigation menu in WordPress, go to your dashboard. Click on “Appearance” and then “Menus. ” Create a new menu, add desired pages, and save. Assign the menu to a location like “Primary Menu” in the “Menu Settings” section.
How To Get Nav Menu In WordPress?
To add a navigation menu in WordPress, go to the admin dashboard. Click on “Appearance” and select “Menus”. Create a new menu by clicking “Create a New Menu”. Add desired pages, posts, or custom links. Save your menu and assign it to a location.
How To Add Menu In WordPress Custom Theme?
Add a menu in a WordPress custom theme by registering it in functions. php. Use `register_nav_menus()` function. Then, implement it in your theme’s template file with `wp_nav_menu()`. Customize with CSS for styling. Ensure your theme supports menus.
How Do I Enable Menus In WordPress Theme?
Go to the WordPress dashboard. Click on “Appearance,” then select “Menus. ” Choose your desired menu location and save changes. Ensure your theme supports menus for optimal display.
Conclusion
Adding a navigation menu enhances your WordPress site. Visitors find content easily. Simple steps make setup smooth. Custom menus tailor your site to your needs. Widgets help in organizing. Appearance settings offer more customization. Always preview changes for best results.
A well-placed menu boosts user experience. Your site’s look feels polished. Spend time exploring options. The effort pays off. A clear path keeps users engaged. Enjoy creating a user-friendly site. Happy designing!


