
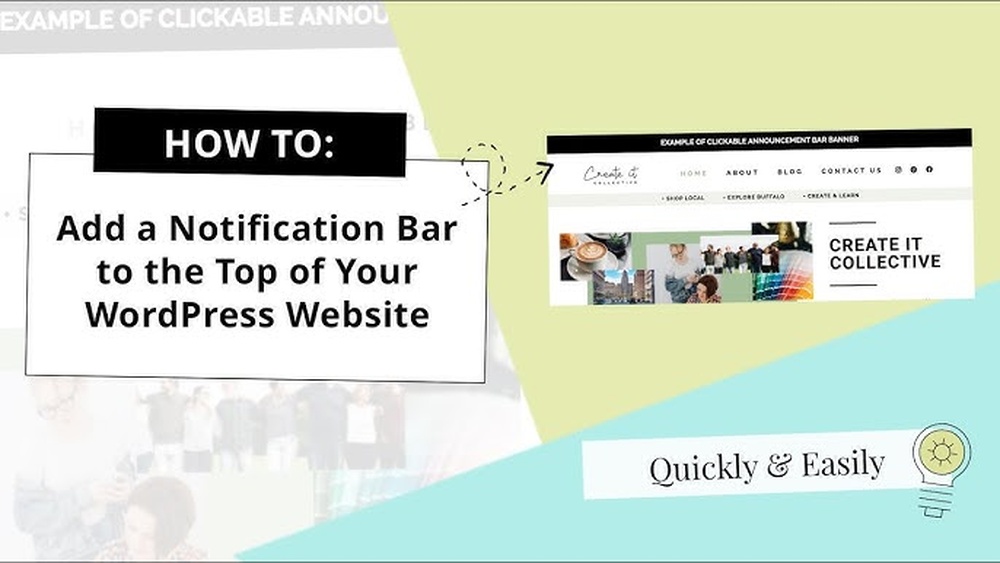
Adding a banner to your WordPress website can instantly grab your visitors’ attention and make your site look more professional. Whether you want to promote a sale, highlight a new product, or simply add a stylish touch, a banner is a powerful tool you don’t want to miss.
But if you’re not sure where to start or worried it might be too complicated, don’t worry—you’re in the right place. You’ll discover simple, step-by-step instructions that anyone can follow. By the end, you’ll have a stunning banner ready to boost your site’s impact and keep your visitors coming back for more.
Let’s get started!
Choosing The Right Banner
Choosing the right banner for your WordPress website is key to making a strong first impression. A well-chosen banner grabs attention and guides visitors to important content. It helps create a clear message and supports your brand identity.
Think about the purpose of your banner. Is it for promotion, information, or branding? The right banner matches your website’s goals and audience.
Banner Types And Sizes
Banners come in many types. Common ones include header banners, sliders, and sidebars. Each serves a different role on your site.
Sizes vary too. Popular sizes are 728×90 pixels (leaderboard), 300×250 pixels (medium rectangle), and 160×600 pixels (wide skyscraper). Choose sizes that fit your website layout.
Responsive banners adjust to screen sizes. These work well for mobile-friendly sites. Make sure your banner looks good on all devices.
Design Tips For Banners
Keep the design simple and clean. Avoid clutter. Use clear fonts that are easy to read.
Focus on one main message. Use a strong call to action to guide visitors.
Balance text and images. Too much text can overwhelm visitors. Use white space to create a neat look.
Selecting Images And Colors
Choose images that relate to your content. Use high-quality photos or graphics. Blurry or pixelated images reduce trust.
Pick colors that match your brand style. Use contrasting colors to make text stand out.
Limit the number of colors. Too many colors can confuse visitors. Stick to two or three main colors for harmony.
Preparing Your Banner
Preparing your banner is the first step to making your WordPress site look great. A clear, well-designed banner grabs attention and shows your site’s purpose. This part guides you through creating and optimizing your banner image for the web. Follow these steps to make a banner that fits your site perfectly.
Creating A Banner Image
Start by deciding the size of your banner. Common widths are 1200 to 1600 pixels. Height can vary from 200 to 400 pixels. Keep your design simple and clear. Use bold colors and readable fonts. Avoid clutter and too much text. Your banner should reflect your site’s theme and message.
Using Online Tools
Many free online tools help make banners. Canva, Adobe Spark, and Fotor are popular options. They offer templates and easy drag-and-drop features. Choose a template that fits your site’s style. Customize colors, fonts, and images to match your brand. These tools save time and do not need design skills.
Optimizing For Web
Large images can slow your website. Compress your banner to reduce file size. Tools like TinyPNG or JPEG-Optimizer work well. Save your banner as JPEG or PNG for best quality. Check that your banner loads fast on different devices. Fast loading keeps visitors happy and improves SEO.
Adding A Banner With WordPress Themes
Adding a banner to your WordPress website can enhance its look and highlight important content. Many WordPress themes include built-in options for banners. These options let you add images or text without using extra plugins. This section explains how to add a banner using theme features. Follow these simple steps to create a banner that fits your site style.
Using Theme Customizer
The Theme Customizer allows you to change your site’s appearance easily. Access it from your WordPress dashboard under Appearance > Customize. Many themes have a banner or header image section here. Upload your banner image and preview changes live. Save your settings once you are happy with the look.
Setting Header Images
Header images often serve as banners in WordPress themes. To set one, go to Appearance > Header in your dashboard. Upload a high-quality image that fits your theme’s recommended size. Some themes let you add text over the header image. Adjust image settings to make the banner stand out.
Adjusting Banner Placement
Banner placement depends on your theme layout. Some themes place banners above the menu or within the header area. Check your theme options for placement controls. Use custom CSS for more precise placement if needed. Test different positions to see which looks best on all devices.

Credit: www.youtube.com
Using Plugins To Add Banners
Using plugins to add banners is a simple way to enhance your WordPress site. Plugins offer ready-made tools to place banners without coding. They help display ads, announcements, or promotions quickly. Many plugins come with easy options for design and placement. You can change banners anytime from your WordPress dashboard. This method saves time and keeps your site flexible.
Top Banner Plugins
Several plugins stand out for banner management. AdRotate allows scheduling and rotating banners. WP Bannerize supports image and HTML banners. Simple Banner shows banners with custom messages at the top or bottom. These plugins work well for beginners and experts alike. Choose one based on your needs and ease of use.
Installing And Activating Plugins
Go to your WordPress dashboard. Click on Plugins > Add New. Type the plugin name in the search box. Click Install Now next to the chosen plugin. After installation, click Activate to start using the plugin. The plugin will appear in your dashboard menu.
Configuring Banner Settings
Open the plugin settings from the dashboard menu. Upload your banner image or enter banner text. Choose where to display the banner on your site. Set the size and link if needed. Save your settings to apply the banner. Preview your site to check banner placement and look. Adjust settings if the banner does not fit well.
Adding Banners With Widgets
Adding banners to your WordPress site can boost its look and highlight important messages. Widgets make banner placement easy and flexible. You can place banners in different parts of your site without changing the theme.
Widgets also allow quick updates. Change your banner anytime without coding. This method suits beginners and those who want fast changes.
Using Image Widgets
Image widgets let you add pictures directly to widget areas. Upload your banner image and add a link if needed. This method is simple and fast.
Go to Appearance > Widgets, then add an Image widget. Select your banner image from the media library. Add a URL to make the banner clickable. Save the widget, and your banner appears on the site.
Placing Banners In Sidebars
Sidebars are common places for banners. They show on every page, giving your banner great visibility. You can use any widget to place a banner there.
Open the Widgets section in your dashboard. Drag and drop an Image or Custom HTML widget into the Sidebar area. Upload your banner or add the code. Save changes to display the banner.
Custom Html Widgets
Custom HTML widgets offer more control. You can add banner code from ad networks or custom designs. This is useful for advanced banners or scripts.
In the Widgets panel, add a Custom HTML widget to your chosen area. Paste your banner’s HTML code. Preview to check the banner’s look. Save and publish for your visitors.
Credit: en-gb.wordpress.org
Adding Banners Via Custom Code
Adding banners via custom code allows full control over your website’s design. It lets you place banners exactly where you want. Custom coding is a good choice for those who want a unique look. This method requires editing theme files safely and carefully.
Editing Theme Files Safely
Always back up your website before changing any theme files. Mistakes can break your site. Use a code editor with syntax highlighting to avoid errors. Edit only the files needed for the banner placement. Avoid editing core WordPress files to keep updates smooth.
Using Child Themes
Child themes protect your changes during theme updates. They let you add code without altering the original theme. Create a child theme and activate it before adding banner code. This keeps your custom banner safe and your site stable.
Inserting Banner Code
Place your banner code in the right theme file. Common files include header.php, footer.php, or sidebar.php. Use HTML and CSS to design your banner. Add image links or text inside the code. Test the banner on different devices for good display.
Testing And Adjusting Your Banner
After adding a banner to your WordPress website, testing and adjusting it is essential. This step ensures the banner looks good and works well on all devices. It helps improve user experience and keeps your site professional.
Checking Responsiveness
Test your banner on different screen sizes. Use tools or resize your browser window to see changes. The banner should fit well on phones, tablets, and desktops. Make sure text and images stay clear and readable. A responsive banner keeps visitors engaged on any device.
Ensuring Fast Load Times
Check how fast your banner loads on your website. Large images can slow down the site. Compress images without losing quality before uploading. A fast-loading banner improves site speed and visitor satisfaction. Use online tools to measure page speed and fix delays.
Making Design Tweaks
Look at your banner’s colors and fonts. Adjust them to match your website’s style. Check alignment and spacing for a neat look. Small changes can make your banner more attractive. Keep the design simple and clear to catch attention.
Maintaining And Updating Banners
Maintaining and updating banners keeps your website fresh and engaging. Regular updates help attract visitors and highlight new offers or events. Neglecting banner updates can make your site look old and less appealing.
Consistent banner changes also improve user experience. Visitors notice fresh content and stay longer on your site. This can increase clicks and conversions.
Scheduling Banner Changes
Set specific dates to change your banners. Use WordPress plugins or built-in tools for scheduling. This keeps your site updated automatically without manual work. Plan banner updates around holidays, sales, or new product launches. Scheduling saves time and ensures timely updates.
Using Rotating Banners
Rotating banners show different images in the same space. This captures visitor attention and displays multiple messages. Use a slider plugin or theme feature for rotation. Keep rotation smooth and not too fast. Rotating banners increase engagement and present diverse offers effectively.
Tracking Banner Performance
Monitor how banners perform using analytics tools. Check clicks, views, and conversions for each banner. This helps identify which banners work best. Remove or update banners with low performance. Tracking data guides better design and content choices for banners.
Credit: oit.caes.uga.edu
Frequently Asked Questions
How Do I Add A Banner To My WordPress Site?
To add a banner, go to your WordPress dashboard. Navigate to Appearance > Customize. Select Header or Homepage Banner, then upload your image. Adjust size and settings, and save changes to display the banner on your site.
What Image Size Is Best For WordPress Banners?
Optimal banner size depends on your theme. Common sizes are 1200×400 or 1600×500 pixels. Use high-resolution images to keep quality crisp. Check your theme’s documentation for exact dimensions to ensure the banner fits perfectly.
Can I Use Plugins To Add Banners In WordPress?
Yes, plugins like “Simple Banner” or “WP Bannerize” simplify banner addition. They offer customization options, scheduling, and display rules. Install and activate the plugin, then follow its settings to add and manage banners easily.
How Do I Make My Banner Mobile-friendly?
Choose responsive banner images that scale on different devices. Use WordPress themes that support responsive design. Test the banner on various screen sizes. Use CSS media queries if needed to adjust banner display on mobiles.
Conclusion
Adding a banner to your WordPress site is simple and quick. Banners help grab visitors’ attention and share key messages. Choose the right size and design to fit your site style. Use WordPress tools or plugins to make the process easier.
Test how the banner looks on different devices. Keep your banner updated to stay fresh and relevant. Now, your website can look more professional and inviting. Give it a try today and see the difference a banner can make.


