
Are you struggling to access your Namecheap email account? You’re not alone.
Many users find themselves overwhelmed with the technicalities. But here’s the good news: accessing your Namecheap email is simpler than you might think. In this guide, we’ll break down the steps in an easy-to-follow manner, ensuring you can effortlessly manage your emails without any hassle.
Imagine the peace of mind you’ll have once you can confidently navigate your email account. Stay with us, and by the end of this article, you’ll wonder why you ever found it challenging in the first place. Let’s simplify the process together!
Credit: www.youtube.com
Setup Namecheap Email
Setting up Namecheap Email can enhance your communication. It’s simple and quick. This guide will walk you through the steps. You’ll be ready to send and receive emails efficiently.
Understanding Namecheap Email
Namecheap Email offers reliable email hosting. It provides a professional touch to your communication. Many businesses use it for their email needs.
Accessing Your Namecheap Account
Log into your Namecheap account first. Use your registered email and password. Navigate to the ‘Dashboard’.
Setting Up Your Namecheap Email
Locate the ‘Email Accounts’ section. Click on ‘Create New Email’. Input your desired email address. Choose a strong password for security.
Configuring Email Settings
Adjust your email settings for optimal use. Go to ‘Email Settings’. Set up forwarding and autoresponders. Customize your spam filters.
Testing Your Email
Send a test email to check functionality. Ensure you receive it promptly. Verify all settings are correct.
Setting Up Email On Your Devices
Access your email on mobile and desktop. Use IMAP or POP3 settings. Follow the device-specific setup guide.
Ensuring Security
Keep your email secure. Regularly update passwords. Enable two-factor authentication. Monitor your account activity.
Troubleshooting Common Issues
Encountering issues can happen. Check your internet connection first. Review your settings and configurations. Reach out to Namecheap support if needed.

Credit: www.youtube.com
Login To Your Email Account
Accessing your Namecheap email is simple. Visit the Namecheap website and click on the “Email” tab. Enter your email address and password to log in and manage your messages.
Accessing your Namecheap email account is a straightforward process that ensures you’re always connected to your professional or personal communications. Whether you’re a business owner managing your brand or simply someone staying in touch with friends and family, knowing how to log in is essential. Let’s walk through the steps so you can access your emails seamlessly and efficiently. ###Step 1: Visit The Namecheap Website
First, open your preferred web browser. Navigate to the [Namecheap website](https://www.namecheap.com). This is your starting point for accessing your email account. ###Step 2: Locate The Login Section
Once on the Namecheap homepage, look for the “Sign In” button at the top right corner. Clicking this will take you to the login page, where you can access various Namecheap services, including your email. ###Step 3: Enter Your Credentials
Here’s where precision matters. Enter your full email address and password in the provided fields. Ensure there are no typos, as even a small error can prevent access. ###Step 4: Click On “login”
After entering your credentials, click on the “Login” button. If your details are correct, you’ll be redirected to your email dashboard. ###Step 5: Troubleshoot Login Issues
What if you can’t log in? Check if Caps Lock is on, as passwords are case-sensitive. If you’ve forgotten your password, use the “Forgot Password” link to reset it. Follow the instructions sent to your recovery email. ###Step 6: Stay Logged In
For convenience, you might want to check the “Stay logged in” option. This keeps you logged into your email account without entering your credentials each time. Remember, only use this feature on personal devices for security reasons. ###Step 7: Secure Your Email Account
Once logged in, consider enabling two-factor authentication (2FA) for added security. This extra step requires a verification code sent to your phone, making your account more secure. Logging into your Namecheap email account is not just a routine task; it’s a gateway to important communications. Have you ever faced any login challenges that made you rethink your password management? Share your thoughts or tips on ensuring a seamless login experience.Troubleshoot Common Issues
Accessing Namecheap email can sometimes be tricky. Check your login credentials first. Clear your browser cache if you face issues. Ensure your internet connection is stable. Following these steps usually helps solve common problems quickly and easily.
Accessing your Namecheap email should be a seamless experience. Yet, sometimes you might face roadblocks. Whether it’s a forgotten password or a stubborn connection issue, these challenges can disrupt your workflow. Here’s how you can troubleshoot common issues to keep your email running smoothly. ###1. Forgotten Password
Have you ever been locked out because you can’t remember your password? It happens to the best of us. To reset your password, head over to the Namecheap login page and click on “Forgot Password?”. Follow the prompts, and soon you’ll have a new password. It’s always a good idea to use a password manager to store your credentials securely. ###2. Email Not Syncing
Is your email not syncing across devices? This can be frustrating, especially if you rely on multiple gadgets. First, make sure your email settings are correct. Check the IMAP/POP settings in your email client to ensure they match Namecheap’s requirements. If the issue persists, consider reaching out to Namecheap support for assistance. ###3. Connection Issues
Are you experiencing connectivity issues with your Namecheap email? A stable internet connection is key. Try switching from Wi-Fi to mobile data to see if the problem resolves. If not, restart your router or modem. Sometimes, a quick reboot can work wonders. ###4. Emails Going To Spam
Finding important emails in your spam folder can be annoying. Train your email client to recognize these messages as important. Mark them as “Not Spam”, and add the sender to your contacts list. This tells your email client which messages you consider important. ###5. Unable To Send Or Receive Emails
Are your emails stuck in the outbox, or aren’t arriving in your inbox? Start by checking your internet connection. Next, verify that your email storage isn’t full. Deleting old messages can free up space. If the problem continues, review your SMTP settings to ensure they’re configured correctly. ###6. Security Concerns
Concerned about email security? It’s crucial to keep your account safe. Enable two-factor authentication for an extra layer of protection. Regularly update your password and be cautious of phishing emails. If something feels off, trust your instincts and investigate further. ###7. Contacting Support
Have you exhausted your troubleshooting options? Sometimes, you need expert help. Reach out to Namecheap’s support team via live chat or email. They can guide you through more complex issues, ensuring your email is back on track. By tackling these common issues, you can ensure your Namecheap email experience is as smooth as possible. Have you faced other challenges with your email? Share your experiences in the comments below. Your insights could help others navigate similar hurdles.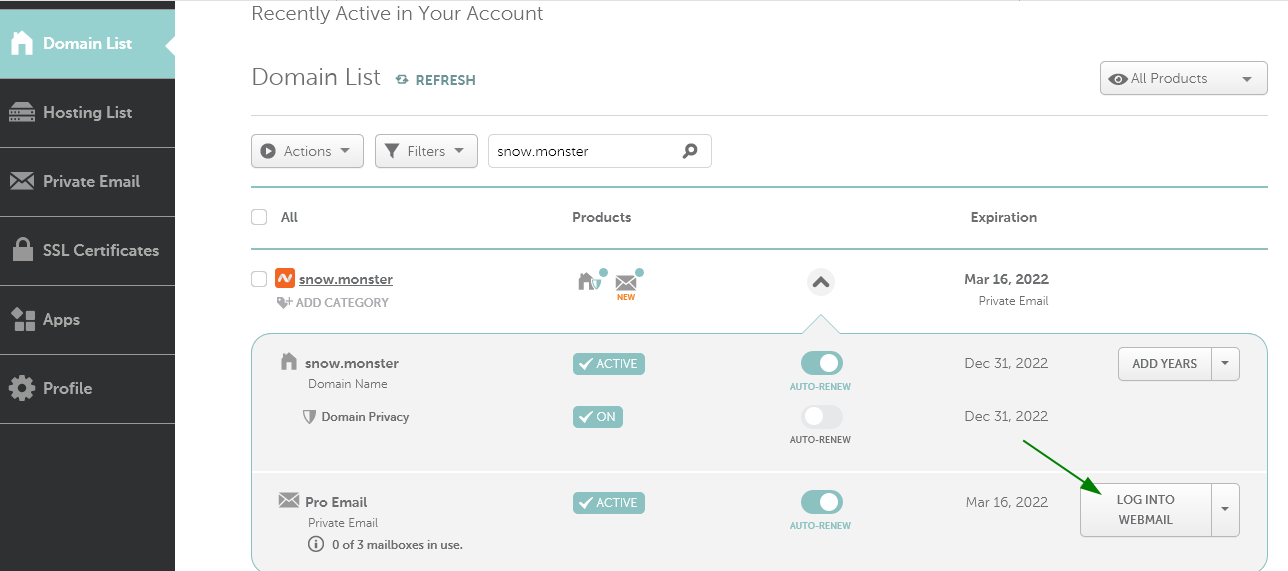
Credit: www.namecheap.com
Frequently Asked Questions
How Do I Login To Namecheap Emails?
To login to Namecheap emails, go to privateemail. com. Enter your full email address and password. Click “Login”. Ensure your credentials are correct for successful access. Check your email settings if issues arise. Use a secure internet connection for safety.
How Do I Access My Domain Email?
Log into your domain hosting provider’s webmail interface. Use your email address and password to access emails. For email clients, configure using your email provider’s settings. Ensure proper IMAP/POP and SMTP details are entered. Contact support if access issues persist.
How To Open Namecheap Email In Gmail?
To open Namecheap email in Gmail, go to Gmail settings and select “Accounts and Import”. Choose “Add a mail account”, enter your Namecheap email, and follow the prompts for SMTP and POP3 settings. Save changes to start receiving emails.
Is There An App For Namecheap Email?
Yes, Namecheap offers the “Namecheap Email” app for managing emails on mobile devices. It is available for both iOS and Android platforms. This app provides a user-friendly interface for accessing and organizing your Namecheap email accounts efficiently.
Conclusion
Accessing Namecheap Email is easy and straightforward. Just follow the simple steps shared above. With this guide, you can manage your emails effortlessly. Remember, practice makes perfect. So, don’t hesitate to explore and learn. Soon, you’ll become more familiar with Namecheap’s features.
Stay patient and keep experimenting. Email management will become second nature. If you face issues, customer support is always available. Happy emailing!


