
Are you looking to make your WordPress site more powerful and functional? Adding plugins is the key.
Plugins help you do everything from improving your site’s speed to adding contact forms or even online stores. But if you’re not sure how to add plugins to WordPress, don’t worry—you’re in the right place. By the end of this article, you’ll know exactly how to find, install, and activate plugins to take your website to the next level.
Ready to unlock your site’s full potential? Let’s dive in.
Credit: www.omnisend.com
Why Use Plugins In WordPress
Plugins are essential for WordPress websites. They add new features and improve site functions. Without plugins, sites remain basic and limited. Plugins help customize sites to fit different needs.
Choosing the right plugins lets you build a unique site. They save time by adding ready-made tools. No coding skills required. Plugins make WordPress easy and flexible for everyone.
Enhance Website Functionality
Plugins add new tools to your site. You can create contact forms, galleries, or online stores. Each plugin offers specific features to improve user experience. This helps keep visitors engaged and happy.
Improve Site Performance
Some plugins help speed up your website. They optimize images, manage caching, or clean databases. A faster site improves visitor retention and search rankings. This leads to more traffic and better results.
Boost Security
Security plugins protect your site from hackers and malware. They monitor threats and block suspicious activity. Regular updates keep your site safe. Security is vital for trust and data protection.
Support Seo Efforts
SEO plugins guide you to optimize content. They suggest keywords, fix errors, and improve site structure. Better SEO means higher search engine rankings. This makes it easier for people to find your site.
Types Of WordPress Plugins
WordPress plugins expand your website’s features without coding. They help you customize your site easily. Different types of plugins serve different purposes. Knowing these types helps choose the right plugin for your needs.
Seo Plugins
SEO plugins improve your site’s search engine ranking. They help with keywords, meta tags, and sitemaps. Popular SEO plugins guide you to write better content.
Security Plugins
Security plugins protect your site from hackers and malware. They add firewalls, scan for threats, and block suspicious activity. These keep your website safe and secure.
Performance Plugins
Performance plugins speed up your website. They optimize images, cache pages, and reduce load time. Faster websites improve user experience and SEO scores.
Backup Plugins
Backup plugins save your website data regularly. They create copies of files and databases. If something breaks, you can restore your site quickly.
Social Media Plugins
Social media plugins add sharing buttons and feeds. They help visitors share your content easily. These plugins increase your reach on social platforms.
E-commerce Plugins
E-commerce plugins turn your site into an online store. They manage products, payments, and orders. These plugins help you sell goods directly from your website.
Finding Plugins In The WordPress Directory
Finding plugins in the WordPress directory is simple and fast. The directory holds thousands of free plugins. Each one can add new features or improve your website.
The directory is built into your WordPress dashboard. This makes it easy to search and install plugins without leaving your site.
Accessing The WordPress Plugin Directory
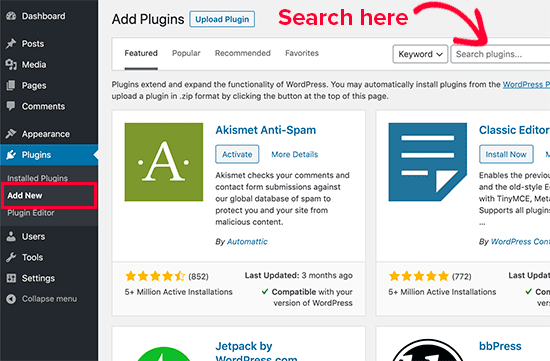
Log in to your WordPress dashboard first. On the left menu, find and click “Plugins.” Then select “Add New.” You will see the WordPress Plugin Directory right there.
Using The Search Bar
The search bar helps find the right plugin. Type a keyword or plugin name. The directory shows matching plugins instantly. Each plugin has a short description and rating.
Filtering Plugins By Popularity And Ratings
Filters help narrow down choices. Sort plugins by “Popular,” “Recommended,” or “Favorites.” Check user ratings and reviews. This helps pick a trusted plugin.
Credit: www.elegantthemes.com
Installing Plugins Via Admin Dashboard
Installing plugins via the WordPress admin dashboard is the easiest way to add new features. The dashboard lets you find, install, and activate plugins without leaving your site. This method works well for beginners and saves time.
Searching For Plugins
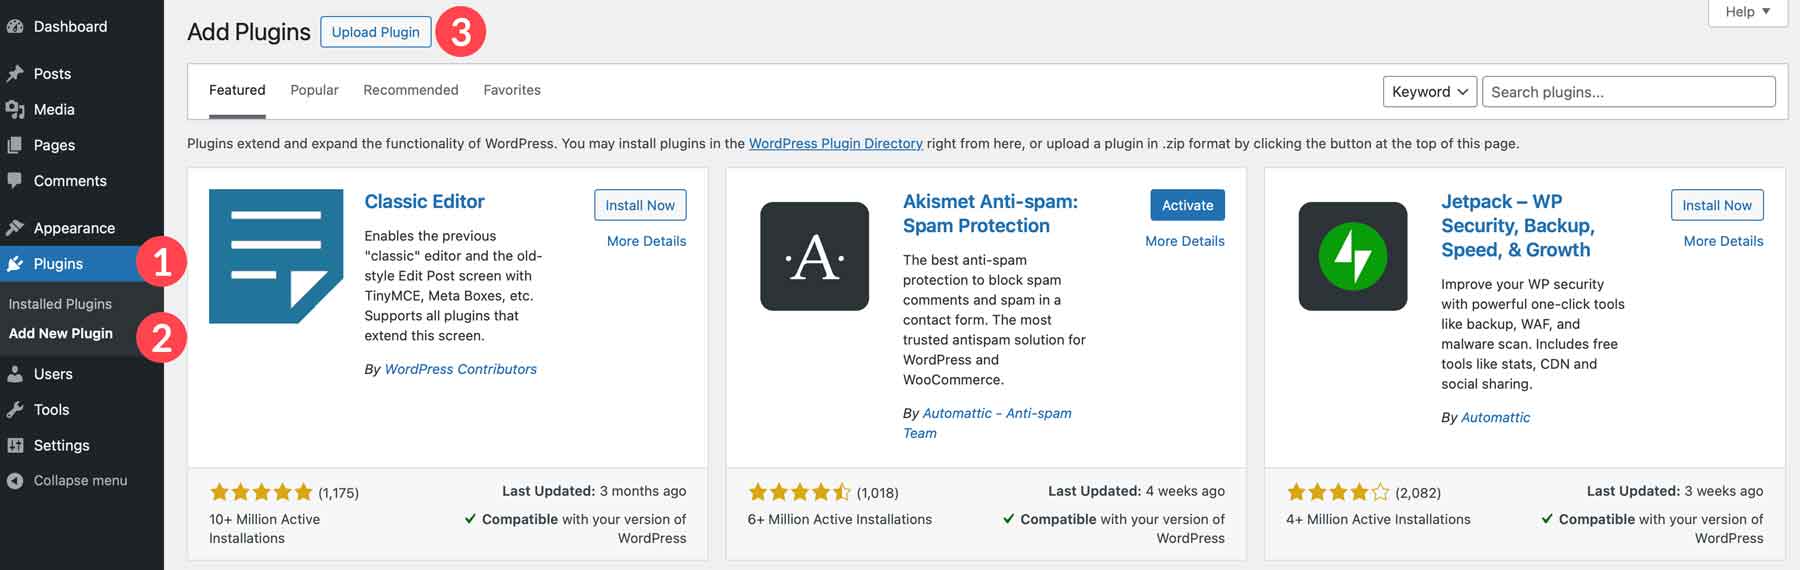
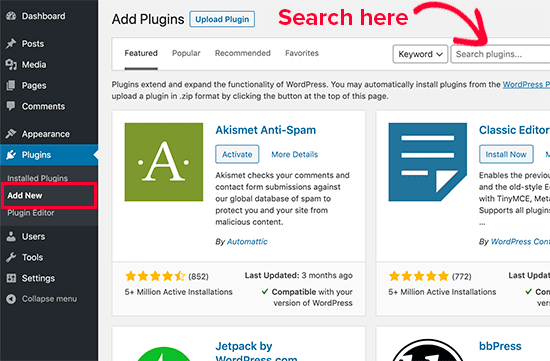
Start by going to the “Plugins” menu in the dashboard. Click on “Add New” to open the plugin search page. Enter the name or keyword of the plugin you need. WordPress shows a list of plugins matching your search. You can read a short description and check ratings.
One-click Installation
Once you find the plugin, click the “Install Now” button. WordPress downloads and installs the plugin automatically. This process takes only a few seconds. No extra steps or files needed. The plugin is ready to use right after installation.
Activating Plugins
After installation, click the “Activate” button. Activation turns the plugin on for your site. Some plugins start working immediately. Others may need configuration in their settings. Activation is key to making the plugin functional.
Uploading Plugins Manually
Uploading plugins manually lets you add custom features to your WordPress site. This method works well when a plugin is not in the WordPress directory. It also helps if you have a plugin from another source. The process is simple and takes only a few steps.
Downloading Plugin Files
First, get the plugin files. Usually, these come in a .zip format. You can download them from a trusted website or plugin provider. Save the .zip file on your computer. Make sure it is the full plugin package, not just part of it.
Using The Upload Feature
Next, log in to your WordPress dashboard. Go to the “Plugins” menu and click “Add New.” At the top, find the “Upload Plugin” button and click it. Choose the .zip file you saved earlier. Click “Install Now” to upload the plugin to your site.
Activating Uploaded Plugins
After the upload finishes, click “Activate Plugin.” This makes the plugin live on your site. Check your site to see if the plugin works correctly. You can configure its settings if needed. Manual uploads give you full control over your plugins.
Installing Plugins Via Ftp
Installing plugins via FTP is a useful method for WordPress users. It helps when the plugin upload through the dashboard fails. This way lets you manually add plugins to your site. It is especially helpful for large files or restricted hosting.
Here is a simple guide to install plugins using FTP. Follow each step carefully to avoid errors.
Accessing Your Server
First, open your FTP client software. Enter your server details: host, username, and password. These details come from your web host. Connect to your WordPress site’s root directory. Usually, it is named public_html or www. Inside, find the wp-content folder.
Uploading Plugin Folder
Next, locate the plugin folder on your computer. The folder should be unzipped and ready. Drag and drop this folder into the plugins directory inside wp-content. Wait until the upload finishes. Upload speed depends on your connection.
Activating Plugins In Dashboard
After uploading, log in to your WordPress dashboard. Go to the Plugins menu and find the new plugin. Click the Activate button. The plugin is now ready to use. Check settings to configure it as needed.
Managing Installed Plugins
Managing installed plugins is a key part of keeping your WordPress site running smoothly. Plugins add useful features, but they need care and attention. Regular updates keep plugins secure and compatible with WordPress. Sometimes, you may need to stop using a plugin or remove it completely. This section explains how to update, deactivate, and delete plugins easily.
Updating Plugins
Keeping plugins updated is important. Updates fix bugs and improve security. WordPress shows a notification when updates are available. To update, go to the Plugins page. Find the plugin with an update notice. Click the “Update Now” button. Wait a few seconds while WordPress updates the plugin. Do this regularly to protect your site.
Deactivating And Deleting Plugins
Deactivating a plugin stops it from working but keeps it on your site. This is useful to test if a plugin causes problems. To deactivate, go to the Plugins page. Click “Deactivate” under the plugin’s name. The plugin will stop running but stay installed.
Deleting a plugin removes it completely from your site. Only delete plugins you no longer need. To delete, first deactivate the plugin. Then click “Delete” under its name. Confirm the deletion. This frees up space and reduces security risks.
Tips For Choosing Safe Plugins
Choosing the right plugins for WordPress is very important. Safe plugins protect your site from bugs and security risks. They also help your website run smoothly and fast. Picking good plugins saves time and avoids future problems. Use these tips to find safe plugins that work well with your site.
Check Plugin Ratings And Reviews
Ratings show how users feel about a plugin. Reviews share real experiences and problems. Choose plugins with many high ratings and positive feedback. Avoid plugins with too many bad reviews or low scores.
Look At The Number Of Active Installations
A large number of active installations means many people trust the plugin. Popular plugins often have more updates and support. Be cautious with plugins that have very few installs.
Verify Regular Updates
Plugins that get updated often are safer. Updates fix bugs and improve security. Avoid plugins that have not been updated for a long time. Check the last update date before downloading.
Review Compatibility With Your WordPress Version
Make sure the plugin works with your WordPress version. Compatibility prevents errors and crashes. The plugin page usually shows the tested WordPress versions.
Check Developer Reputation
Trust plugins made by known developers or companies. Good developers provide support and fix problems fast. Research the developer before installing the plugin.
Test Plugins On A Staging Site
Try new plugins on a test site first. This prevents issues on your live website. Testing helps you see if the plugin works well with your theme and other plugins.
Troubleshooting Plugin Issues
Plugin issues can disrupt your WordPress site’s performance. Troubleshooting helps fix these problems quickly. This section covers common plugin issues and clear steps to resolve them. Simple fixes often save time and keep your site running smoothly.
Identifying Conflicting Plugins
Plugins sometimes conflict with each other. Deactivate all plugins first. Then activate each plugin one by one. Check your site after activating each plugin. This shows which plugin causes the issue.
Clearing Cache To Fix Plugin Problems
Cached data can cause plugin errors. Clear your browser cache. Also, clear WordPress cache if you use a caching plugin. This refreshes your site and may solve the problem.
Checking Plugin Compatibility
New WordPress versions may not support old plugins. Check the plugin’s last update date. Look for compatibility notes on the plugin page. Update or replace plugins not compatible with your WordPress version.
Reviewing Error Logs For Clues
Error logs show detailed information about issues. Enable debugging in WordPress by editing the wp-config.php file. Check logs for plugin error messages. Use this information to find and fix problems.
Reinstalling Or Updating Plugins
Corrupted plugin files can cause errors. Delete the problematic plugin. Download and install the latest version from the WordPress repository. Keep plugins updated to avoid bugs and security risks.
Credit: accessibility-helper.co.il
Frequently Asked Questions
What Is The Easiest Way To Add Plugins To WordPress?
The easiest way is using the WordPress dashboard. Go to Plugins > Add New, search for the plugin, and click Install Now. After installation, activate the plugin to start using it immediately.
Can I Add Plugins To WordPress Without Ftp?
Yes, you can add plugins directly from your WordPress admin panel without FTP. Simply use the “Add New” option under Plugins, search, install, and activate your desired plugin easily.
Are All WordPress Plugins Free To Install?
Not all plugins are free. Many offer free versions with basic features, while premium plugins require purchase for advanced functions. Always check plugin details before installing.
How Do I Manually Install A WordPress Plugin?
To manually install, download the plugin ZIP file. Then, go to Plugins > Add New > Upload Plugin in WordPress dashboard. Upload the ZIP file, install, and activate it.
Conclusion
Adding plugins to WordPress is simple and quick. Just find the plugin you need, install it, and activate it. Plugins help your website do many new things. Always choose trusted plugins for safety and performance. Keep your plugins updated to avoid problems.
Explore different plugins to improve your site step by step. This way, you can make your WordPress site work better for you.


