
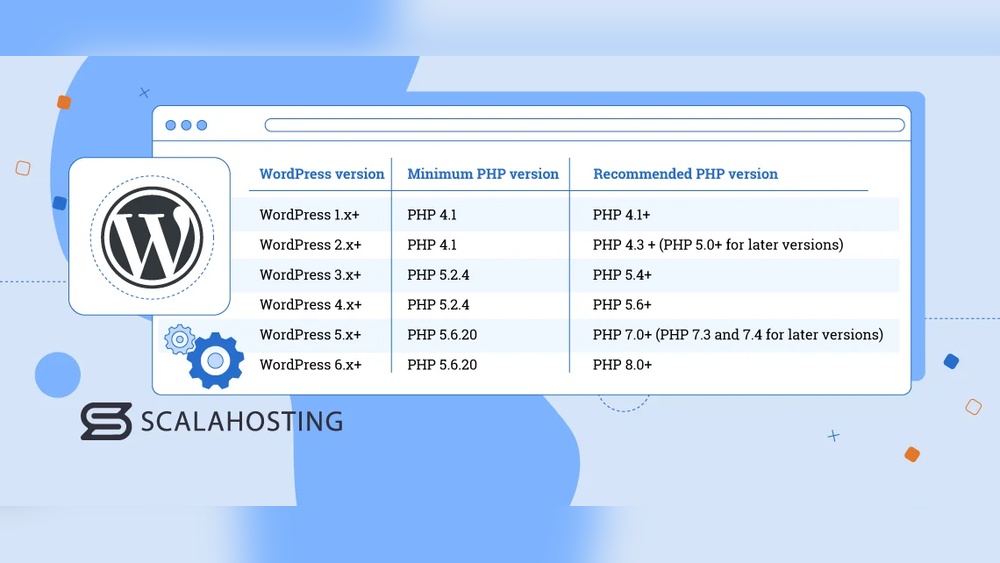
Are you wondering how to upgrade your PHP version in WordPress? If your website feels slow or you want better security, updating PHP is one of the smartest moves you can make.
But you might be worried about breaking your site or not knowing where to start. Don’t worry—this guide will walk you through the process step-by-step, using simple words and clear instructions. By the end, you’ll have a faster, safer WordPress site without any hassle.
Ready to boost your website’s performance? Let’s dive in!
Check Current Php Version
Checking your current PHP version is the first step before upgrading it in WordPress. This helps you know if an update is needed. A newer PHP version can improve your website speed and security. There are simple ways to find out which PHP version your site uses.
Using WordPress Site Health Tool
WordPress has a built-in Site Health tool that shows your PHP version. To use it, log in to your WordPress dashboard. Go to Tools and then click Site Health. Next, select the Info tab. Scroll down to the Server section. Here, you will see the PHP version listed clearly. This method is quick and does not require extra plugins.
Checking Via Hosting Control Panel
You can also check your PHP version through your hosting control panel. Log in to your hosting account. Look for a section named PHP Settings or Server Information. Hosting panels like cPanel or Plesk usually display the PHP version here. This method is helpful if you want to manage PHP settings directly. It gives you a clear view of the server environment.
Credit: www.elegantthemes.com
Backup Your Website
Backing up your website is the first and most important step before upgrading your PHP version. It protects your site from data loss or errors during the update. A solid backup allows you to restore your site quickly if something goes wrong.
Backing up involves saving both your website files and the database. These parts contain all the content, settings, and design of your site. Without a backup, you risk losing everything in case of a problem.
Creating A Full Site Backup
Start by creating a full backup of your WordPress files. These include themes, plugins, and media uploads. Use an FTP client or your hosting control panel to download all files. Make sure to save the backup in a safe place on your computer or cloud storage.
Many WordPress plugins can help you create full backups easily. Plugins like UpdraftPlus or BackWPup allow you to schedule backups automatically. This saves time and keeps your backups up to date.
Backing Up The Database
Your database stores all the text, posts, pages, and settings on your site. It is crucial to back it up separately from your files. Use tools like phpMyAdmin from your hosting control panel to export your database.
Choose the export option and save the database file on your computer. Make sure the file is complete and not corrupted. Without a database backup, your website content cannot be restored.
Backing up both files and database ensures you can restore your website fully after upgrading PHP. Keep your backups safe and organized for easy access.
Review Plugin And Theme Compatibility
Reviewing plugin and theme compatibility is a key step before upgrading your PHP version. Plugins and themes must work well with the new PHP to avoid errors. Old or unsupported code can cause your site to break. Taking time to check ensures a smooth upgrade process. It protects your website’s functionality and user experience.
Updating Plugins And Themes
Start by updating all plugins and themes to their latest versions. Developers often release updates that fix compatibility issues. Use the WordPress dashboard to check for available updates. Updated plugins and themes usually support newer PHP versions. This step reduces the risk of conflicts after the upgrade.
Identifying Incompatible Components
Scan your site for plugins or themes that do not support the new PHP version. Tools like PHP Compatibility Checker can help find issues. Note any components flagged as incompatible. Consider replacing or removing these to avoid problems. Testing in a staging environment helps catch errors early. This approach keeps your live site safe and stable.
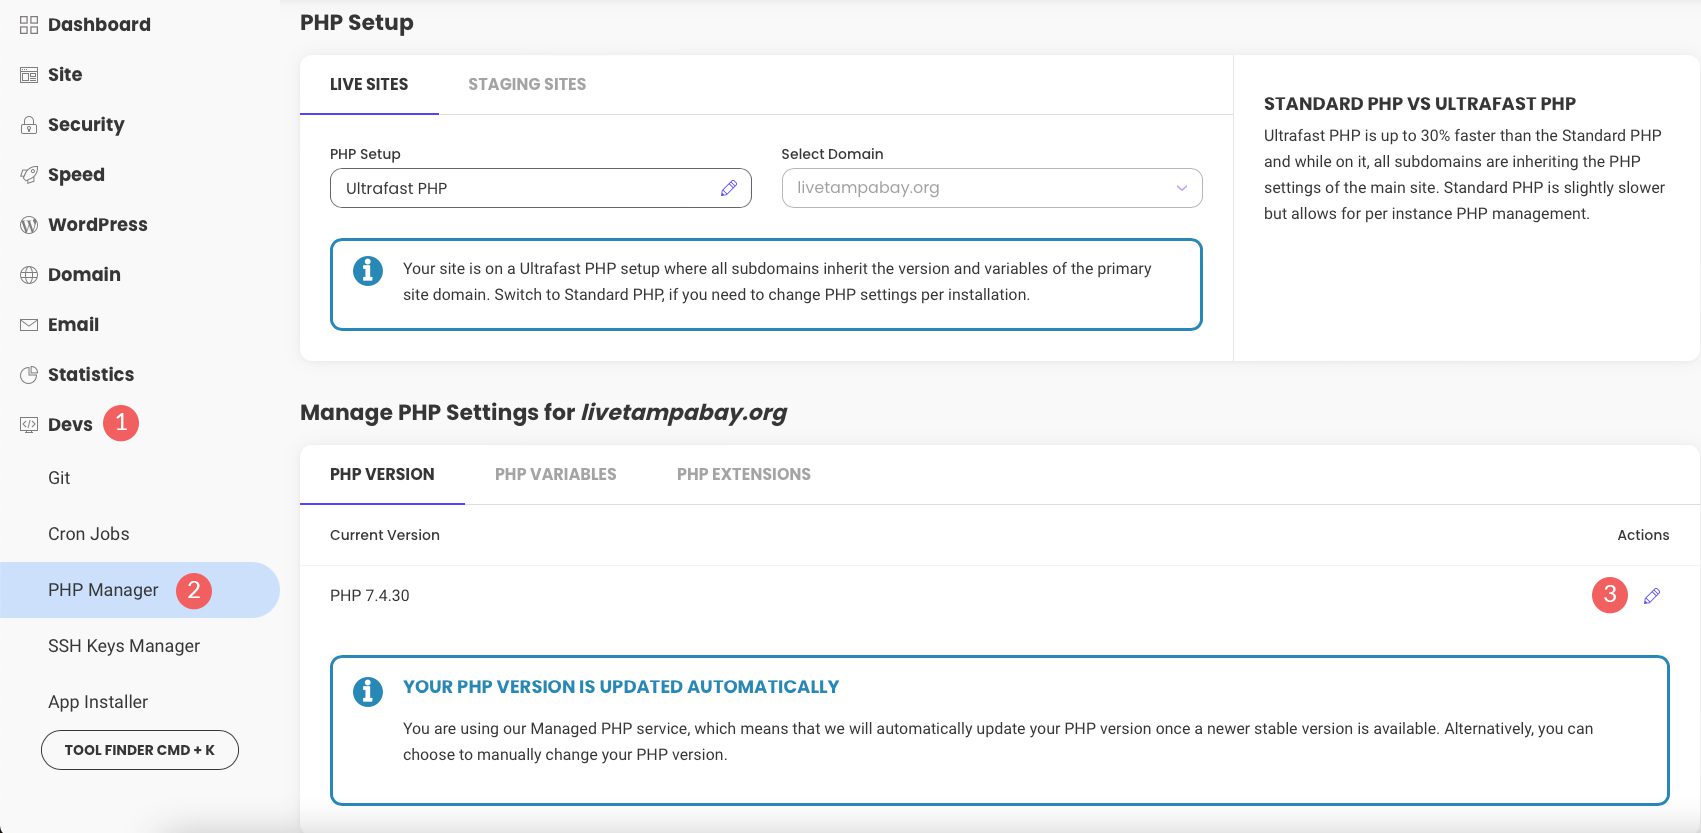
Credit: www.elegantthemes.com
Upgrade Php Through Hosting Panel
Upgrading PHP through your hosting panel is a simple and safe way to improve your WordPress site’s speed and security. Most hosting services provide a control panel where you can change the PHP version quickly. This method does not require technical skills or coding knowledge. Just follow a few easy steps, and your site will run on a newer PHP version.
Accessing Php Settings
Log in to your hosting control panel. This could be cPanel, Plesk, or another interface. Look for the section named “Software” or “Programming.” Find the option labeled “PHP Selector,” “PHP Manager,” or “PHP Settings.” Click on it to open the PHP configuration area.
Selecting The New Php Version
In the PHP settings, you will see a list of PHP versions. Choose the latest stable version supported by WordPress. The versions are usually numbered like 7.4, 8.0, or 8.1. Avoid versions marked as “deprecated” or “beta.” Select the version that balances new features and compatibility with your plugins.
Saving And Applying Changes
After selecting the new PHP version, find the “Save” or “Apply” button. Click it to update the PHP version for your website. Wait a few seconds for the changes to take effect. Check your WordPress site to confirm it works well with the new PHP version. If any errors appear, switch back or contact your hosting support.
Testing Website After Upgrade
After upgrading your PHP version in WordPress, testing your website is vital. This step ensures everything works smoothly and your visitors have a great experience. Testing helps spot problems early and keeps your site running well.
Checking For Errors
Start by looking for errors on your website. Enable WordPress debug mode to see error messages. Watch for white screens, broken pages, or warnings. Also, check your server error logs for clues. Fix any errors before moving forward.
Verifying Site Functionality
Next, test all parts of your site. Click through pages, posts, and menus. Check contact forms and shopping carts. Test plugins and themes to confirm they work. Use different devices and browsers to be sure. This step confirms your site works for every visitor.
Troubleshooting Common Issues
Upgrading your PHP version in WordPress can boost your site’s speed and security. Sometimes, issues appear after the upgrade. Troubleshooting helps fix these problems quickly. Knowing common issues saves time and keeps your site running well.
Reverting Php Version If Needed
Sometimes the new PHP version may cause errors on your site. You can switch back to the previous version. Most hosting services allow you to change PHP versions in their control panel. Find the PHP settings and select the older version. Test your site after reverting to ensure it works properly.
Resolving Compatibility Problems
Plugins or themes may not work with the new PHP version. Check if your plugins and themes are updated. Update them to the latest versions for better compatibility. Disable any plugin causing errors to find the problem. Look for alternative plugins if issues persist. Clear your cache to see changes. Compatibility fixes improve site stability and performance.
Keep Php Updated Regularly
Keeping PHP updated regularly is important for WordPress sites. New PHP versions bring better speed, security, and features. Running an old PHP version can cause errors and slow down your website.
Regular updates help your site stay safe from hackers. They also make sure your plugins and themes work smoothly. You do not need to wait for problems to start updating PHP.
Setting Up Update Reminders
Set reminders to check for PHP updates often. Use calendar apps or task managers to create alerts. Mark a date every few months to review your PHP version.
This habit stops you from forgetting updates. It keeps your site running on the latest software. You can also schedule reminders after major WordPress updates.
Staying Informed About Php Releases
Follow official PHP news sources for update announcements. Subscribe to newsletters or blogs that cover PHP changes. These sources share release dates and new features.
Knowing about updates early helps you plan the upgrade. It also prepares you to test your site with the new PHP version. Staying informed reduces risks during updates.
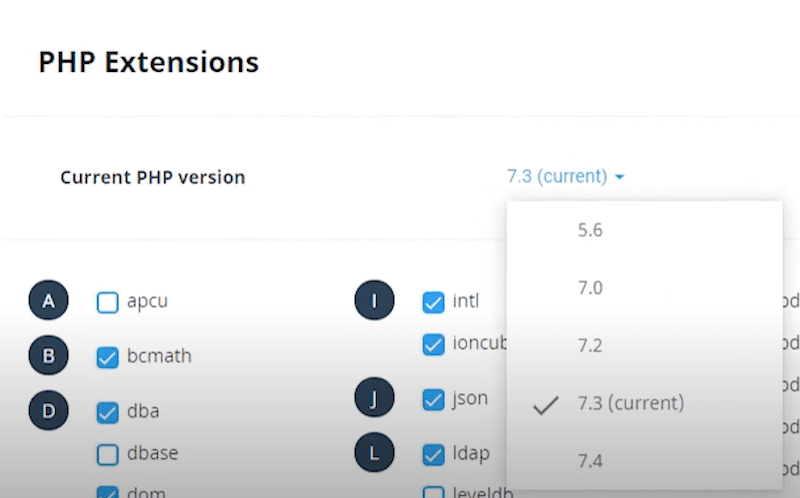
Credit: wp-rocket.me
Frequently Asked Questions
How Do I Check My Current Php Version In WordPress?
You can check your PHP version via WordPress dashboard using plugins like “Health Check. ” Alternatively, access your hosting control panel or create a PHP info file to view the version.
What Are The Benefits Of Upgrading Php In WordPress?
Upgrading PHP improves website speed, security, and compatibility. It ensures better performance and reduces vulnerabilities from outdated PHP versions, enhancing user experience and SEO rankings.
Can I Upgrade Php Version Without Breaking My WordPress Site?
Yes, but backup your site first. Test compatibility with themes and plugins. Use staging environments or consult your hosting provider to prevent site issues during the upgrade.
How Do I Upgrade Php Version Via Hosting Control Panel?
Log in to your hosting control panel, find the PHP settings or software section, select the desired PHP version, and save changes. Confirm upgrade by checking your site’s PHP info.
Conclusion
Upgrading your PHP version improves your WordPress site’s speed and security. Always back up your site before starting the update. Check your plugins and themes for compatibility first. Use your hosting control panel or ask your host for help. After upgrading, test your site to ensure everything works well.
Keep your PHP version updated regularly for best performance. This simple step helps your website stay safe and fast.


