
Are you ready to move your domain from GoDaddy to WordPress but unsure where to start? Transferring your domain might seem tricky, but it doesn’t have to be.
Imagine having full control over your website and making it easier to manage everything in one place. In this guide, you’ll discover simple, step-by-step instructions to transfer your domain smoothly and without hassle. Keep reading, and by the end, you’ll have the confidence to take charge of your online presence like a pro.

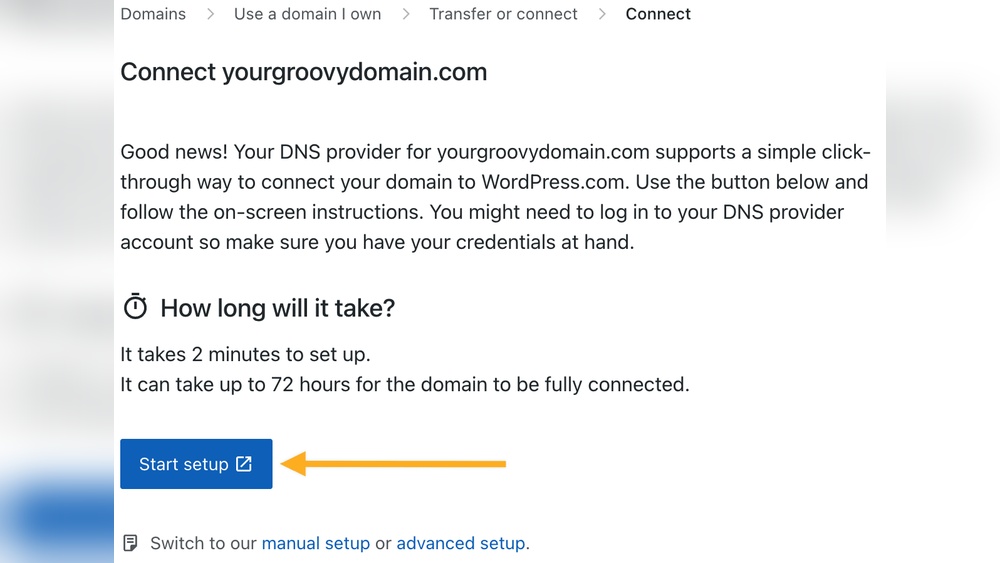
Credit: wordpress.com
Prepare Your Domain For Transfer
Preparing your domain for transfer is an important step before moving it from GoDaddy to WordPress. This process ensures that your domain is ready and that the transfer goes smoothly. You need to complete a few key tasks to avoid delays or problems.
Start by checking if your domain can be transferred. Then, you must unlock the domain and get a special code called the authorization code. Each step is simple but crucial for a successful transfer.
Check Domain Eligibility
Not all domains can be transferred immediately. Some have restrictions based on their age or recent changes. Check if your domain has been registered or transferred in the last 60 days. If so, you must wait before transferring it. Also, make sure your domain is not expired or on hold. These factors can stop the transfer process.
Unlock Your Domain
Domains are often locked to prevent unauthorized transfers. You need to unlock your domain in your GoDaddy account settings. This allows WordPress to take control of the domain. Look for the domain lock option and turn it off. Keep in mind that unlocking the domain makes it easier to transfer but does not affect your website or email services.
Obtain Authorization Code
The authorization code is a unique key needed for the transfer. It acts like a password for your domain. In your GoDaddy account, find the option to request the authorization code. The code will be sent to your email or shown on the screen. Keep this code safe because you will need it to complete the transfer on WordPress.
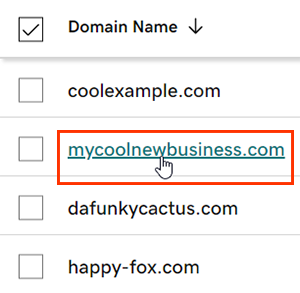
Credit: www.godaddy.com
Set Up Your WordPress Hosting
Setting up your WordPress hosting is the first step in moving your domain from GoDaddy. It creates the space where your website lives online. A good hosting plan helps your site load fast and stay online without issues.
Follow these steps to prepare your WordPress hosting before transferring your domain.
Choose A Hosting Plan
Select a hosting plan that fits your website needs. Shared hosting is good for small sites. If you expect more traffic, consider VPS or dedicated hosting. Check for features like storage, bandwidth, and customer support. Make sure the host supports WordPress easily.
Install WordPress
Most hosts offer a one-click WordPress install. Use this option to set up WordPress quickly. If not, download WordPress from its official site and upload it to your hosting. Follow the setup wizard to create your admin account and site details. Your WordPress will be ready to use in minutes.
Access Domain Transfer Settings
After setting up hosting, find the domain transfer settings in your WordPress host dashboard. This area lets you manage incoming domains. You will need to unlock your domain at GoDaddy and get an authorization code. Enter this code in your WordPress hosting panel to start the transfer process.
Initiate Domain Transfer On WordPress
Starting the domain transfer on WordPress is a key step to move your website address. This process helps you manage your domain and hosting in one place. You will follow clear steps inside your WordPress dashboard. Each step is simple and requires basic information about your current domain. Follow these steps carefully to avoid delays or issues with your transfer.
Enter Domain Details
First, log in to your WordPress account. Go to the domain transfer section. Enter the domain name you want to transfer from GoDaddy. Make sure to type the exact domain name without mistakes. WordPress will check if the domain is eligible for transfer. This step confirms that your domain can be moved to WordPress.
Provide Authorization Code
Next, get the authorization code from GoDaddy. This code is also called the EPP code. You need to request it from your GoDaddy account or support. Enter the code into WordPress when asked. The authorization code confirms you own the domain and allows the transfer. Keep this code safe and do not share it with others.
Confirm Contact Information
Finally, check your domain contact details. WordPress will show the current email and address linked to the domain. Make sure all information is correct and up to date. This step is important because WordPress will send transfer confirmation emails to this contact. Confirm the details to avoid missing any important transfer messages.
Approve Transfer Via Godaddy
Approving the domain transfer through GoDaddy is a key step in moving your domain to WordPress. This step confirms that you agree to the transfer. Without approval, the process cannot move forward. It’s important to act quickly to avoid delays. The approval happens mainly through your email linked to GoDaddy.
Check Godaddy Email
GoDaddy sends an email to the address on file. This email contains the transfer approval request. Check your inbox and spam folder. The subject usually mentions domain transfer or approval. Open the email carefully to find the approval link or instructions.
Approve Transfer Request
Click the approval link in the email. This confirms you want to transfer the domain. Sometimes, you may need to log in to your GoDaddy account. Follow the steps to officially approve the transfer. This step is fast and simple but must be done promptly.
Understand Transfer Timeline
After approval, the transfer process begins. It can take up to 5-7 days to complete. During this time, your domain remains active. You can still use your website and email. Be patient and check for any updates from GoDaddy or WordPress.
Finalize Transfer And Update Dns
Finalizing the domain transfer from GoDaddy to WordPress is an important step. It ensures your website works smoothly on the new platform. After you start the transfer, you must confirm the domain status and update DNS settings. These actions help connect your domain to your WordPress site. Testing the domain connection is the last step to check everything works right.
Verify Domain Status
Check if your domain transfer is complete. Log in to your WordPress account. Look for the domain section to see its status. The domain should show as active or transferred. This means GoDaddy released the domain, and WordPress accepted it. If the status is pending, wait a few hours and check again.
Update Dns Settings
Go to your WordPress domain settings. Find the DNS or name server options. Replace old GoDaddy name servers with WordPress ones. This step directs traffic to your WordPress site. Make sure to save changes after updating. Incorrect DNS settings can cause your site to be unreachable.
Test Domain Connection
Open a web browser and enter your domain name. Your WordPress website should load correctly. If the site does not appear, clear your browser cache. Wait a few minutes for DNS changes to take effect. Use online tools to check if DNS points to WordPress servers. Confirm the site is fully connected before closing the process.
Troubleshoot Common Transfer Issues
Transferring a domain from GoDaddy to WordPress can sometimes face issues. These common problems can delay or stop the process. Knowing how to fix them helps you complete the transfer faster. Below are some frequent issues and easy ways to handle them.
Transfer Delays
Transfers usually take 5 to 7 days. Delays happen if the domain is too new or recently updated. Also, some domains have rules that slow the process. Check the domain’s age and status in your GoDaddy account. Patience is key during this waiting period.
Authorization Errors
Authorization codes are needed to move your domain. Errors occur if the code is wrong or expired. Double-check the code from GoDaddy before starting the transfer. Request a new code if needed. Enter it carefully on WordPress to avoid mistakes.
Domain Lock Problems
Domains often have a lock to prevent unauthorized moves. If the domain is locked, the transfer will fail. Log in to GoDaddy and unlock the domain in the settings. After unlocking, try the transfer again. Remember to lock the domain after the process for security.

Credit: wordpress.com
Frequently Asked Questions
How Do I Unlock My Domain On Godaddy?
To unlock your domain, log into your GoDaddy account. Go to domain settings, find the lock status, and disable the registrar lock. This step is necessary to prepare your domain for transfer to WordPress or any other registrar.
What Is An Authorization Code For Domain Transfer?
An authorization code, also called EPP code, is a security key. It verifies domain ownership during transfer. You can request this code from your GoDaddy account under domain settings before transferring to WordPress.
How Long Does Domain Transfer Take To Complete?
Domain transfers typically take 5 to 7 days to complete. However, the process can be faster if you approve transfer requests promptly through your email. Delays may happen due to domain lock or incorrect authorization codes.
Can I Keep My Email When Transferring Domains?
Yes, you can keep your email service, but it depends on your email provider. If your email is linked to GoDaddy, update DNS settings after transfer. This ensures uninterrupted email communication during and after the domain move.
Conclusion
Transferring your domain from GoDaddy to WordPress is a clear process. Follow each step with care to avoid mistakes. Keep your login details handy and stay patient during the transfer. Check your website after the move to ensure everything works well.
This change gives you more control over your site. Take your time and enjoy the benefits of WordPress hosting. The effort pays off with a smoother website experience. Simple steps lead to successful domain transfer.


