
Are you ready to take control of your email experience with Namecheap Private Email? If you’re looking to boost your email’s security, enhance its functionality, and maintain a professional image, you’ve come to the right place.
Setting up your Namecheap Private Email might seem daunting at first, but it’s easier than you think—and we’re here to guide you every step of the way. Imagine having a sleek, efficient email system that not only protects your sensitive information but also empowers you to communicate seamlessly.
You’ll discover that with just a few simple steps, you can transform your email setup into a powerful tool that serves your needs perfectly. So, why wait any longer? Dive into our guide and unlock the full potential of Namecheap Private Email today!
Benefits Of Namecheap Private Email
Namecheap Private Email offers secure communication and easy management. Setup involves a few straightforward steps. Enjoy enhanced privacy and seamless integration with existing tools.
Setting up Namecheap Private Email offers a range of benefits that can significantly enhance your email management experience. Whether you’re a small business owner, a freelancer, or just someone looking for a reliable email solution, Namecheap Private Email provides features that cater to various needs. Let’s explore why choosing Namecheap Private Email can be a smart move for you.1. Enhanced Privacy And Security
Your email contains sensitive information. Namecheap Private Email prioritizes privacy and security by offering robust protection features. With encrypted connections and advanced spam filters, your emails are safeguarded from prying eyes and unwanted clutter.2. Professional Email Addresses
Having a professional email address can make a big difference in how you are perceived. Instead of using a generic email domain, Namecheap allows you to create a custom email address that matches your domain. This can enhance your brand’s credibility and make communications look more official.3. Easy Integration With Other Tools
Namecheap Private Email seamlessly integrates with popular email clients like Outlook and Gmail. This means you can manage your emails efficiently without having to switch platforms. It’s designed to work smoothly with the tools you already love.4. Ample Storage And Flexibility
Worried about running out of space? Namecheap Private Email offers generous storage options, allowing you to store emails, attachments, and files without hassle. You can easily upgrade as your needs grow, ensuring you never have to delete important emails to free up space.5. User-friendly Interface
A cluttered and confusing email interface can slow you down. Namecheap Private Email provides a clean and intuitive interface that makes navigating and managing your emails easy. Even if you aren’t tech-savvy, you’ll find it simple to use.6. Cost-effective Solutions
Balancing quality and cost is crucial for any email service. Namecheap Private Email offers affordable plans without compromising on features. This means you get value for your money while enjoying top-notch email services.7. Reliable Customer Support
No service is complete without dependable support. Namecheap provides 24/7 customer support to help you with any issues or questions. Knowing help is just a click away can give you peace of mind. By choosing Namecheap Private Email, you’re not just opting for an email service; you’re investing in a tool that supports your professional and personal communications effectively. What features matter most to you in an email service? Consider your priorities and see how Namecheap measures up.
Credit: privateemail.com
Choosing The Right Plan
Setting up Namecheap Private Email begins with choosing the right plan. Each plan offers different features tailored to your needs. Understanding these features will help you make an informed decision.
Consider how many users will access the email. Plans vary in user limits. Some are ideal for individuals, others suit teams or businesses.
Understanding Your Requirements
Think about your email usage. Are you a heavy user or occasional? Heavy users benefit from plans with larger storage. Occasional users might prefer smaller, cost-effective options.
Assessing Storage Needs
Email storage varies by plan. Determine how much space you need. If you store many emails, choose a plan with ample storage.
Evaluating Security Features
Security is crucial for email. Namecheap offers plans with enhanced security measures. Evaluate which features are necessary for you.
Considering Budget Constraints
Budget plays a role in decision-making. Namecheap has plans for different budgets. Choose one that fits your financial situation.
Reviewing Support Options
Support options differ across plans. Consider how much support you need. Some plans offer extensive support, others are more limited.
Creating A Namecheap Account
Setting up a Namecheap Private Email begins with creating your Namecheap account. This is your first step towards a streamlined email experience. A Namecheap account acts as your central hub. Here, you manage all your services, including emails.
Step 1: Visit The Namecheap Website
Open your web browser. Type in Namecheap.com in the address bar. Press enter to access the site.
Step 2: Click On The “sign Up” Button
On the homepage, find the “Sign Up” button. It’s usually at the top right corner. Click to begin your registration process.
Step 3: Fill In Your Details
You’ll see a registration form. Enter your email, username, and a strong password. Choose a password that’s easy to remember but hard to guess.
Step 4: Verify Your Email
After submitting your details, check your email inbox. Look for a verification email from Namecheap. Click the link in the email to verify your account.
Step 5: Access Your Dashboard
Once verified, log into your Namecheap account. Use your username and password. Now, you can access your dashboard. This is where you manage your Namecheap services.
Step 6: Secure Your Account
Enable two-factor authentication for extra security. It protects your account from unauthorized access. Follow the on-screen instructions to set it up.
Domain Registration And Configuration
Setting up Namecheap Private Email involves registering a domain and configuring DNS settings. Begin by purchasing a domain from Namecheap. Then, navigate to the DNS settings and link your domain with Namecheap Private Email.
Setting up Namecheap Private Email is a straightforward process, but it all begins with a solid foundation: domain registration and configuration. This step ensures your email setup is seamless and efficient, allowing you to stay connected with your audience effortlessly. Whether you’re starting fresh or already have a domain, understanding how to register and configure your domain is crucial. Let’s dive into the specifics of getting your domain ready for Namecheap Private Email.Registering A New Domain
Are you ready to bring your online presence to life? Registering a new domain is your first step. It’s like choosing a unique name for your digital identity. Begin by visiting Namecheap’s website. Search for a domain name that resonates with your brand or personal style. You want something memorable and easy to spell. Once you find the perfect name, add it to your cart. Follow the checkout process, entering your details. Namecheap makes it simple, guiding you through each step. Consider privacy protection options. Keeping your personal information secure is vital. Namecheap offers WHOIS protection to keep your data safe from prying eyes. After purchase, confirm your registration. You’re officially the owner of your domain, ready to configure it for email use.Connecting An Existing Domain
Already have a domain? It’s time to connect it to Namecheap’s platform. This step ensures your email setup is efficient and smooth. Log into your Namecheap account. Navigate to the domain management section. Here, you’ll find options to adjust settings for your existing domain. Look for the DNS settings. You’ll need to update these to point to Namecheap’s servers. This is crucial for email functionality. Enter the required MX records provided by Namecheap. These records direct email traffic to your domain. It’s like setting up a virtual mailbox. Don’t forget to verify your changes. Check if the domain is correctly configured. This step ensures that your emails are delivered without hiccups. Have you ever wondered why some emails end up in spam? Proper configuration prevents this, ensuring emails reach the inbox. Now, your domain is configured, paving the way for a seamless email setup with Namecheap Private Email. Are you excited to start sending and receiving emails with your own domain? It’s a powerful tool for building credibility and trust.Purchasing A Private Email Plan
Setting up Namecheap Private Email involves purchasing a plan and configuring email accounts. Begin by selecting a suitable plan on Namecheap’s website. Follow the setup instructions to link your domain and create personalized email addresses.
Purchasing a Private Email Plan from Namecheap is a straightforward process that can significantly enhance your email experience. Choosing the right plan is key to meeting your communication needs effectively. Whether you’re an individual or a business, selecting the appropriate plan ensures you get the features you need without overspending.Understanding The Options
Namecheap offers a variety of private email plans tailored to different requirements. It’s important to review each plan’s features and pricing to find the best fit. Look for plans that offer the storage and number of mailboxes you need.Comparing Features
Take a close look at what each plan includes. Some plans might offer advanced features like calendar integration, while others focus on generous storage. Make a list of features that are non-negotiable for you. This will make it easier to decide.Budget Considerations
While it might be tempting to go for the most feature-rich plan, consider your budget. Do you really need all those features? Balancing your needs with your financial constraints is crucial. Sometimes, the simpler plan is more than sufficient.Evaluating Your Needs
Reflect on your email usage and future needs. Are you anticipating increased email traffic or more team members? This foresight can help prevent unnecessary upgrades later. Planning ahead saves both time and money.Making The Purchase
Once you’ve decided on the best plan, the purchase process is simple. Log into your Namecheap account, select the plan, and proceed to checkout. Ensure you enter the correct domain details if prompted.Ensuring A Smooth Transition
After purchasing, setting up your new email is the next step. Namecheap provides guides to help you through this. If you’re transitioning from another provider, consider how to migrate your existing emails seamlessly. Choosing the right private email plan is more than just a decision; it’s an investment in your communication efficiency. Have you ever overlooked a feature that later became crucial? Share your experiences in the comments below.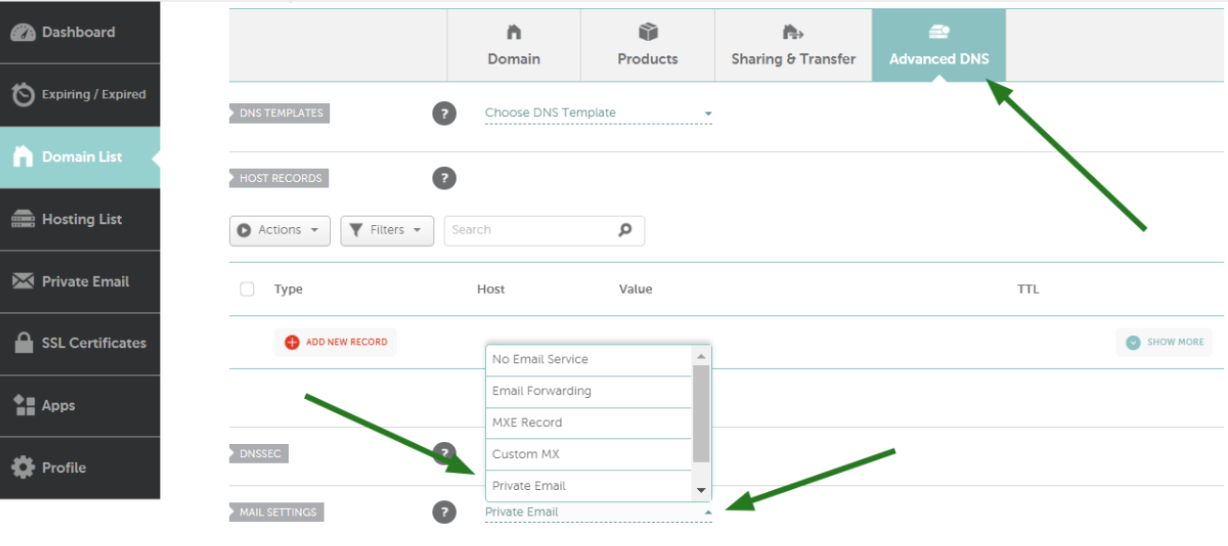
Credit: www.namecheap.com
Setting Up Email Accounts
Setting up Namecheap Private Email is easy. First, log into your Namecheap account. Then, navigate to your dashboard. Select “Email” and choose “Private Email. ” Follow the setup instructions. Configure your email client with the provided settings. Start sending and receiving emails effortlessly.
Setting up email accounts with Namecheap Private Email can streamline your communication processes significantly. Whether you’re managing a small business or organizing personal projects, having a structured email system is crucial. Let’s dive into the practical steps you can take to get your email accounts up and running efficiently.Adding User Accounts
Creating user accounts is your first step. You’ll need to decide who needs access and what their roles are. Picture this: you’re setting up email for a team of writers. Each writer gets their unique email address, allowing them to manage their communications independently. To add a user account, log into your Namecheap dashboard. Navigate to the Private Email section. From there, you’ll find an option to add new users. Input their details, such as name and email address. Think of this step as creating individual digital mailboxes. Each team member can now handle their emails, keeping your team organized.Configuring Aliases
Aliases are like nicknames for your email accounts. They allow you to receive emails from multiple addresses without creating separate accounts. Imagine you’re a business owner who wants to manage multiple departments but doesn’t want to juggle numerous logins. To set up an alias, go to the same Private Email section in your dashboard. Find the option to create aliases under the account settings. For instance, you might have an email address like info@yourbusiness.com. You can create aliases like sales@yourbusiness.com and support@yourbusiness.com that direct to the main info account. This simplifies your email management and keeps everything in one place. Why not use aliases to streamline your communication? It’s a simple trick that keeps your inbox organized without the hassle of checking multiple accounts. By setting up user accounts and configuring aliases, you’re building a robust email system that enhances productivity and organization. So, what’s stopping you from optimizing your email setup today?Email Client Configuration
Setting up Namecheap Private Email involves configuring your email client with the correct settings. Start by entering the server details, such as IMAP or POP3, and SMTP. Ensure your username and password are correct to access your emails seamlessly.
Setting up Namecheap Private Email on your devices can enhance your productivity by ensuring seamless access to your emails anytime, anywhere. The process is straightforward and requires just a few steps to configure your email client. Whether you prefer accessing your emails through webmail, desktop clients, or mobile devices, we’ve got you covered. Let’s dive into the specifics of setting up your email client for optimal performance and convenience. ###Webmail Access
Accessing your emails via webmail is the simplest method to stay connected. Navigate to the Namecheap webmail login page and enter your credentials. This allows you to check your emails from any browser without additional software. Webmail offers a user-friendly interface with intuitive navigation. You can manage your inbox, send emails, and organize folders effortlessly. Do you need to access your emails while traveling? With webmail, all you need is an internet connection. ###Desktop Email Clients
Do you prefer managing emails on your desktop? Configuring a desktop email client like Outlook or Thunderbird is a great option. Start by opening your email client and selecting the option to add a new account. You will need to enter your Namecheap email address, password, and server settings. Use IMAP for incoming mail and SMTP for outgoing mail to ensure smooth synchronization. These settings enable you to manage emails offline and keep your inbox organized efficiently. ###Mobile Device Setup
In today’s fast-paced world, having email access on your mobile device is crucial. Open your phone’s email app and choose the option to add an account. Input your Namecheap email credentials and select the appropriate server settings. Ensure your mobile app is set to sync at regular intervals. This keeps your inbox updated without manual refreshes. Whether you’re in a meeting or on the go, setting up Namecheap Private Email on your mobile ensures you never miss an important message. Each setup method offers unique advantages. Which method will you choose to stay connected?Managing Dns Settings
Setting up Namecheap Private Email involves managing DNS settings efficiently. Access the DNS settings in your domain registrar account. Then, update the MX records, SPF, DKIM, and CNAME records as specified by Namecheap.
Setting up Namecheap Private Email can transform your communication experience, but understanding DNS settings is crucial to ensure everything runs smoothly. DNS settings act as the backbone of your email setup, determining how emails are routed and verified. Proper management here isn’t just a technical necessity; it’s the key to maintaining your email’s credibility and functionality. ###Updating Mx Records
MX Records are the mail exchange addresses that direct your emails to the right server. Think of them as your email’s GPS. Without correct MX records, your emails could end up lost in cyberspace. To update them, log into your Namecheap account. Navigate to the “Advanced DNS” section. Here, you’ll find the existing MX records. Replace them with the ones provided by Namecheap Private Email. This step ensures your emails reach their intended destination. Have you ever wondered why some emails never reach your inbox? Often, it’s because MX records aren’t properly updated. ###Configuring Spf And Dkim
SPF and DKIM are protocols that help prevent email spoofing. They ensure your emails are recognized as genuine by recipient servers. Start with SPF records. These specify which mail servers can send email on your behalf. Add them in the DNS settings by entering the SPF record provided by Namecheap. Next, configure DKIM, which encrypts your emails to verify their origin. Generate the DKIM record from your Namecheap Private Email settings and add it to your DNS. These steps enhance your email security, protecting you from phishing attacks. Have you ever received an email claiming to be from a trusted source, only to find out it was fake? Configuring SPF and DKIM helps prevent such scenarios. Managing DNS settings might seem like a daunting task at first. But once you break it down into manageable steps, it becomes clear how vital they are for your email’s reliability. Are there any steps you might be overlooking in your setup? Ensuring everything is up-to-date is paramount to a seamless email experience.Troubleshooting Common Issues
Setting up Namecheap Private Email often involves troubleshooting common issues. Ensure correct DNS settings and update MX records promptly. Verify login details and configure email clients for seamless communication.
Setting up Namecheap Private Email is usually straightforward, but sometimes you may encounter common issues that require troubleshooting. Whether it’s login problems or email delivery issues, understanding the root cause can save you time and frustration. Let’s dive into some practical solutions to these common challenges.Login Problems
Can’t log in to your Namecheap Private Email? First, ensure you’re using the correct email and password. It might sound simple, but a small typo can lead to login failures. Double-check that Caps Lock is off and your keyboard layout is correct. If the login page isn’t loading, try clearing your browser cache or switching to a different browser. Sometimes browser extensions can interfere, so disable them temporarily to see if that resolves the issue. Are you still facing problems? Resetting your password might be necessary. Follow the “Forgot Password” link and check your recovery email for instructions. If you don’t receive a reset email, check your spam or junk folder.Email Delivery Issues
Are your emails not reaching their destinations? Start by checking your spam folder. Sometimes, legitimate emails end up there. Mark them as “Not Spam” to improve future delivery. Verify that your DNS settings are correct. Incorrect MX records can cause delivery failures. Namecheap provides detailed guides on configuring these settings, or you can contact their support for help. You might also face issues with attachments. Ensure they meet size limits and are in accepted formats. If your emails are bouncing back, check the error message. It often provides clues to the issue, like incorrect recipient address or server problems. Have you ever considered the importance of email reputation? Sending too many emails too quickly can flag your account as spam. Space out your emails and avoid using spammy language to maintain your reputation. Troubleshooting can sometimes feel overwhelming, but with a bit of patience and persistence, you’ll get your Namecheap Private Email running smoothly. What strategies have you found effective in resolving email issues? Share your thoughts in the comments!Enhancing Email Security
Setting up Namecheap Private Email strengthens security by encrypting messages and safeguarding sensitive information. Navigate your email dashboard, configure settings, and activate security features to protect against threats. Enhance privacy with straightforward steps ensuring your communication remains secure and confidential.
Enhancing your email security is essential in today’s digital age. With cyber threats lurking at every corner, ensuring the safety of your communications is not just about protecting your data, but also about maintaining peace of mind. Namecheap Private Email offers robust security features to help you safeguard your information. Are you leveraging these features to their full potential?Enabling Two-factor Authentication
Two-factor authentication (2FA) adds an extra layer of security to your email account. It requires not only your password but also a second form of verification, like a code sent to your phone. This means even if someone gets hold of your password, they can’t access your emails without your phone. Setting up 2FA is straightforward with Namecheap. Simply go to your account settings, find the security section, and follow the prompts to link your phone. This small step can make a huge difference in protecting your sensitive information. Have you considered how much more secure your account could be with just this one change?Spam And Virus Protection
Spam and viruses are constant threats to your inbox. Namecheap Private Email includes built-in spam and virus protection to keep these nuisances at bay. The system automatically filters out suspicious emails, reducing the risk of opening harmful attachments or links. To enhance this protection, regularly check your spam folder for any false positives, and adjust your settings if needed. You can also manually mark emails as spam to help the system learn and improve. How often do you review your spam settings to ensure optimal security? By taking these proactive measures, you not only secure your emails but also contribute to a safer digital environment. Email security isn’t just a feature—it’s a necessity. Are you ready to take control of your email safety today?Faqs And Support Resources
Discover how to set up Namecheap Private Email with easy-to-follow guides and support resources. Find step-by-step instructions and troubleshooting tips to get your email working smoothly. Access FAQs for quick answers to common questions.
Setting up Namecheap Private Email can be a breeze when you know where to find help. From troubleshooting tips to detailed guides, Namecheap offers several resources to ensure you get the most out of your email setup. Whether you’re just starting or facing a specific issue, knowing where to turn can make all the difference. Let’s dive into some frequently asked questions and explore the support resources available to you.Faqs About Namecheap Private Email
Understanding the common queries can save you time and frustration. Namecheap’s FAQ section is a treasure trove of information that covers everything from basic setup to advanced configurations. You might wonder, “What should I do if my emails aren’t syncing?” or “How can I reset my password?” The FAQ section provides straightforward answers to these questions and more. It’s like having a mini-guide at your fingertips, ready to assist you whenever you need it.Support Resources For Namecheap Private Email
The support resources available are designed to empower you with the knowledge to tackle any challenge you might face. Namecheap offers detailed guides and tutorials that walk you through each step of the setup process. Their Knowledge Base is filled with articles that break down complex tasks into simple, actionable steps. Whether it’s configuring your email client or managing your account settings, these articles are your go-to source. Ever thought about reaching out to a community for help? Namecheap’s community forums can be a goldmine for getting insights from fellow users who have faced similar issues.Live Chat And Email Support
If you prefer real-time assistance, Namecheap’s live chat is a fantastic resource. Imagine having an expert guide you through your issue, step by step. Their support team is known for being responsive and helpful. You can contact them via email for more detailed inquiries or issues that require a bit more attention. Isn’t it reassuring to know that help is just a click away whenever you need it?Personal Experience: Navigating Support
I recall the first time I had trouble with my email setup. The live chat support was an absolute lifesaver. Within minutes, the representative had pinpointed the issue and provided a clear solution. This experience showed me the importance of utilizing available resources. It’s not just about fixing problems; it’s about learning to handle them efficiently. Have you ever thought about how much easier life could be if you had instant access to expert advice like that? Navigating Namecheap’s support resources and FAQs is not just about solving immediate issues—it’s about equipping yourself with the knowledge to manage your email effectively. So, next time you face a challenge, remember: you’re not alone, and solutions are just a click away.
Credit: www.youtube.com
Frequently Asked Questions
How To Set Up A Private Email With Namecheap?
To set up a private email with Namecheap, sign in to your account. Purchase a private email plan, then go to the dashboard. Select “Email Management,” add a domain, and configure settings. Follow the instructions to finalize setup and begin using your private email.
How To Set Up A Private Email Server?
Set up a private email server by choosing hardware, installing software like Postfix, configuring DNS settings, and securing connections. Regularly update software and monitor server activity for security.
How Much Is Private Email On Namecheap?
Private email on Namecheap starts at $0. 91 per month. Prices vary based on the plan chosen. Options include Starter, Pro, and Ultimate plans. Each offers different storage and features. Visit Namecheap’s website for detailed pricing and features.
Is Private Email Pop3 Or Imap?
Private email can use either POP3 or IMAP protocols. POP3 downloads emails to your device, while IMAP syncs emails across devices. Choose based on your needs for email access and storage. IMAP is ideal for accessing emails on multiple devices, while POP3 is better for offline access.
Conclusion
Setting up Namecheap Private Email is straightforward. Follow the steps carefully. Soon, your email will be ready. Enjoy more security and privacy with ease. The process empowers you to manage emails efficiently. Everything is laid out step by step. Take each instruction as it comes.
You’ll connect your domain smoothly. Troubleshooting is simple if issues arise. Embrace reliable communication with confidence. Your digital presence will benefit. You’ve taken a smart step for your business. Keep your email organized and secure. Start using Namecheap Private Email today.
Enjoy the advantages it brings to your workflow.


