
Are you ready to make your website truly yours by adding your own domain to WordPress? Imagine having a web address that’s easy to remember and looks professional.
This simple step can boost your brand, build trust with visitors, and make your site stand out. In this guide, you’ll learn exactly how to connect your domain to WordPress—without confusion or technical headaches. Keep reading, and by the end, you’ll have your personalized web address up and running smoothly.
Choose The Right Domain
Choosing the right domain is a key step for your WordPress site. It shapes your brand and affects how visitors find you. A good domain name is easy to remember and fits your website’s purpose. Take time to pick a domain that works well for you.
Pick A Memorable Name
Choose a domain name that people can easily recall. Short and simple names stick better in the mind. Avoid using hard spellings or long words. A clear name helps visitors come back to your site. Think about your target audience and what suits your content.
Select A Suitable Domain Extension
The domain extension is the ending part, like .com or .net. Pick one that matches your website type. For business sites, .com is the most trusted choice. Nonprofits might use .org, while local sites often use country codes like .us or .uk. The right extension adds trust and shows your site’s focus.

Credit: wordpress.com
Register Your Domain
Registering your domain is the first step to create your WordPress website. It gives your site a unique address on the internet. Choose a name that matches your brand or topic. This helps visitors find your site easily. The registration process is simple but important. Follow these steps to secure your domain properly.
Use A Trusted Registrar
Select a reliable domain registrar for your purchase. Trusted registrars offer good support and security. They keep your domain safe from theft or loss. Examples include GoDaddy, Namecheap, and Google Domains. Check reviews to confirm their reputation. Avoid unknown or suspicious registrars to prevent issues later.
Check Domain Availability
Search for your desired domain name first. Use the registrar’s search tool to check availability. If the name is taken, try different extensions like .net or .org. You can also add simple words or hyphens. Choose a domain that is short and easy to remember. Confirm it is available before proceeding to register.
Access WordPress Dashboard
Accessing the WordPress dashboard is the first step in adding your domain. This area lets you control your website settings and make changes easily.
Understanding how to reach this dashboard saves time and reduces confusion. Follow the steps below to find your way.
Log Into Your Account
Open your web browser and go to wordpress.com. Enter your username or email address. Type your password carefully. Click the “Log In” button. If your details are correct, the dashboard will appear.
Navigate To Domain Settings
Inside the dashboard, look for the “My Site” menu on the left side. Click it to open more options. Find and click “Domains” or “Domain Settings.” This section lets you manage your domain. Here you can add a new domain or connect an existing one.
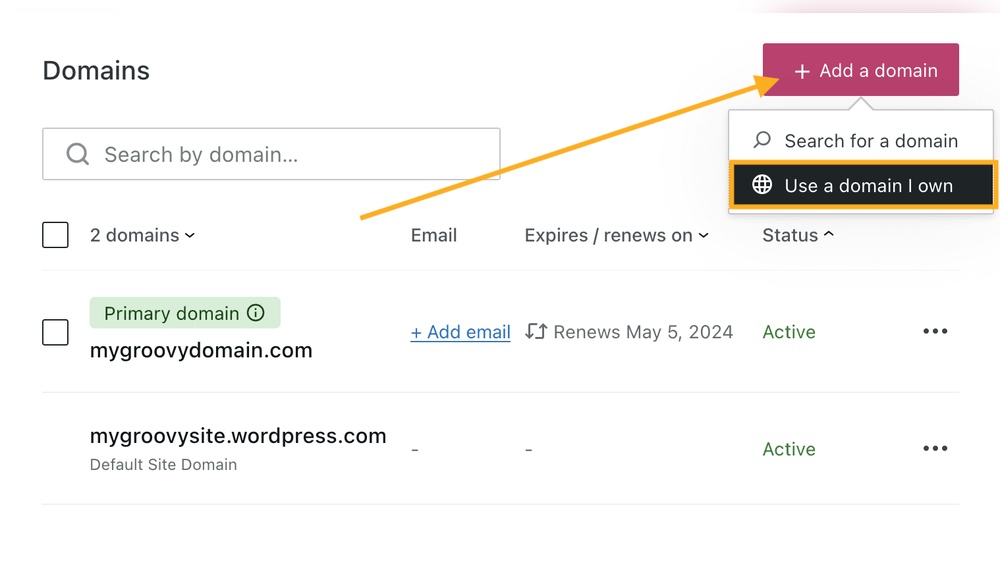
Add Domain To WordPress
Adding your domain to WordPress connects your website to your chosen web address. This step helps visitors find your site easily. It also builds your brand identity and credibility online. The process is simple and takes just a few steps.
Enter Your Domain Name
Start by logging into your WordPress account. Go to the settings or domain section. Type your domain name exactly as you purchased it. Double-check for any spelling errors. Save the changes to move forward.
Verify Domain Ownership
WordPress asks you to prove you own the domain. This protects your site and keeps it secure. You will receive a verification code or a file. Follow the instructions to add this code to your domain host. Once confirmed, WordPress will link your domain to your site.
Update Dns Settings
Updating your DNS settings is a key step to connect your domain with WordPress. It tells the internet where to find your website. This process involves changing records at your domain registrar. These records control how visitors reach your site. The right settings make sure your domain shows your WordPress content.
Locate Your Dns Records
First, sign in to your domain registrar’s control panel. This is where you manage your domain settings. Find the section labeled “DNS Management” or “Name Server Settings.” Here, you will see your current DNS records. These usually include A records, CNAME records, and others. Make sure you can edit these records before moving on.
Point Domain To WordPress Servers
To connect your domain to WordPress, update the DNS records with WordPress server details. Change the A record to the IP address provided by WordPress. This points your domain to the WordPress hosting server. You may also need to update CNAME records for subdomains like “www.” Save all changes after editing. DNS changes can take time to update, usually a few hours to 48 hours. Be patient while the changes take effect.

Credit: help.leadconnectorhq.com
Set Primary Domain
Setting your primary domain in WordPress is a key step after connecting your domain. This step tells WordPress which domain to show visitors first. It helps to avoid confusion and keeps your site consistent. Setting the main domain also improves your site’s SEO by focusing all traffic on one address.
Choose Main Website Domain
Go to your WordPress dashboard and open the domain settings. You will see a list of domains linked to your site. Pick the domain you want visitors to see first. This domain will be your main address. Make sure it is the one you want everyone to use.
Save Domain Preferences
After choosing the main domain, save your changes. Click the save or confirm button. This action locks in your choice for the primary domain. It may take a few minutes to update. Check your site by typing the new domain in a browser to confirm.
Test Domain Connection
Testing your domain connection is a key step after adding your domain to WordPress. This ensures your website is live and visible on the internet. Without a proper connection, visitors cannot reach your site. You need to confirm that the domain points correctly to your WordPress hosting.
Check Website Accessibility
Open a web browser and enter your domain name in the address bar. The site should load your WordPress homepage. If you see your content, the domain is connected properly. Try loading the site on different devices and browsers. This confirms it works everywhere. Clear your browser cache to avoid old data showing up. Use online tools to check if your domain is resolving worldwide.
Troubleshoot Common Issues
If your site does not load, check your DNS settings. The domain must point to your WordPress hosting IP address. Confirm your DNS records have fully propagated; this can take up to 48 hours. Look for typos in your domain or nameserver entries. Disable any active caching or security plugins temporarily. Check your domain registrar and hosting support for errors. Fixing these issues usually restores your connection quickly.
Credit: wordpress.com
Maintain Your Domain
Maintaining your domain is crucial for keeping your WordPress site live and accessible. You must take simple steps to protect your domain from expiration or misuse. These steps help avoid interruptions and keep your website running smoothly.
Renew Domain Regularly
Domains expire after a set time, usually one year. Renew your domain before it expires to keep control. Set reminders or enable auto-renewal with your registrar. A lapsed domain can cause your website to go offline. Early renewal prevents this problem and keeps your online presence safe.
Keep Contact Information Updated
Your domain registrar needs accurate contact details. Update your email and phone number regularly. This ensures you receive important notifications about your domain. Missing these messages can lead to losing your domain. Keep your information current to avoid any issues.
Frequently Asked Questions
How Do I Connect My Domain To WordPress?
To connect your domain, update your domain’s DNS settings to point to WordPress servers. Then, add the domain in your WordPress dashboard under “Domains. ” This links your custom domain with your WordPress site for seamless access.
Can I Use A Domain Bought Outside WordPress?
Yes, you can use external domains. Change the domain’s nameservers to WordPress hosting nameservers. After that, add the domain in your WordPress settings. This allows your purchased domain to work with your WordPress site.
How Long Does Domain Propagation Take On WordPress?
Domain propagation usually takes 24 to 48 hours. It depends on your domain registrar and DNS servers. During this time, your site may be temporarily unreachable while changes take effect globally.
Do I Need To Pay Extra For A Custom Domain On WordPress?
If you already own a domain, you don’t pay extra to connect it. However, WordPress offers domain registration services at a cost. Using your own domain is free once linked properly.
Conclusion
Adding your domain to WordPress is simple and clear. Follow the steps carefully and take your time. Once done, your website will look more professional. Visitors will find your site easier to remember. Keep your domain settings updated for smooth performance.
Regular checks help avoid common problems. Now, you are ready to share your content with the world. Your online presence just got stronger. Keep learning and improving your site every day. Success starts with small, steady actions.


