
Are you looking to add a login page to your WordPress site but don’t know where to start? Creating a simple, secure login page can make your website more professional and protect your content.
In this guide, you’ll discover easy steps to set up a custom login page that fits your needs. Whether you want to control who accesses your site or offer members a seamless experience, this article will help you get there quickly and without hassle.
Keep reading, and you’ll have your login page ready in no time.
Credit: blog.templatetoaster.com
Choose The Right Plugin
Choosing the right plugin is important for your WordPress login page. The plugin controls how users log in and how secure the process is. A good plugin improves user experience and protects your site from attacks. It should be easy to use and fit your needs.
Many plugins offer different features. Some focus on design, while others focus on security. Picking the right one helps keep your site safe and simple for users.
Popular Login Plugins
Many plugins work well for login pages in WordPress. WPForms is popular for creating custom login forms. Theme My Login lets you match the login page with your site design. LoginPress offers many design options to make your login page look good.
Ultimate Member helps build user profiles and login forms together. Wordfence Login Security adds extra protection to your login page. Each plugin has its strengths. Choose one that matches your site goals.
Plugin Features To Consider
Security features are very important. Look for plugins with two-factor authentication or CAPTCHA support. These tools stop hackers from guessing passwords.
Customization options let you change the login form style. Choose a plugin that lets you add your logo and colors easily. This keeps your site branding consistent.
Check if the plugin supports social login. Letting users log in with Facebook or Google saves time and effort.
Make sure the plugin is easy to install and update. Good plugins have clear instructions and regular updates.
Install And Activate The Plugin
Installing and activating a plugin is the first step to add a login page in WordPress. Plugins add features without coding. This process is simple and quick. Two main ways exist to install plugins. Choose the best method for your needs.
Using The WordPress Dashboard
Log into your WordPress dashboard. Look for the “Plugins” menu on the left side. Click “Add New” to open the plugin search screen. Type the plugin name in the search box. Find the plugin in the list below. Click “Install Now” next to the plugin. Wait a moment as WordPress downloads and installs it. After installation, click “Activate” to enable the plugin. The plugin is now ready to use for your login page.
Manual Installation Steps
Download the plugin file as a .zip from the plugin website. Log into your WordPress dashboard. Go to “Plugins” and click “Add New.” Choose the “Upload Plugin” button at the top. Click “Choose File” and select the downloaded .zip file. Click “Install Now” to upload the plugin. After the upload, click “Activate Plugin.” The plugin activates and is ready for setup. This method works well for plugins not listed in the WordPress directory.
Customize Your Login Page
Customizing your login page helps create a unique experience for your users. It reflects your brand and makes your site look professional. Simple changes can make a big difference. You can adjust logos, colors, backgrounds, and form fields. These tweaks improve user trust and keep your site consistent.
Changing The Logo And Colors
Start by replacing the default WordPress logo with your own. This small change shows your brand identity right away. Next, adjust the color scheme to match your website’s style. Changing button colors and text helps create a polished look. Use tools or plugins to make these edits easily without coding. Keep colors simple and readable for all users.
Adding Custom Backgrounds
Adding a custom background makes your login page stand out. Choose an image that fits your brand or site theme. Use a subtle pattern or a clean photo to avoid distractions. You can also set a solid color background for a minimal look. Many plugins allow you to upload backgrounds quickly. Make sure the background does not affect the form’s visibility.
Modifying Login Form Fields
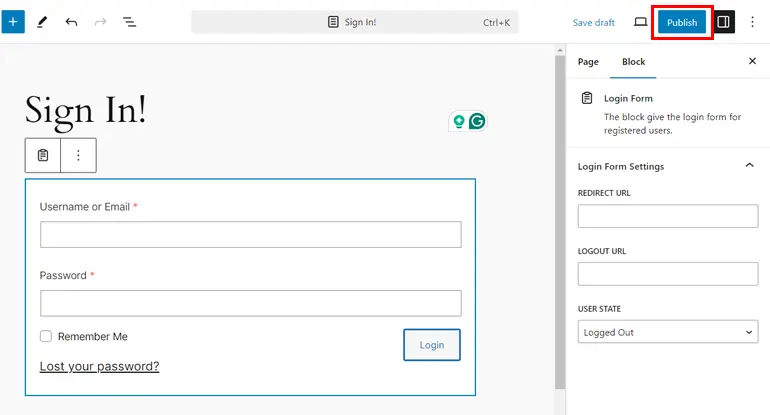
You can change the login form fields to suit your needs. Add extra fields like a “Remember Me” checkbox or custom messages. Remove unnecessary fields to keep the form simple. Adjust the size and style of input boxes for better usability. Customizing the form improves user experience and clarity. Always test changes to ensure the form works on all devices.

Credit: jetpack.com
Set Up Login Page Url
Setting up a login page URL in WordPress improves user experience and site security. A clear, custom login URL helps users find the login page easily. It also reduces the risk of bots attacking the default login page. This section explains how to create a custom login URL and set up redirects after login.
Creating A Custom Login Url
WordPress uses a default login URL: yoursite.com/wp-login.php. Changing this URL makes your site safer from bots. Use plugins like WPS Hide Login or iThemes Security. These tools let you create a new login URL without coding. After installing, choose a unique URL. Keep it simple and easy to remember. Avoid common words like “login” or “admin.” Save changes and test the new URL in your browser.
Redirecting After Login
Redirecting users after login improves navigation. You can send users to the homepage, dashboard, or any page. Use plugins like Peter’s Login Redirect or LoginWP. These plugins allow setting different redirects for user roles. For example, send admins to the dashboard and customers to the shop page. Set the redirect URL in the plugin settings. Test the login process to ensure the redirect works properly.
Add Login Page To Navigation
Adding a login page to your WordPress site navigation helps visitors find it easily. It improves user experience by making login quick and simple. You can add the login link to menus or use widgets to place it anywhere on your site.
Both methods are simple and do not require coding skills. This guide shows how to add a login page link effectively.
Adding Login Link To Menus
Go to your WordPress dashboard and open the Menus section. Select the menu you want to edit or create a new one. Use the Custom Links option to add your login page URL. Enter the URL, such as yoursite.com/login, and name it “Login”. Click Add to Menu, then save the menu.
The login link now appears in your site’s navigation. Visitors can click it to reach the login page fast. You can place the link in header, footer, or sidebar menus.
Using Widgets For Login
Widgets offer another way to add a login form or link. Go to Appearance > Widgets in your dashboard. Find the “Meta” widget or a specific login widget if your theme supports it. Drag the widget to your desired widget area, like sidebar or footer.
The widget shows a login link or form directly on your site. This method is useful for quick access without navigating menus. You can customize the widget title to guide users easily.
Enhance Security Measures
Adding a login page to WordPress is not enough to keep your site safe. Extra security steps help protect your site from hackers and unwanted access. This section explains simple ways to enhance your login security. These steps keep your website and user data safer.
Limit Login Attempts
Limiting login attempts stops hackers from guessing passwords. You can set a limit on how many times someone can try to log in. After reaching the limit, the system blocks further attempts for a short time. This reduces the risk of brute force attacks.
Many WordPress plugins can help you limit login attempts. They are easy to install and use. Set your preferred number of tries and lockout time. This method adds a strong layer of protection.
Enable Two-factor Authentication
Two-factor authentication (2FA) requires users to enter a code after their password. The code is sent to their phone or email. This extra step makes it harder for hackers to access accounts.
WordPress offers plugins to enable 2FA quickly. Once activated, users must verify their identity each time they log in. This simple action greatly improves your site’s security.
Test Your Login Page
Testing your login page is important to ensure it works properly. A well-functioning login page helps users access your site without problems. It also protects your site from unauthorized access. Always check your login page after creating it. This helps find errors early and fix them fast.
Checking Functionality
Start by entering valid usernames and passwords. See if the login process completes smoothly. Check if users are redirected to the correct page after login. Try logging out to confirm the logout button works. Use different browsers to test compatibility. Also, test on mobile devices to ensure responsiveness.
Troubleshooting Common Issues
Login errors can occur for many reasons. Clear browser cache to solve display problems. Reset passwords if users cannot log in. Check plugin conflicts by disabling other plugins temporarily. Ensure your site uses HTTPS for secure login. Review error messages for clues and fix the issues accordingly.
Credit: wpuserregistration.com
Frequently Asked Questions
How Do I Create A Custom Login Page In WordPress?
To create a custom login page, use plugins like Theme My Login or LoginPress. These allow easy customization without coding. You can change the design, logo, and redirect URLs for a personalized login experience on your WordPress site.
Can I Add A Login Page Without A Plugin In WordPress?
Yes, you can create a login page manually by coding a custom template. However, this requires PHP knowledge. Plugins are easier and safer for beginners to add and customize login pages without touching code.
How To Redirect Users After Login In WordPress?
Use plugins like Peter’s Login Redirect or add custom code in your theme’s functions. php. These methods let you specify where users land after logging in, improving navigation and user experience.
Is It Possible To Secure The WordPress Login Page?
Yes, secure your login page by enabling two-factor authentication, using strong passwords, and limiting login attempts. Plugins like Wordfence or Loginizer help enhance login security effectively.
Conclusion
Adding a login page in WordPress is simple and useful. It helps protect your site and control user access. You can use plugins or create a custom page to fit your needs. Keep your login page easy to find and use.
Regular updates keep it safe from threats. Start now to improve your website’s security and user experience. A good login page makes your site stronger and more professional.


