
Are you struggling to organize your products on your WordPress site? Adding product categories is the key to making your store easy to navigate.
When your visitors can quickly find what they’re looking for, they stay longer and buy more. You’ll learn exactly how to add product categories step-by-step, even if you’re not a tech expert. Keep reading, and you’ll have a well-structured online store that keeps your customers coming back.

Credit: wpzita.com
Accessing WordPress Dashboard
Accessing the WordPress dashboard is the first step in managing your website. The dashboard is the control center where you can add product categories, create posts, and manage settings.
It shows all the tools you need to organize your site. Understanding how to reach and navigate the dashboard saves time and effort.
Logging Into Your WordPress Site
Open your web browser and go to your website’s login page. Usually, it is yoursite.com/wp-admin. Enter your username and password. Click the “Log In” button. You will see the WordPress dashboard after successful login.
Dashboard Overview
The dashboard has a menu on the left side. This menu contains links to posts, pages, products, and categories. The center area shows updates and quick actions.
Finding The Products Section
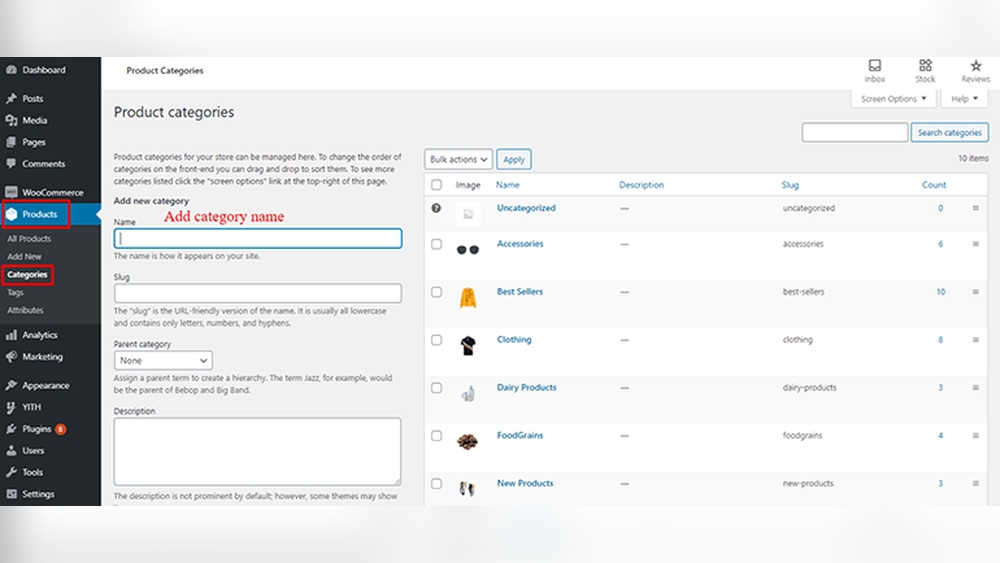
Look for the “Products” tab in the left menu. Click it to reveal options like “All Products” and “Categories.” This area is where you manage your store products and categories.
Credit: crocoblock.com
Navigating To Product Categories
Navigating to product categories in WordPress is easy. This step helps you organize your products well. Proper categories make your online store clear and user-friendly.
Knowing where to find the product categories saves time. It also helps you manage your products efficiently. Follow these simple steps to locate the right section.
Accessing The WordPress Dashboard
Start by logging into your WordPress dashboard. This is the main control panel of your website. Use your username and password to sign in.
Once logged in, you see the dashboard menu on the left side. This menu contains all the options for website management.
Finding The Products Menu
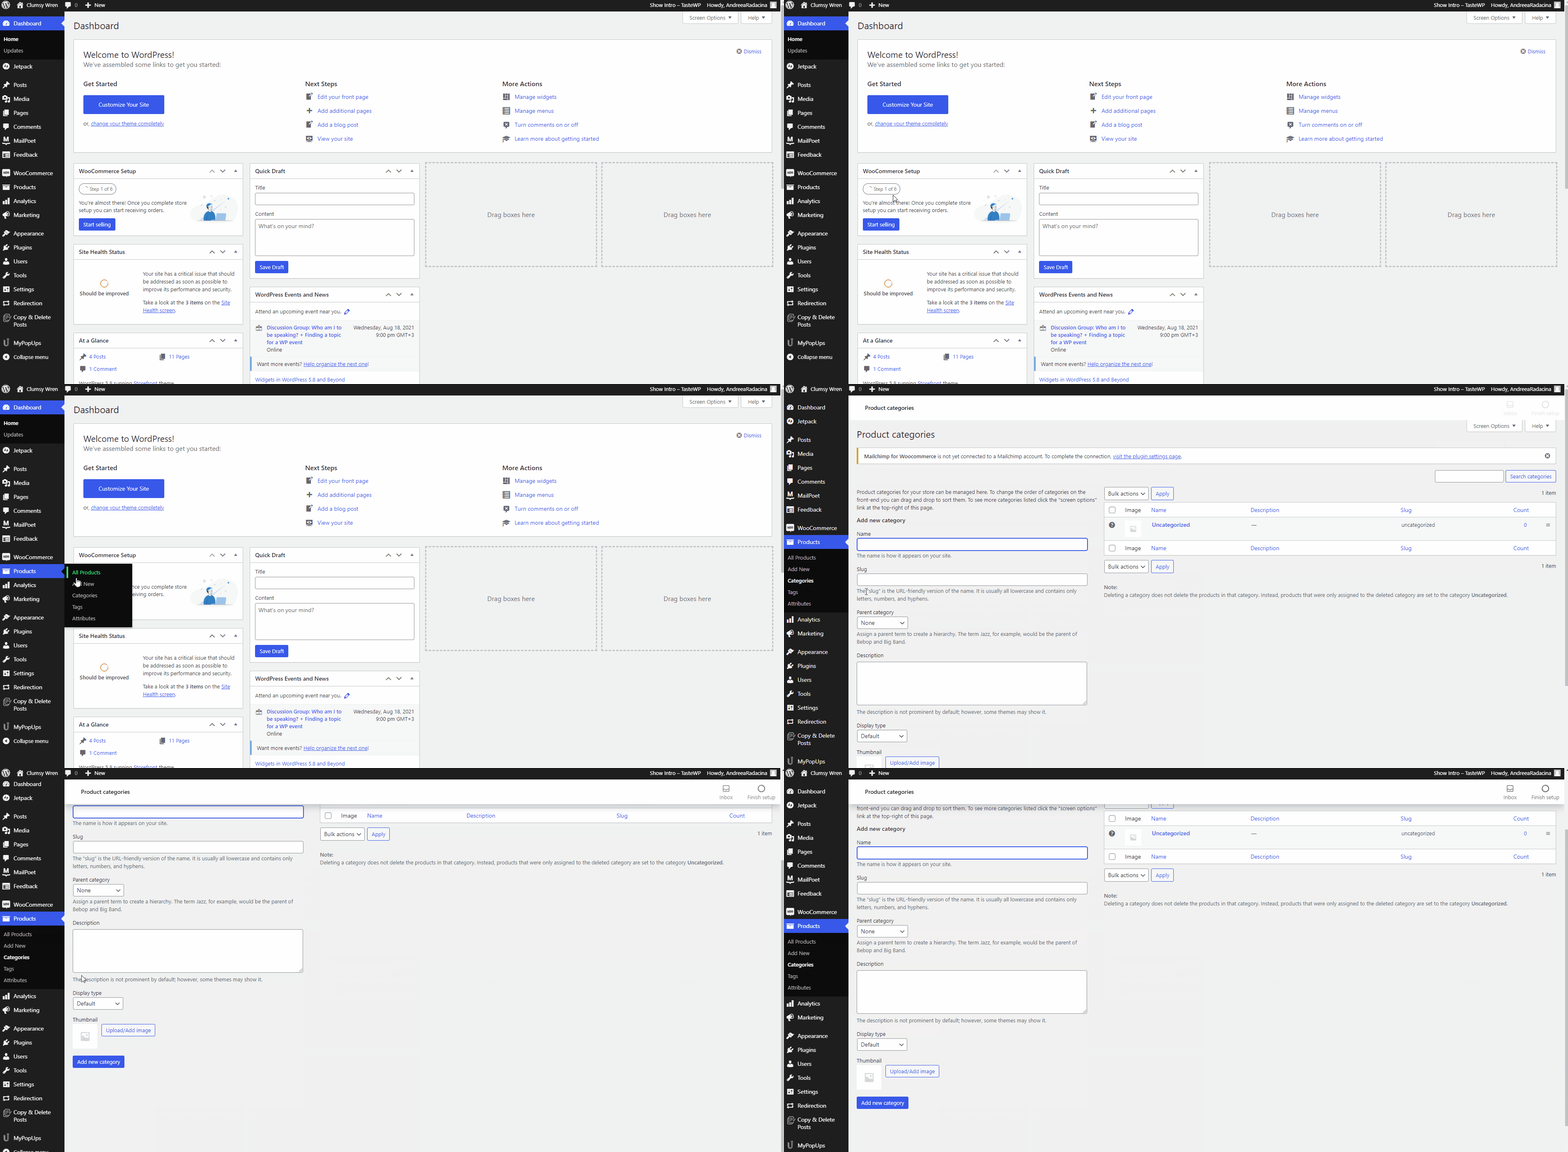
Look at the dashboard menu and find the “Products” option. This appears if you have WooCommerce installed. Click on “Products” to open more choices.
Opening The Product Categories Section
Under “Products,” select “Categories.” This opens the product categories page. Here, you can add, edit, or delete product categories easily.
Creating A New Category
Creating a new product category in WordPress helps organize your store better. Categories make it easy for customers to find products. Setting up a category is simple and fast. Follow these steps to create a clear and useful category.
Adding Category Name
Start by entering the name of your new category. This name appears on your website and helps users identify the products. Choose a name that clearly describes the group of products. Keep it short and easy to understand.
Setting Category Slug
The slug is the URL-friendly version of the category name. It usually contains only lowercase letters and hyphens. WordPress creates the slug automatically, but you can edit it. Make it simple and relevant to improve SEO and user experience.
Assigning Parent Category
Select a parent category if your new category fits under a broader group. This creates a hierarchy and helps organize categories better. If the category stands alone, leave this option set to none. Using parent categories keeps your store tidy and easy to navigate.
Writing Category Description
Add a short description that explains what products belong in this category. This text can show on your site, helping customers understand the category better. Use clear and simple language to describe the products or purpose of the category.
Saving And Managing Categories
Saving and managing product categories in WordPress keeps your store organized. It helps customers find products quickly. Proper category management also improves your website’s SEO. WordPress makes it simple to edit or delete categories after creating them. This section explains how to manage categories easily.
Editing Existing Categories
To edit a category, go to your WordPress dashboard. Click on “Products” and then “Categories.” Find the category you want to change. Hover over it and click “Edit.” You can change the name, slug, or description. After making changes, click “Update” to save them. Editing keeps your categories accurate and relevant.
Deleting Unwanted Categories
Deleting categories removes clutter from your store. Go to the “Categories” page in WordPress. Locate the category to delete. Hover over it and select “Delete.” Confirm the deletion to remove the category. Products in deleted categories will not be lost. They will become uncategorized unless assigned elsewhere. Clean categories help improve your site’s navigation and SEO.
Assigning Categories To Products
Assigning categories to products helps organize your online store. Categories make it easier for customers to find products. They also improve your site’s SEO by grouping similar items together.
In WordPress, assigning categories is simple. You can assign one or multiple categories to each product. This keeps your product list neat and user-friendly.
Accessing The Product Edit Page
First, go to your WordPress dashboard. Click on “Products” in the menu. Find the product you want to edit and click its name. This opens the product edit page.
Finding The Categories Section
On the product edit page, look to the right side. You will see a box labeled “Product categories.” This box shows all the categories you created. If you don’t see the box, check your screen options at the top.
Selecting Categories For Your Product
To assign a category, tick the checkbox next to the category name. You can select more than one category if needed. Your product will appear under all selected categories on the store page.
Adding A New Category While Editing
If you need a new category, click “+ Add new category” below the list. Enter the new category name. Choose a parent category if needed. Click “Add new category” to save and assign it right away.
Saving Your Changes
After selecting categories, scroll up and click “Update” or “Publish.” This saves your product with the new category assignments. Check your store page to confirm the product is listed correctly.
Using Categories In Menus
Using product categories in menus helps visitors find items fast. It organizes your store better. Visitors click categories to see related products. This makes shopping easier and improves user experience.
Menus with categories guide visitors through your website. You can highlight popular sections. This leads to more clicks and sales. Categories also help search engines understand your site structure.
Adding Product Categories To Your Menu
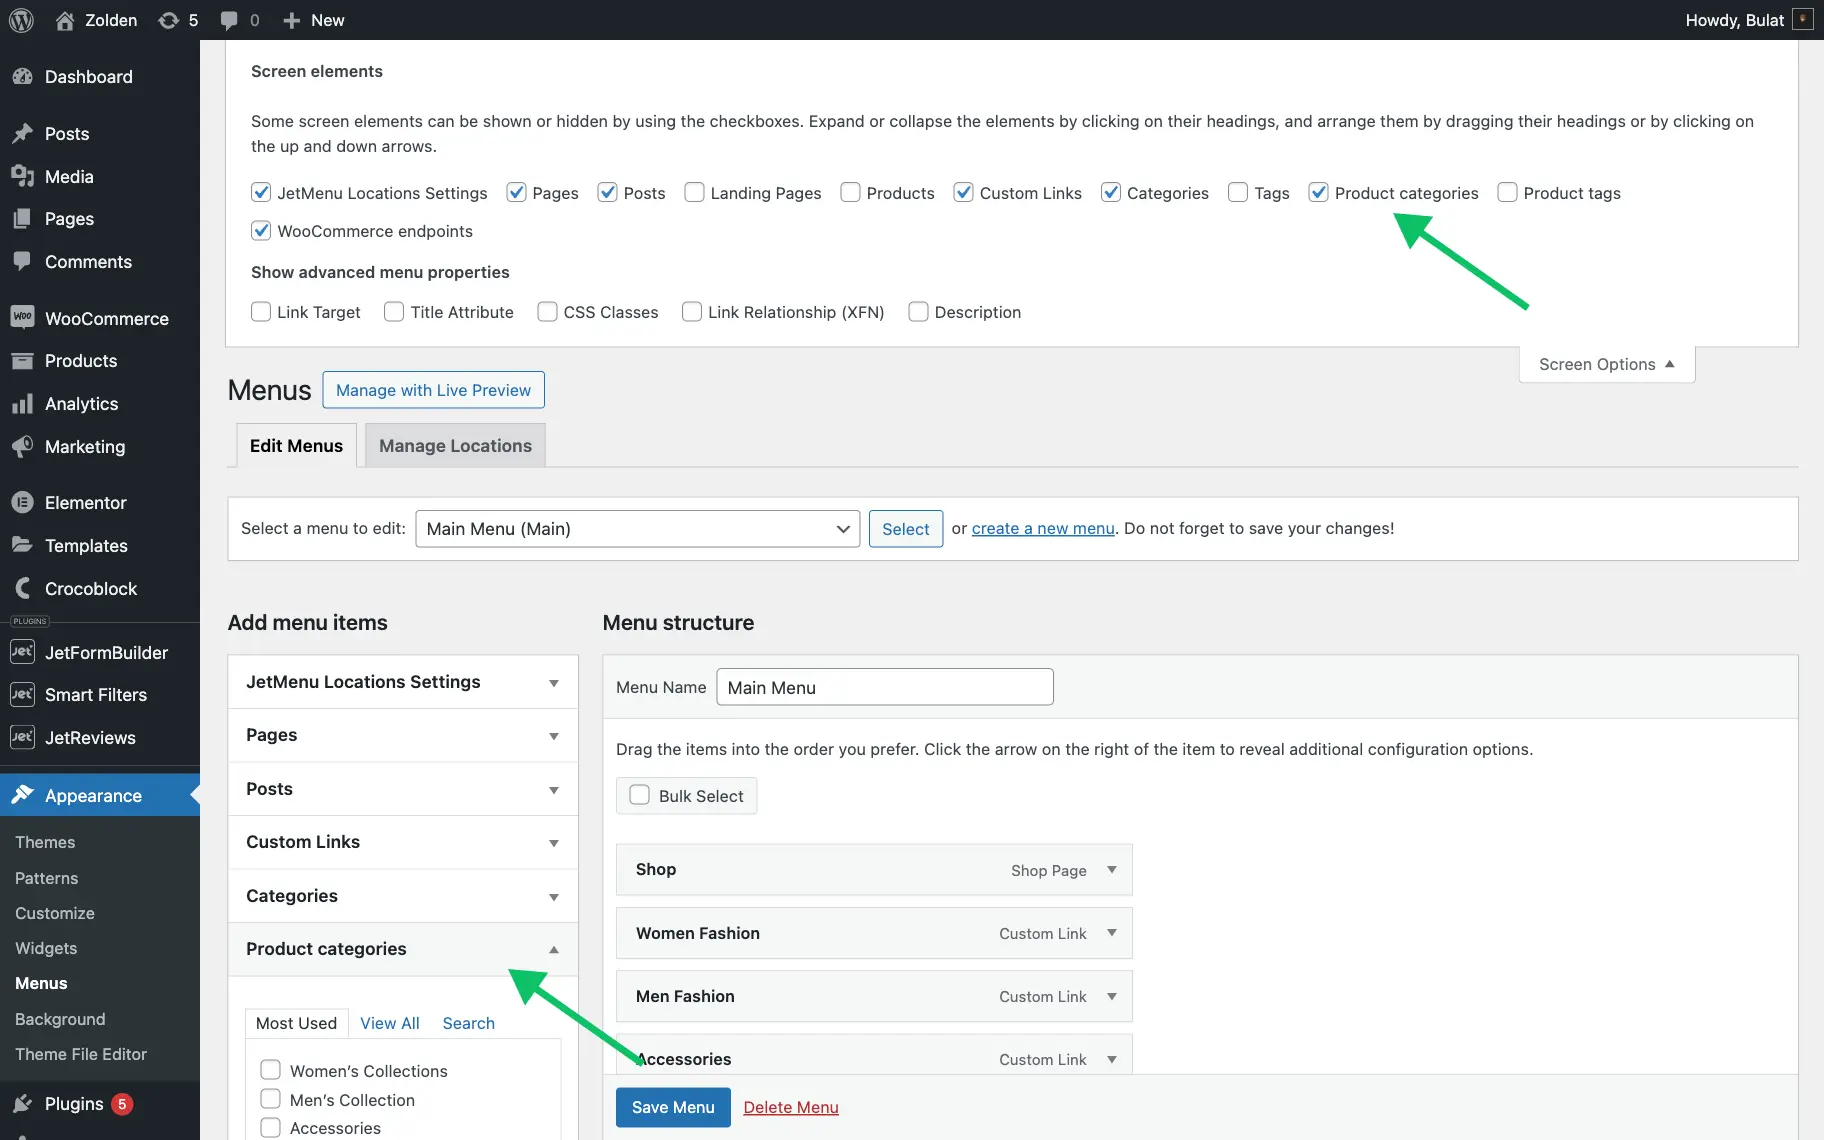
Go to the WordPress dashboard. Click on Appearance, then Menus. Choose the menu you want to edit. On the left, find the Product Categories box. Check the categories you want to add. Click Add to Menu. Drag and drop to arrange them. Save the menu when finished.
Organizing Categories In Menus
Arrange categories in logical order. Group similar categories under one menu item. Use submenus for better structure. This makes navigation simple and clear. Visitors can find products without confusion.
Customizing Menu Category Labels
You can change category names in menus. Click the arrow next to a menu item. Edit the Navigation Label field. Use clear and simple words. This helps visitors understand the category quickly.
Tips For Organizing Categories
Organizing product categories improves user experience and site structure. Clear categories help visitors find products faster. Well-organized categories also boost SEO by making your site easier to crawl. Follow these tips to keep your categories clean and useful.
Use Clear And Simple Category Names
Choose names that describe the products well. Avoid complex words or jargon. Simple names help users understand your products quickly. Keep category names short and direct.
Create A Logical Hierarchy
Arrange categories from general to specific. Use parent and child categories for better structure. This helps users navigate through your products easily. A clear hierarchy also improves site indexing by search engines.
Limit The Number Of Categories
Too many categories can confuse visitors. Stick to a manageable number that covers all products. Group similar items under broader categories. This keeps your site clean and easy to use.
Use Consistent Naming Patterns
Keep category names consistent in style and format. Use singular or plural forms consistently. This creates a professional and organized look. Consistency also helps search engines understand your site better.
Regularly Review And Update Categories
Check your categories often to remove duplicates or outdated ones. Add new categories as your product range grows. Regular updates keep your site relevant and user-friendly.
Credit: docs.themeisle.com
Frequently Asked Questions
How Do I Create A Product Category In WordPress?
Go to your WordPress dashboard, navigate to Products > Categories. Enter the category name, slug, and description. Click “Add New Category” to save it.
Can I Add Subcategories Under Product Categories?
Yes, you can add subcategories by selecting a parent category while creating a new product category. This helps organize products better.
How Do Product Categories Affect Seo In WordPress?
Product categories improve site navigation and help search engines understand your site structure, boosting SEO and user experience.
Where Do Product Categories Appear On My WordPress Site?
Product categories appear on product pages, category archive pages, and can be displayed in menus or widgets for easy browsing.
Conclusion
Adding product categories in WordPress helps organize your online store. It makes finding products quick and easy for visitors. Clear categories improve user experience and boost site navigation. Keep your categories simple and relevant to your products. Regularly update categories to match your store’s growth.
This small step can make a big difference in managing your store. Start adding categories today to keep your site neat and user-friendly.


