
Are you looking to host your web service on GoDaddy but unsure where to start? You’re in the right place!
GoDaddy is a popular choice for hosting due to its reliability and user-friendly interface. Whether you’re launching a personal blog or a business website, GoDaddy offers tools and features to get your site up and running smoothly. We’ll guide you through the steps to host your web service on GoDaddy.
You’ll discover tips that simplify the process, making it easy even if you’re a beginner. So, let’s dive in and unlock the secrets to a seamless hosting experience with GoDaddy. Keep reading to empower yourself with the knowledge you need to succeed online!
Credit: www.godaddy.com
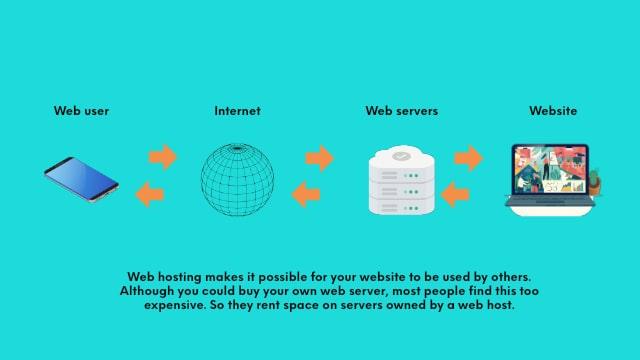
Choosing A Web Hosting Plan
Shared hosting is a popular choice. Many websites use it. It is budget-friendly. You share resources with others. Good for small websites. Easy to set up and use. Perfect for beginners. Keeps costs low. Limited control over server settings. Resources are shared among users.
VPS stands for Virtual Private Server. Offers more control than shared hosting. Resources are dedicated. More flexibility for users. Suitable for growing websites. Better performance and security. Costs more than shared hosting. Allows custom server configurations. Ideal for medium-sized sites.
Dedicated servers provide full control. No sharing with others. Best for large websites. Offers highest performance. Maximum security features. Most expensive option. Requires technical skills to manage. Ideal for high-traffic sites. Provides ample resources.
Credit: www.godaddy.com
Setting Up Your Domain
First, visit the GoDaddy website. You need to find the domain search bar. Type your desired domain name. Click search to see if it’s available. If it is, click “Add to Cart”. Then proceed to checkout. Follow the steps to make the payment. Now, the domain is yours!
Go to your GoDaddy account. Find the section for managing domains. Click on your domain name. Look for DNS settings. You may see a list of DNS records. Edit the records to point to your web hosting server. Save the changes. Your domain is now connected!
Accessing Godaddy Control Panel
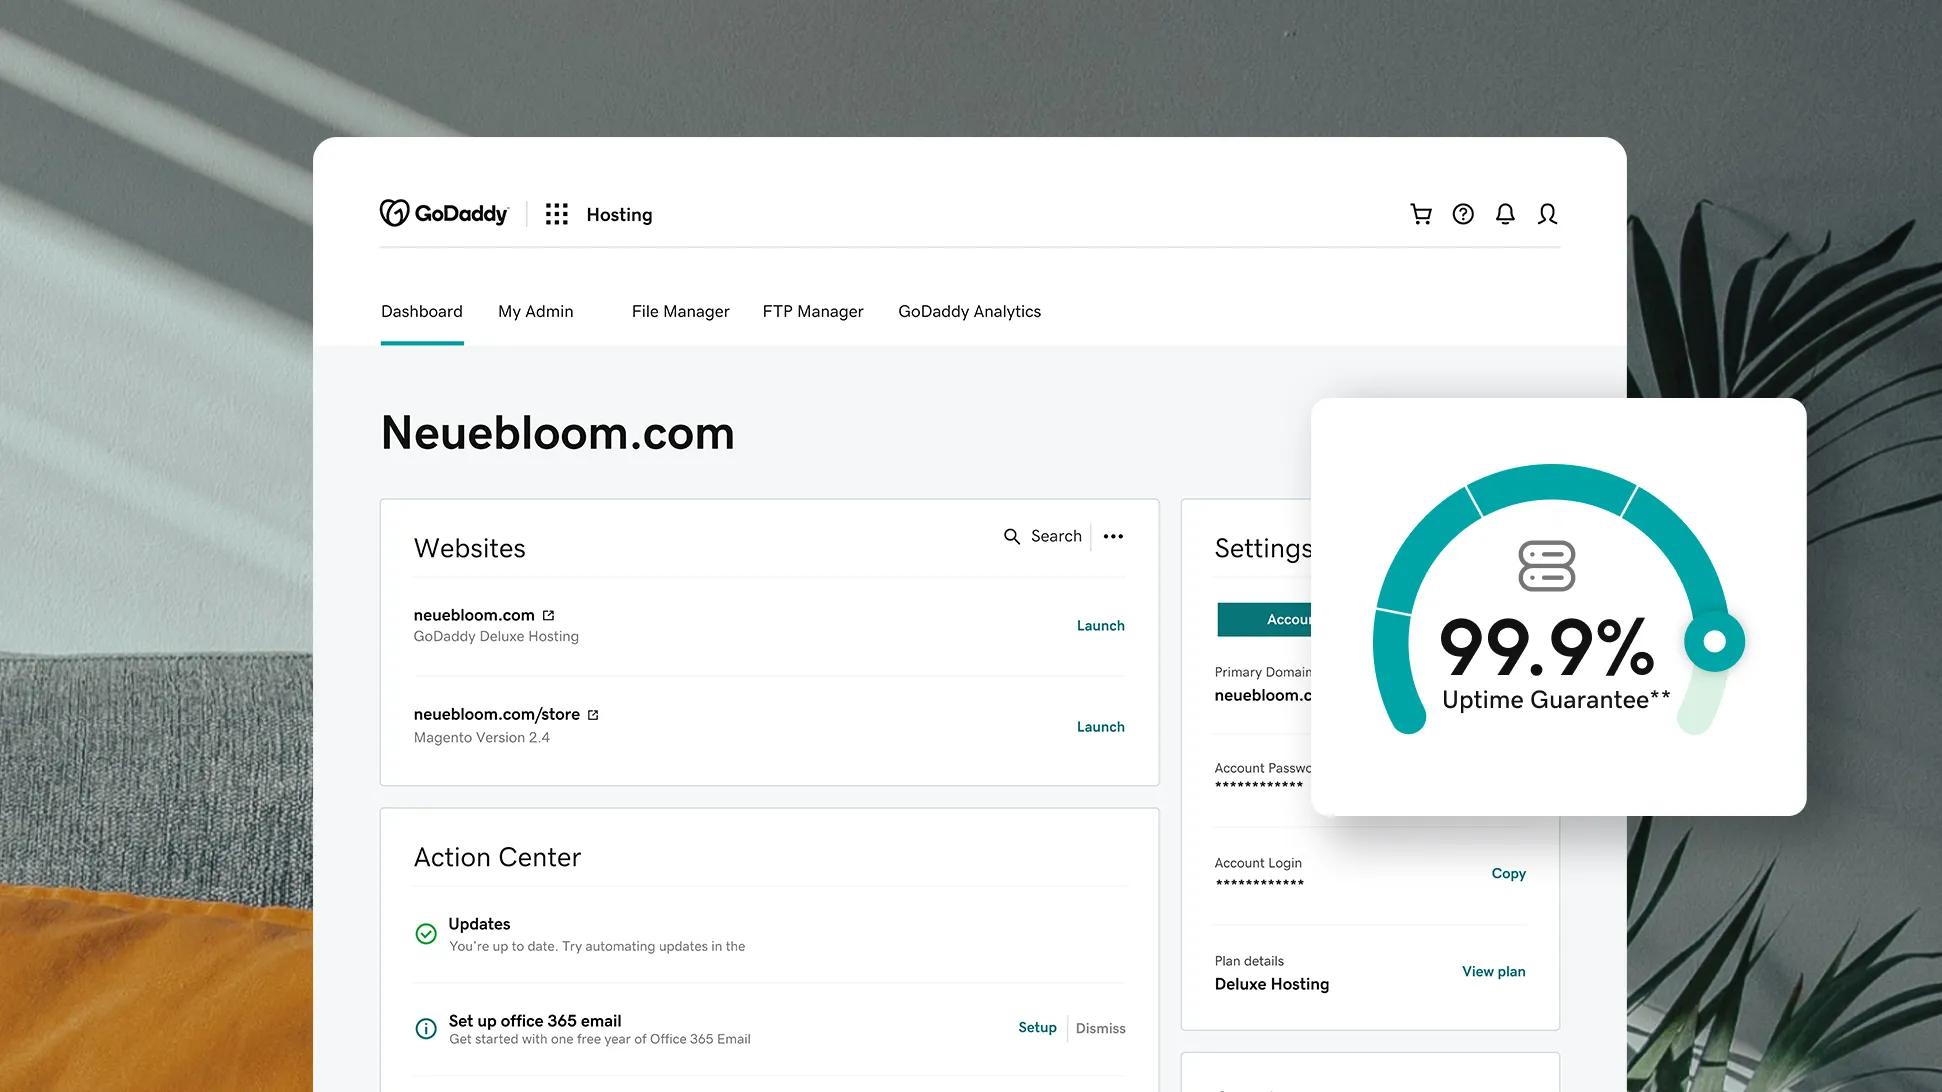
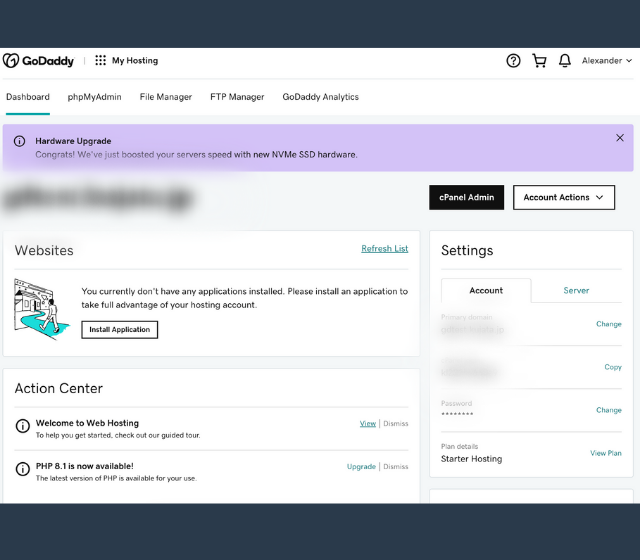
First, log in to your Godaddy account. Use your username and password. Once logged in, find the Dashboard. It’s on the main screen. The dashboard shows all your products. Click on the Hosting option. This helps you manage your web services. The dashboard is easy to use. Just follow the icons and labels. Each icon has a purpose. Hover over them for more details.
Godaddy has many features. Domain management is important. You can add or remove domains. SSL certificates keep your site safe. Email setup is also available. Create business emails easily. Use the file manager to upload files. You can also backup data. These features help run your website smoothly. Explore each feature carefully. It will help you later.
Uploading Web Service Files
FTP helps move files to your website. Use an FTP client like FileZilla. Enter your GoDaddy credentials. Connect to your server. Drag your web files to the server panel. Wait for the files to upload. Ensure all files are transferred. Check if your website works.
File Manager is found in your GoDaddy account. Log in to your GoDaddy account. Find the File Manager tool. Click to open it. Upload files by clicking the upload button. Select all needed files. Wait for upload to finish. Refresh your site to see changes.
Database Configuration
Start by logging into your Godaddy account. Find the database section in the hosting panel. Click on create new database. Choose a name for your database. Make sure it is easy to remember. Set up a username and password for security. Write these details down. You will need them later.
Use your web service platform. Go to its database settings. Enter the database name you created. Input the username and password. These are the ones from Godaddy. Double-check the details. Make sure they are correct. Click connect to link your service. Wait for the confirmation message. Your web service is now connected to the database.
Ssl Certificate Setup
Buying an SSL certificate is easy. First, log in to your GoDaddy account. Next, find the SSL certificates section. Choose the certificate that fits your needs. Prices might vary. Pay for the certificate and wait for the confirmation email. This email will have important details. Keep it safe.
After buying the SSL, it’s time to install it. Go to your GoDaddy dashboard. Find the SSL option and click install. Follow the steps given on the screen. Ensure you enter all details correctly. Once installed, activate the certificate. This step is crucial for security. Your website will now be secure. Look for the padlock icon in the address bar.
Testing Your Web Service
Hosting your web service on GoDaddy starts with choosing the right plan. Follow their step-by-step guide to set up. Ensure to configure DNS settings properly for seamless connectivity and test your web service to verify it’s working correctly.
Verifying Functionality
Start by checking your web service. Ensure it works smoothly. Open the service and test every feature. Make sure each part is running correctly. Look for errors or problems. Fix them promptly. Use different devices for testing. Tablets, computers, and phones. This ensures your service is accessible everywhere. Test with various browsers. Chrome, Firefox, and Safari are popular. This covers most users. Confirm that responses are quick. Users dislike slow services. Speed is crucial. Check user input. Make sure forms capture data correctly. Monitor data flow. Ensure it reaches the server properly. Verify the service’s output. Is it correct and clear? Test repeatedly. Regular checks ensure quality.
Ensuring Security
Security is vital. Protect your web service from threats. Use strong passwords. Change them often. Encrypt data for safety. Encryption keeps information private. Secure the server. Install firewalls and antivirus software. They block harmful attacks. Regularly update security systems. New threats appear frequently. Stay prepared. Monitor access logs. Look for unusual activity. Unauthorized access is a red flag. Limit user permissions. Only give access to necessary areas. Backup data regularly. Avoid data loss during attacks. Train staff on security practices. Awareness prevents mistakes. Review security policies often. Update them to tackle new challenges.
Credit: www.godaddy.com
Troubleshooting Common Issues
Hosting a web service on GoDaddy can be tricky. Understanding server settings and domain configurations is crucial. Ensure proper DNS setup for seamless integration.
Resolving Connection Problems
Connection problems can be frustrating. Check if the server is up. Make sure the IP address is correct. Verify the DNS settings. These settings must point to your server. Look at your firewall settings. Sometimes, firewalls block connections. Ensure ports are open. Port 80 is important for web traffic. Test the connection using a simple tool. Ping can help. If the ping fails, there’s a problem. Try restarting the server. Often, this fixes issues.
Fixing Database Errors
Database errors can stop your web service. Check the database connection string. It must be correct. Verify the username and password. Mistakes here can cause problems. Look at the database server status. Ensure it’s running. Review the database logs. Logs can show error details. Fix any errors shown. If the database is full, clear some space. Disk space is crucial for operation. Restart the database service if needed. This often resolves issues.
Frequently Asked Questions
How Do I Host A Godaddy Web Api?
To host a GoDaddy Web API, purchase a hosting plan. Upload your API files through cPanel or FTP. Configure DNS settings to point to your domain. Ensure your server environment supports the API. Test the API to confirm it’s running smoothly.
Is Godaddy Good For Website Hosting?
GoDaddy offers reliable hosting services with various plans to suit different needs. Its user-friendly interface and 24/7 customer support make it a popular choice. Some users report occasional uptime issues, but overall, it provides good value for small to medium-sized websites.
Always compare features before choosing a hosting provider.
How To Make A Website Live On Godaddy?
To make your website live on GoDaddy, log in to your account, select “My Products,” and choose your domain. Click “Manage” and upload your website files using File Manager or connect through FTP. Ensure DNS settings are correctly configured. Test the site by entering your domain in the browser.
How To Deploy Code On Godaddy?
Deploy code on GoDaddy by accessing the hosting account via FTP or SSH. Upload your files using an FTP client. Ensure your domain points to the correct directory. For databases, use GoDaddy’s phpMyAdmin to import data. Test your website to confirm successful deployment.
Conclusion
Hosting a web service on GoDaddy is straightforward. You start by choosing the right plan. Then, set up your domain and server. Follow the easy steps to install your web service. Troubleshooting is simple with GoDaddy’s support. Regular updates keep your service running smoothly.
Security measures protect your data and users. Remember, a well-maintained site attracts more visitors. Keep your website engaging and user-friendly. With GoDaddy, you get reliability and ease. Hosting a web service doesn’t have to be complicated. Enjoy your journey on GoDaddy today.


