
Have you ever struggled with uploading images to your GoDaddy web hosting account? You’re not alone.
Many users find themselves scratching their heads when trying to navigate the process. But worry not; this guide is here to help you. By the end of this article, you’ll have the confidence and know-how to effortlessly upload your images, making your website visually appealing and engaging for your audience.
Imagine the feeling of satisfaction as you see your site come to life with vibrant visuals that captivate your visitors. Let’s dive in and make your website shine!
Credit: www.godaddy.com
Accessing Godaddy Dashboard
First, visit the Godaddy website. Enter your username and password. Click the “Sign In” button. Now, you’re inside your account.
Look for the “My Products” tab. Click on it. Scroll down to find “Web Hosting”. Click the “Manage” button next to your hosting. This takes you to your hosting dashboard.
Preparing Images For Upload
Pick the right image format for your needs. JPEG is good for photos. PNG is great for graphics with clear lines. GIF is for simple animations. Each format serves a unique purpose. Know what you need before you start.
Keep images small for fast loading. Large files slow down websites. Use tools to compress images. Smaller images save space and speed up loading. Fast websites make users happy. Always aim for the smallest size possible without losing quality.
Using File Manager
First, log in to your GoDaddy account. Look for the “My Products” page. Find your hosting account. Click “Manage” next to it. You will see the cPanel dashboard. Search for “File Manager” icon. Click it to open the tool. It’s easy to find. Usually under the “Files” section.
In the File Manager, choose the “public_html” folder. This is where your website files are. Open the folder you want to put images in. Click the “Upload” button on top. Select the images from your computer. Wait for the upload to finish. You can see the progress. Once done, your images are on your website. It’s quick and simple.
Uploading Via Ftp
Uploading images to GoDaddy hosting via FTP is straightforward. Begin by accessing your hosting account and navigating to the FTP manager. Use an FTP client to connect and transfer your image files to the server, ensuring they are placed in the correct directory for website display.
Setting Up Ftp Client
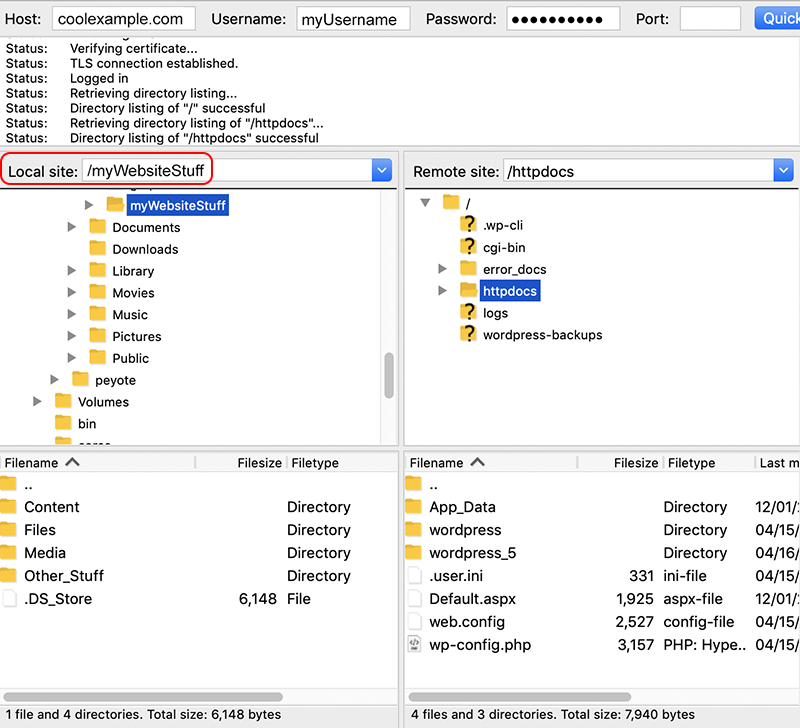
First, download an FTP client like FileZilla. It is free and easy to use. Install it on your computer. Open the FTP client. Enter your FTP credentials. You can find these in your GoDaddy account. Look for the FTP settings. Enter the host, username, and password. Click connect. Now, you are ready to upload files.
Transferring Images With Ftp
Find the folder on your computer. It should have the images you want to upload. In the FTP client, find the remote site section. This shows your website files. Drag and drop the images from your computer to the remote site. This uploads them to GoDaddy. Wait for the transfer to complete. Check if the images are on your website. If they are there, you are done!
Embedding Images In Web Pages
Images need a web address. This is the URL. To find it, upload the image to your hosting. Use Godaddy’s control panel. Right-click the image. Choose “Copy Image Address.” This gives you the URL. Keep this URL safe. You will use it in your HTML code.
The HTML code is simple. Use the
Troubleshooting Common Issues
Uploading images to GoDaddy web hosting can sometimes be tricky. Ensure your file format is supported and check your internet connection. For large files, compress them before uploading to save bandwidth.
Resolving Upload Errors
Image upload can sometimes fail. Check the file size first. Large files may not upload. Reduce the size if needed. Ensure the file format is correct. Use JPEG or PNG. Double-check the internet connection. A weak connection can cause errors. Make sure the server permissions allow uploads. Contact support if unsure.
Checking Image Display Problems
Images not displaying? Check the file path. It must be correct. Ensure images are in the right folder. Verify the URL used is correct. Browser cache might show old images. Clear it to see updates. Make sure the image names have no spaces. Use underscores instead.
Maintaining Image Quality
Good image quality is important for websites. High-quality images look clear and sharp. Blurry images can make your site look bad. Use images that are not too big in size. Large files take longer to load. This can slow down your site. Keep images under 1MB if possible. Use tools to compress images. This helps keep them clear while reducing size.
Fast load times keep users happy. Slow images can make visitors leave. Check how fast your images load. Tools online can help you with this. Load times should be under 3 seconds. Use smaller image sizes to speed things up. Lazy loading helps with fast loading. This loads images only when needed.
Responsive images fit on all devices. They look good on phones and computers. Use code that makes images adjust to screen size. HTML and CSS can help with this. Try using the ‘srcset’ attribute in HTML. This helps choose the right image size. Websites with responsive design work better. Everyone can see images clearly.

Credit: freshroastedhosting.com

Credit: klavenj.medium.com
Frequently Asked Questions
How Do I Add Images To My Godaddy Website?
Log in to GoDaddy, select “Edit Site,” click “Add Section,” choose “Image,” and upload your image. Save changes.
How Do I Upload Files To Godaddy Web Hosting?
To upload files to GoDaddy hosting, use the cPanel File Manager. Log in to your GoDaddy account, navigate to “My Products,” and select “Web Hosting. ” Click “Manage,” access “cPanel,” and select “File Manager. ” Use the “Upload” option to transfer your files.
How Do You Upload An Image To Your Website?
First, log into your website’s admin panel. Click “Media” or “Images”, then “Upload”. Choose your image file and hit “Submit”. Ensure the image is optimized for web use. Finally, add alt text for SEO.
How Do I Add Content To My Godaddy Website?
Log into your GoDaddy account. Select “Edit Website” on your dashboard. Click “Add” to insert new content. Use the provided tools to format text, images, and media. Save changes to update your site.
Conclusion
Uploading images to your GoDaddy hosting is quite simple. Follow the steps carefully. Always choose the right file type for images. Ensure your files are optimized for web use. Double-check your uploads for errors. Proper image naming helps in search visibility.
Regular updates keep your website fresh. Remember to back up your files. Explore GoDaddy’s support resources for extra help. With these tips, managing images becomes easier. Keep practicing and you’ll gain confidence. Your website’s visuals will shine and attract visitors.


