
Imagine your website running smoothly, efficiently, and securely, all thanks to the power of virtual hosts. If you’ve ever felt overwhelmed by the technical jargon surrounding web servers, you’re not alone.
But here’s the good news: creating a virtual host doesn’t have to be a headache. In fact, it can be a straightforward process that empowers you to manage multiple domains on a single server effortlessly. Whether you’re a web developer, a small business owner, or someone with a keen interest in tech, understanding how to create a virtual host can be a game-changer.
It can enhance your site’s performance, improve security, and even save you money. Curious about how to get started? Stick around, and you’ll discover step-by-step guidance, valuable insights, and practical tips tailored just for you. Unlock the full potential of your web server and take control of your digital presence with confidence.
Understanding Virtual Hosts
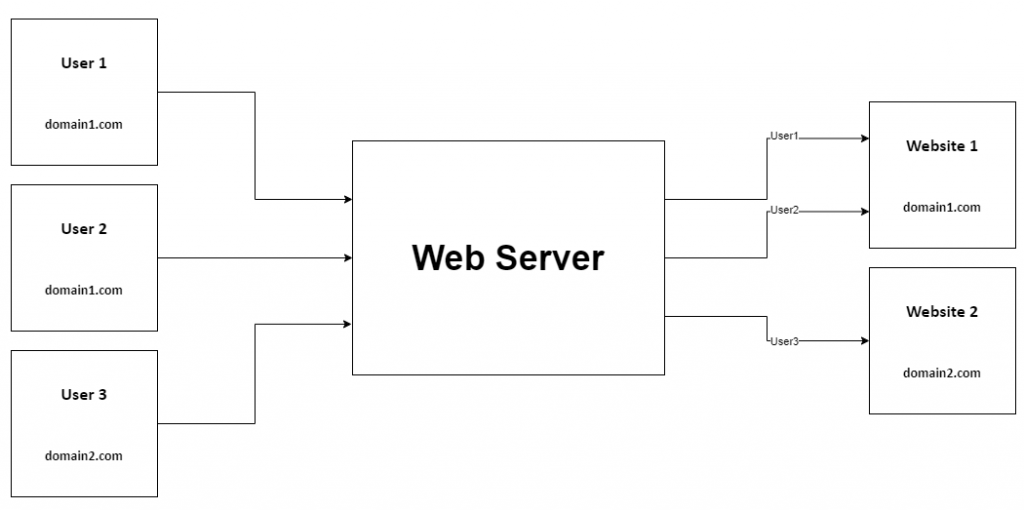
Virtual hosts help run multiple websites on one server. They make it cost-effective and efficient. A single server can host many domains. Each domain feels like it has its own server. This helps in better resource management. It also saves money. No need for many servers. Just one can do the job.
There are mainly two types of virtual hosts. Name-based and IP-based. Name-based virtual hosts use domain names to distinguish sites. This is common and simple. IP-based hosts use different IP addresses. Each site has its own IP. This is less common. Name-based is easier for most users.
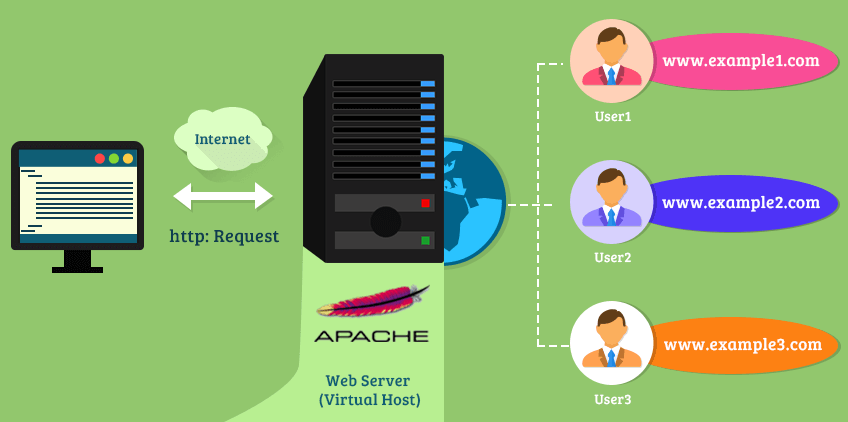
Credit: medium.com
Preparation Before Setup
Ensure your computer meets the system requirements. You need a reliable operating system. This can be Windows, Linux, or MacOS. Your system should have at least 4GB of RAM. A stable internet connection is crucial. Also, check for sufficient storage space. This helps in storing files and data. A text editor like Notepad++ or Sublime Text is useful.
A domain name is essential for your virtual host. Register a unique name with a domain registrar. Use services like GoDaddy or Namecheap. After registration, configure the DNS settings. Point the domain to your web server’s IP address. This ensures your site is reachable online. Make sure the domain name is easy to remember. Avoid using complex or long names.
Setting Up Virtual Hosts In Apache
Apache is a popular web server. It helps run many websites. Begin by installing Apache on your computer. Use a package manager like apt or yum. Type sudo apt-get install apache2 in the terminal. It will download and set up Apache for you. Make sure the installation is complete. Check the status with sudo systemctl status apache2. The server should be running now.
Apache can host many sites. This is done with virtual hosts. Each site needs its own configuration file. These files are in the /etc/apache2/sites-available/ directory. Copy the default config file. Use sudo cp 000-default.conf mysite.conf. Edit mysite.conf to match your site. Change the DocumentRoot and ServerName values. Save the file when done.
It’s important to test your settings. Apache has a tool for this. Run sudo apache2ctl configtest in the terminal. It checks for errors in your files. Fix any issues it finds. When everything is okay, restart Apache. Use sudo systemctl restart apache2. Your virtual host is now active. Visit the site in your web browser. It should show your new setup.
Credit: www.liquidweb.com
Setting Up Virtual Hosts In Nginx
First, open the terminal on your computer. Type sudo apt update and press enter. This command updates your system. Next, type sudo apt install nginx. Press enter again. This command installs Nginx. Wait for the installation to finish. Now, Nginx is ready on your system.
Nginx uses server blocks to host websites. Go to the /etc/nginx/sites-available/ directory. Create a new file for your site. Name it after your domain. Use the command sudo nano yourdomain.com. Copy a basic configuration into the file. Change the server_name to your domain. Save the file and exit. Now, create a link to sites-enabled with sudo ln -s /etc/nginx/sites-available/yourdomain.com /etc/nginx/sites-enabled/.
It’s time to test your setup. Type sudo nginx -t in the terminal. This checks for errors. If everything is okay, restart Nginx. Use the command sudo systemctl restart nginx. Open your browser and type your domain. If you see your page, you did it right. Now, your virtual host is live.
Common Challenges
Troubleshooting Configuration Errors can be tricky for many. Virtual hosts need accurate settings. A small mistake can cause issues. Always check your configuration files. Look for missing or wrong entries. Syntax errors are common. They prevent the server from working. Tools are available to verify your settings. They help find errors fast. Fix errors as soon as you find them. This keeps your server running smoothly.
Resolving Domain Name Issues is essential. Incorrect domain settings cause problems. The server might not recognize the domain. Ensure the domain points to the right server. Check DNS settings carefully. Updates might take time. Sometimes, a simple typo causes errors. Double-check your domain name entries. Correct them if needed. Proper domain settings help users find your site easily.
Security Best Practices
Setting up a virtual host on a web server enhances website organization and management. Start by accessing the server configuration files. Follow the steps to define server names and document roots, ensuring each site operates independently. This practice boosts efficiency and security, helping manage multiple domains seamlessly.
Ssl/tls Configuration
SSL/TLS keeps data safe. It encrypts information between users and servers. Always use the latest version. This protects against many threats. A strong certificate is vital. It assures users they are on the right site. Regular updates are essential. They keep security measures strong. Avoid weak ciphers. They make data vulnerable.
Access Control Measures
Limit who can access your server. Only trusted people should have access. Use strong passwords for all accounts. Change them regularly. Enable two-factor authentication. It adds an extra layer of security. Review access logs often. Look for any unusual activity. This helps catch threats early.
Performance Optimization
Assigning resources wisely is key. Memory and CPU must be balanced. Allocate more RAM for busy sites. Less active sites need less. Monitor usage. Adjust if needed. This keeps the server fast. Avoid overloading. It can slow everything down.
Use caching to make sites load faster. Store data temporarily. Cache stores images and files. Users get them quickly. This saves time. Reduces server load. Update cache regularly. Old files slow down sites. Keep cache clean for best speed.

Credit: www.ricmedia.com
Monitoring And Maintenance
Creating a virtual host allows you to host multiple websites on a single web server. Regular monitoring ensures each site runs smoothly, while maintenance helps prevent downtime and optimize performance. Efficiently managing virtual hosts enhances server utility, making it ideal for managing diverse web projects.
Log Analysis
Logs are like diaries for computers. They tell what happens on a server. Reading logs helps find problems. It shows where errors come from. Logs can show traffic patterns. This means knowing when users visit. It helps with security checks. Tracking logs make servers safer. Look at logs often. This keeps servers running well.
Regular Updates
Updating software is important. It fixes bugs. It makes servers better. New features come with updates. They improve server performance. Security patches protect from hackers. Updates should happen regularly. This keeps data safe. Regular updates mean fewer problems. It makes web hosting easier.
Frequently Asked Questions
How Do I Create A Virtual Host?
To create a virtual host, first edit your server configuration file. Define a new virtual host block specifying domain, directory, and port. Then, update your hosts file with the domain name. Finally, restart the server to apply changes. Ensure DNS settings point to your server’s IP.
What Is A Virtual Host In A Web Server?
A virtual host allows a single web server to host multiple websites. Each site appears independently with its own domain. This technique saves resources and simplifies management, enhancing server efficiency and scalability. Virtual hosting is commonly used for shared hosting environments and supports multiple domain handling on one IP address.
How To Create A Virtual Hostname In Windows?
Edit the “hosts” file in “C:WindowsSystem32driversetc” to create a virtual hostname. Add the IP address followed by the desired hostname. Save changes and restart your network connection for the hostname to take effect. Ensure administrative privileges to modify system files.
How To Create A Virtual Server?
To create a virtual server, choose a cloud provider like AWS or Google Cloud. Select the desired server specifications. Configure the operating system and network settings. Deploy the server and access it using the provided credentials. Ensure security by setting up firewalls and regularly updating the software.
Conclusion
Creating a virtual host is simple and essential. It helps manage multiple sites on one server. Follow the steps carefully. Start with understanding your server configuration. Then, set up directories and configure host files. Test everything to ensure it works correctly.
Troubleshooting is important if issues arise. This process boosts website management efficiency. Keep learning and practicing. Your skills will grow with time. Implement these steps today. Enjoy smoother website operations. Happy hosting!


