
Are you ready to showcase your web application to the world but feeling a bit overwhelmed by the technical details? Hosting your web application in IIS 8 might seem like a daunting task, but it doesn’t have to be.
Imagine the satisfaction of seeing your hard work live and accessible to users everywhere. This article is designed with you in mind, offering clear, straightforward steps to make the process as smooth as possible. Whether you’re a tech enthusiast or a business owner looking to expand your digital presence, mastering IIS 8 will empower you to take control of your web hosting needs.
Dive in, and discover how you can efficiently host your web application, ensuring it runs seamlessly and effectively. Your journey to a successful web application launch starts here.

Credit: learn.microsoft.com
Prerequisites
A good computer is needed. It should have a fast processor. At least 2 GHz speed is fine. Make sure you have 2 GB RAM. More is better. Free disk space is also important. Try to have at least 10 GB free. This helps for smooth running. A stable internet connection is a must. It helps in downloading and updates. Make sure your operating system is Windows Server 2012 or later. This is important for IIS 8 compatibility. Ensure your system is updated. This keeps it secure and fast.
Installing IIS 8 is the first step. This is available in Windows. No need to download separately. Use the Control Panel to install it. Next, make sure to have .NET Framework. This helps run web apps smoothly. Version 4.5 or later is needed. Check if ASP.NET is enabled in IIS. This is crucial for many web apps. A good text editor like Notepad++ can be useful. It helps in editing code easily.
Installing Iis 8
First, open the Server Manager on your Windows server. It’s usually found in the Start menu or search bar. Server Manager helps you manage server roles and features. It’s a central place for server operations. It’s essential for installing IIS.
Inside Server Manager, click on Add Roles and Features. This wizard guides you through adding new roles. Select IIS from the list. Follow the steps carefully. Each step is important. Ensure all necessary features are checked.
After adding the IIS role, configure its features. Choose Default settings if unsure. Adjust settings based on your needs. Some features enhance security. Others improve performance. Configure them wisely. They affect how your web application runs.
Preparing Your Web Application
Organize your application files neatly. Keep HTML, CSS, and JavaScript in separate folders. Name folders clearly. It helps you find files fast. Use a folder for images and another for scripts. Place your main file at the root. Ensure all files are linked correctly. This structure aids in easy management. Good organization saves time. It avoids confusion.
Set up your database carefully. Choose SQL Server or MySQL. Create tables for your data. Use clear names for tables and columns. Connect the database to your application. Test the connection. Ensure it works properly. A good configuration prevents errors. It keeps your data safe and accessible. Always back up your database. Backup protects your data.
Credit: knowledge.digicert.com
Deploying The Web Application
Start by opening the IIS Manager. You will see a list of sites. Click on “Add Website”. A window will pop up. Enter the site name. Choose a physical path for your files. Make sure the path is correct. Click OK to create your site. Your site is now listed in IIS.
An application pool keeps apps separate. This is for better management. Choose or create a new pool. Right-click the site name. Select Manage Application, then Advanced Settings. Find Application Pool. Select your chosen pool. Click OK to save.
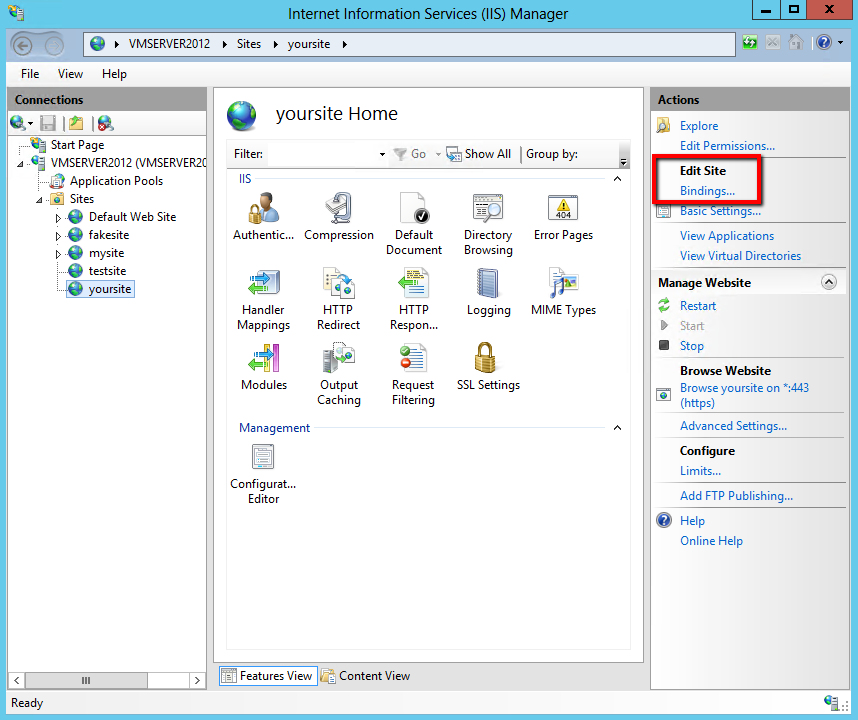
Bindings connect your site to the network. Right-click your site. Choose “Edit Bindings”. A window will appear. Click Add. Choose type like HTTP or HTTPS. Enter the port number. Set a hostname if needed. Click OK to finish. Your site is now ready!
Configuring Application Settings
Setting Up Application Pool is crucial. Choose the right pool for your app. Each pool runs separately. This helps with security and performance. Make sure your pool uses the correct .NET version. This ensures compatibility with your app. Adjust the pool’s settings for your needs. Set the idle timeout to save resources. Use recycling settings to keep the app fresh. These steps enhance the app’s reliability.
Configuring Authentication secures your app. Enable Windows authentication for intranet apps. Use basic authentication for simple access. This is suitable for smaller apps. Enable anonymous access if needed. This allows users without login access. Set permissions carefully to protect data. Always test authentication settings. Ensure users can access as intended.
Enabling Directory Browsing makes files visible. Users can see folders and files. It helps in debugging and testing. Use it only when necessary. Keep important files hidden for safety. Enable browsing for specific folders. This limits access to sensitive data. Always review settings before enabling. This keeps the app secure and efficient.
Testing The Deployment
Check the web application on the browser. Enter the URL to see the app. The homepage should load quickly. If it does not, there might be issues. Firewalls or network settings could block access. Adjust settings if needed. Ensure the server is running. Without it, the app won’t work. Confirm no error messages appear. All pages should be reachable. If a page is missing, check the links. They might be broken or incorrect.
Test each feature of the app. Click every button to ensure they work. Input data in the forms. See if it saves correctly. Check the database for updates. Verify the login function. Use valid and invalid details. The app should handle errors well. Make sure graphics load properly. Broken images can confuse users. Test on different browsers. Each browser may behave differently.
Troubleshooting Common Issues
Setting up web applications on IIS 8 often involves tackling common issues. Solving these problems can ensure smooth hosting. Ensure correct configurations and permissions to avoid errors.
Resolving Permission Errors
Permission errors can stop your web app. Set correct permissions on folders. Make sure the IIS user has access. Use the right account to run the app. Check web.config for any restrictions. Misconfigured settings can cause errors. Always verify settings after changes.
Addressing Application Crashes
Application crashes are frustrating. Check the event logs for errors. Logs can show what went wrong. Update your app to the latest version. Old versions can have bugs. Examine your code for mistakes. Debugging tools can help find problems. Ensure the server has enough resources. Low resources can cause crashes.
Enhancing Security
Hosting a web application in IIS 8 enhances security by leveraging built-in features like authentication and authorization. Regular updates and proper configuration ensure robust protection against threats. Always monitor and adjust settings to maintain a secure environment for your applications.
Implementing Ssl
SSL encrypts data between the server and users. This keeps information safe from hackers. Use a trusted SSL certificate provider. Install the certificate on your server. Follow the steps given by your provider. It may involve downloading files. Or configuring settings in IIS. After installation, check if SSL is working. Use online tools to verify the encryption. Make sure the connection is secure. This builds trust with users. They feel safe on your site.
Configuring Firewall Rules
A firewall is like a security guard for your server. It blocks unwanted visitors. Configure rules to allow only specific traffic. Start by identifying safe sources. List them in your settings. Block all other sources. This prevents harmful data from entering. Regularly update firewall rules. Keep out new threats. Use simple rules for easy management. Too many rules can be confusing. Check logs to see blocked attempts. This helps you know what’s happening. Adjust settings as needed.
Optimizing Performance
Hosting a web application in IIS 8 improves performance with proper configuration. Set up involves adding the application to the server and adjusting settings for optimal speed and security. Regular monitoring helps maintain efficiency and reliability.
Enabling Compression
Compress files to make them smaller. Smaller files load faster. This helps your website run better. Use IIS 8 to turn on compression. Go to the IIS Manager. Click on your site. Look for Compression in the Features View. Check both static and dynamic compression boxes. This saves bandwidth and boosts speed. Users will notice the difference.
Managing Caching Settings
Caching helps load content faster. It stores data in a temporary place. With IIS 8, you can manage caching easily. Find the Output Caching option in the IIS Manager. Set the caching rules. Choose how long to keep files cached. This reduces server load. Makes your site quicker. Better performance keeps visitors happy.
Credit: www.c-sharpcorner.com
Frequently Asked Questions
How To Host A Web Application In Iis?
Install IIS via Control Panel. Open IIS Manager and add a new site. Set the physical path to your application directory. Bind the site to a port. Ensure ASP. NET is enabled. Configure application pool settings. Test by accessing the site URL in a browser.
How To Run An Application From Iis?
To run an application from IIS, first install IIS and configure your application. Add the application to a site, set permissions, and ensure the application pool is properly configured. Test the application by accessing its URL in a web browser.
Ensure all dependencies and settings are correctly configured for optimal performance.
Where Is The Application Host File In Iis?
Find the application host file in IIS at the path: C:WindowsSystem32inetsrvconfigapplicationHost. config. It stores global settings and configurations. Always backup this file before making changes to ensure system stability and quick recovery.
How To Host Web Api In Iis Step By Step?
To host a web API in IIS, first, install IIS on your server. Open IIS Manager, then create a new website. Set the site path to your API folder. Configure bindings and authentication settings. Click “Start” to host your API.
Ensure firewall settings allow traffic to your API.
Conclusion
Hosting a web application in IIS 8 is straightforward. Follow the steps carefully. Use the IIS Manager for setup. Configure your site and ensure settings are correct. Test the application after installation. Troubleshoot common issues, if needed. Keep security measures in mind.
Regular updates are crucial. With practice, the process becomes easier. IIS 8 offers robust features for hosting. Your application will run smoothly. Enjoy the benefits of having your web application live. Remember, patience and attention to detail are key. Happy hosting!


