
If you’ve ever wondered how to get your .NET web application up and running on Internet Information Services (IIS), you’re in the right place. Hosting your application on IIS might sound like a daunting task, but with the right guidance, it can be straightforward and rewarding.
Imagine all the possibilities once your application is live—reaching more users, enhancing your online presence, and providing a seamless experience for your audience. In this guide, you’ll discover step-by-step instructions to make the process hassle-free and understand the essentials you need to succeed.
By the end of this article, you’ll have the confidence and knowledge to host your application effectively, unlocking its full potential. Let’s dive in and make your web application shine!
Prerequisites For Hosting
A Windows operating system is necessary for hosting. Ensure it is version 7 or later. The server must have adequate RAM. At least 4GB is ideal. Processor speed should be reasonable. Dual-core or more is recommended. Check the disk space. Ensure there is enough space for files.
Microsoft .NET Framework must be installed. Version 4.5 or newer is needed. Internet Information Services (IIS) should be active. Use version 7 or higher. Install SQL Server for database management. Ensure it is set up correctly. Visual Studio is helpful for development. Make sure it’s installed and ready.
Installing Iis On Windows
IIS helps you run your web apps on Windows. Start by opening the Control Panel. Find Programs and click on it. Next, look for Turn Windows features on or off. A new window will pop up. This window shows many features. Make sure you see the option for Internet Information Services (IIS). You are now ready for the next step.
In the window, tick the box for Internet Information Services. Click OK to proceed. Your computer will begin installing IIS. It may take a few minutes. Be patient. Once done, you will see a success message. Now, IIS is ready to use on your computer. You can now start hosting web applications with ease.
Configuring Iis
Start by opening the IIS Manager on your server. Find the Application Pools section. Click on Add Application Pool. Name your pool and choose the .NET version. This step is crucial for compatibility. Set the Managed Pipeline Mode to Integrated. Click OK to create the pool. Your app pool is ready.
Go back to the IIS Manager main page. Click on Sites and choose Add Website. Enter a name for your site. Choose the application pool you just created. Set the physical path to your web app files. Configure the binding settings. This includes the IP address and port. Click OK to add your site. Your site is now configured.

Credit: learn.microsoft.com
Deploying .net Web Application
First, open your Visual Studio. Click on your project. Select the Publish option. Choose a Folder or IIS as your target. This step creates the files. These files are needed for deployment.
Use FTP or File Explorer to move files. Connect to your server. Upload all the published files. Ensure the files reach the correct directory. Check if all files are transferred. This step is crucial for the application to work.
Application Setup In Iis
Open IIS Manager. Click on “Sites” in the left panel. Choose “Add Website” from the right panel. Enter a name for your website. Select the physical path where your web app is stored. Choose a port number for your site. Click “OK” to create the website. Your new site appears under “Sites”.
Each site needs an application pool. Click on “Application Pools” in IIS Manager. Choose “Add Application Pool”. Enter a name for your pool. Select the .NET framework version. Choose the managed pipeline mode. Click “OK”. Assign this pool to your site. Click on your site name in “Sites”. In the right panel, click “Basic Settings”. Choose your pool from the drop-down. Click “OK”.
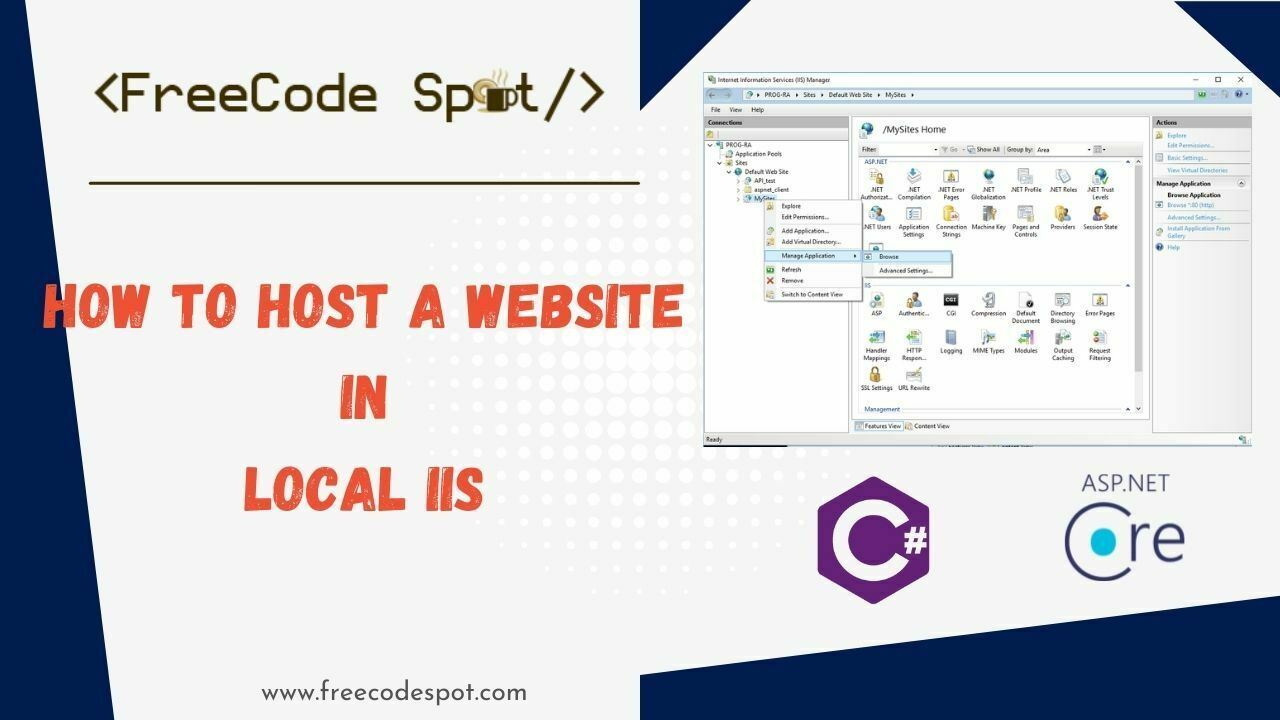
Credit: www.freecodespot.com
Managing Application Settings
Ensure users can access your app safely. Use Windows Authentication for secure access. This method uses the user’s Windows account. It’s simple and effective. For external users, use Forms Authentication. It asks for a username and password. You can also choose Anonymous Authentication for open access. This method does not require a login. Always pick the best fit for your app’s needs.
Bindings link your app to network connections. Set a host name for easy access. Choose a port number carefully. Commonly, port 80 is used for HTTP. For secure connections, use port 443 with HTTPS. Bindings also need a strong SSL certificate. This ensures data stays safe. Always check your settings to avoid conflicts. Proper settings ensure smooth app performance.
Testing And Troubleshooting
Test your application to ensure it works properly. Visit the web address in your browser. Check if pages load quickly and the content appears. Click buttons and links to see if they respond. Use different browsers for better testing. Look for errors in the browser console. If you find any, note them down. Fix these errors to make your app work right.
Sometimes applications don’t work. Error 404 means a page is missing. Check your URLs for mistakes. Error 500 is a server issue. Look at your server logs to find details. Slow loading can happen if images are large. Optimize images for faster loading. If your app is not secure, check SSL settings. Make sure your server is updated. Updates fix many problems. Keep testing until the app runs smoothly.
Security Considerations
HTTPS keeps data safe. It uses encryption. This makes sure only the right people see the data. You need a certificate. Get it from a trusted place. Install the certificate on IIS. This helps create a secure connection. Always use HTTPS for sensitive info. It builds trust with users. It is important for privacy.
Permissions control who can access the site. Set permissions carefully. Too many permissions are risky. Give access only to those who need it. Use roles for users. Assign roles based on tasks. Regularly check and update permissions. This helps keep the site safe. Protects from unwanted access. Make sure to keep permissions simple.
Performance Optimization
Hosting a. NET web application in IIS boosts performance optimization. Configure application settings for efficient server management. Regularly update IIS features to ensure smooth functionality and enhance load speed.
Caching Strategies
Use caching to speed up your web app. Cache stores data for quick access. It reduces load time. Cache is like a memory box. It keeps frequently used data. This means less work for the server. Users get faster results.
Use HTTP caching for static files. Images, CSS, and JavaScript files benefit most. Set expiration dates for cache. Old data is removed automatically. This keeps information fresh. Use data caching for dynamic content. Database queries can be cached. This reduces server load.
Load Balancing Techniques
Load balancing spreads traffic across servers. It keeps your app running smoothly. Use a load balancer. It divides user requests. Many servers share the work. No single server gets overloaded. This prevents crashes.
Choose between hardware and software load balancers. Hardware balancers are fast and reliable. They cost more, though. Software balancers are flexible. They are easier to configure. Use round robin method. Servers take turns handling requests. It is simple and effective.

Credit: www.binaryintellect.net
Frequently Asked Questions
How To Host A .net Web Application In Iis?
Install IIS via Windows Features. Configure IIS by adding a new site. Set the physical path to your. NET web application folder. Ensure the application pool uses the correct. NET version. Bind the site with a suitable port. Start the site and test in your browser.
How To Deploy .net Framework Application On Iis?
Deploy a. NET Framework application on IIS by first publishing it. Open IIS Manager, create a new site, and point to your application folder. Bind the site with a domain or IP, and start it. Ensure ASP. NET is installed and configured on the server.
How To Run A Web Application From Iis?
To run a web application from IIS, install IIS on Windows, configure the site in IIS Manager, deploy application files to the server, and set appropriate bindings and permissions. Test the application by accessing the specified URL in a browser.
Ensure proper configuration for security and performance.
How To Add .net To Iis?
Install. NET Framework from Microsoft’s website. Open IIS Manager, select your site, and click on “Add Application”. Configure. NET in the application settings. Ensure the correct application pool is selected and supports. NET. Restart IIS to apply changes.
Conclusion
Hosting a. NET web application in IIS is straightforward. Follow each step carefully to ensure success. Configure IIS settings and deploy your application with ease. Double-check all configurations for smooth operation. Troubleshooting helps resolve potential issues quickly. Practice makes the process faster and simpler over time.
Now, you’re equipped to handle hosting tasks confidently. Share your newfound skills and help others. Keep learning and improving your hosting techniques. Your web application will perform efficiently on IIS. Happy hosting!


