
Are you ready to bring your Java web service to life on a server? Hosting your Java web service might seem daunting, but once you grasp the essentials, you’ll discover it’s easier than you think.
Imagine the possibilities: a seamless, efficient platform, accessible to users around the globe. This guide will walk you through the process step-by-step, ensuring you have all the tools you need to succeed. By the end, you’ll not only feel confident in your ability to host your Java web service, but you’ll also uncover tips and tricks that can optimize performance and increase your service’s reach.
Dive in and transform your web service from concept to reality.
Choosing The Right Server
Dedicated hosting means your server is all yours. It gives you more control and power. Shared hosting is cheaper. You share it with others. Sometimes it gets slow because many people use it.
Cloud hosting is flexible. You pay for what you use. It grows with your needs. Many companies offer cloud hosting. It’s good for scaling your web service. It can be fast and secure.
Check server RAM and CPU. More RAM and CPU means faster service. Look at storage space too. You need enough for your files. Bandwidth is important. More bandwidth means more people can visit your site at once.
Credit: blog.devgenius.io
Setting Up The Environment
Setting up the environment for hosting a Java web service involves installing necessary software and configuring server settings. Ensure compatibility with Java version and web server requirements. Efficiently manage resources to support smooth operation and performance of the service.
Installing Java Development Kit
Download the Java Development Kit (JDK) from the official site. Choose the correct version for your computer. Open the installer file. Follow the steps to install JDK. After installation, check the version. Open the command prompt. Type java -version. Ensure it shows the right version.
Configuring Apache Tomcat
Visit the Apache Tomcat website. Download the latest version. Extract the files to a folder. Open the Tomcat bin directory. Find startup.bat or startup.sh. Run the file to start Tomcat. Open a browser. Type http://localhost:8080. Check if Tomcat works.
Setting Up Environment Variables
Environment variables help Java applications run. Go to system settings. Find Environment Variables. Create a new variable. Name it JAVA_HOME. Set the path to JDK installation. Find the Path variable. Add the bin directory path of JDK. Save and close the settings. Restart your computer.
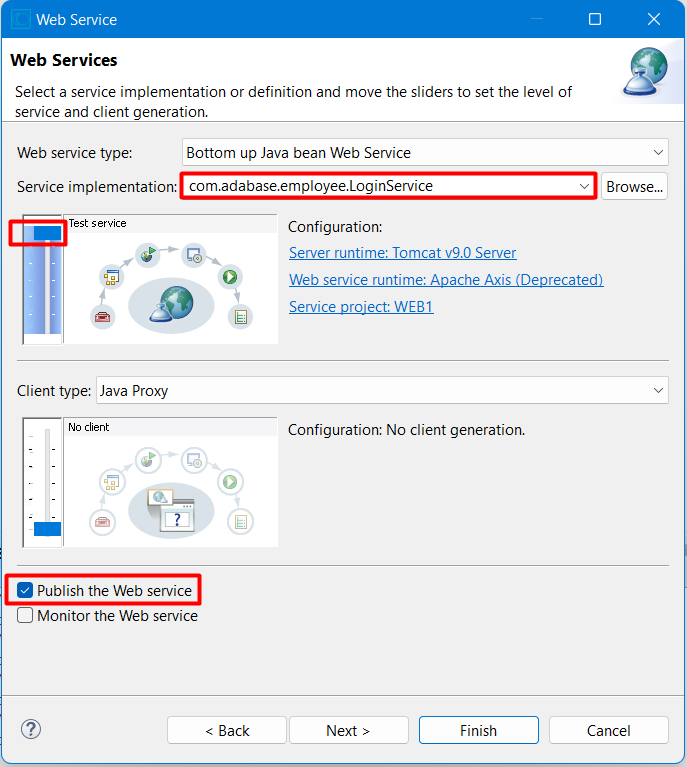
Deploying The Java Web Service
First, create a WAR file. This file holds your web service. Use a tool like Maven or Gradle. These tools help build your project easily. Ensure all files are correct before building. This step is crucial for a smooth deployment.
Next, upload the WAR file to your server. Use FTP or SCP for this task. Ensure the server is ready to accept files. Check the server settings before uploading. This ensures your web service works well.
Set the web service parameters on the server. These settings control how the service runs. Check the server configuration files. Make sure they match your needs. This step ensures the service performs correctly.
Ensuring Security Measures
Hosting a Java web service on a server requires careful security measures. Set up firewalls to block unauthorized access. Use SSL certificates to encrypt data, ensuring safe communication. Regularly update software to patch vulnerabilities and protect sensitive information. Employ strong authentication methods for user access.
Implementing Ssl/tls
SSL/TLS protocols keep data safe. They encrypt information. This stops hackers. Use strong certificates. Certificates verify identity. Always update them. Updates fix security gaps. Keep your web service secure.
Setting Up Firewalls
Firewalls protect your server. They block bad traffic. Traffic filtering is important. Choose a reliable firewall. Set it up correctly. Correct setup means fewer threats. Firewalls are your first defense.
Managing User Authentication
User authentication is crucial. It verifies users. Use strong passwords. Passwords should be hard to guess. Consider multi-factor authentication. Multi-factor adds extra security. Always monitor login attempts. Monitoring helps detect issues.
Monitoring And Maintenance
Monitoring tools help track your server’s health. They show you CPU usage, memory, and disk space. These tools alert you if something goes wrong. They are like a doctor’s stethoscope for your server. Use them to keep your server running smoothly. It’s important to check the tools often. This ensures your server stays happy and healthy.
Regular backups protect your data. They save copies of your work. If something breaks, backups help you restore it. Plan your backups wisely. Choose a time when you don’t need the server much. Store backups in a safe place. This keeps your data safe from loss. Backup schedules are like a safety net for your server.
Server updates fix problems and add features. They keep your server secure. Always check for new updates. Install them carefully. Pick a time when users are not busy. Updates make your server better and safer. They are like new clothes for your server, keeping it fresh and strong.

Credit: download.oracle.com
Troubleshooting Common Issues
Sometimes web services don’t deploy correctly. This can be confusing. Check the server logs for messages. They often tell you what’s wrong. Ensure all Java libraries are in place. Missing files can cause errors. Double-check your XML configuration files. They must be accurate. Even a small mistake can cause a big issue.
Slow services can be frustrating. Look at the server load. High load can slow things down. Check if the database queries are optimized. Slow queries affect speed. Use profiling tools to find slow parts in the code. These tools help in identifying issues. Consider more server resources if needed.
Sometimes services can’t connect. Check the network cables and connections. They should be secure. Ensure the firewall settings allow traffic. Blocked traffic stops connections. Verify the server IP address and DNS settings. Incorrect settings cause issues. Restart network devices if needed.
Optimizing Performance
Caching helps speed up your service. It stores data for quick access. Use memory to cache frequently used data. This reduces server load. Data can be retrieved faster. It’s important to choose what to cache. Use smart rules for cache expiry. This keeps data fresh.
Load balancing spreads work across servers. This helps handle more users. It prevents any server from being overloaded. Use round-robin or least connections methods. They are simple and effective. Load balancing keeps services running smoothly. It boosts user experience.
Resources include CPU, memory, and storage. Managing them is crucial. Allocate resources based on need. Monitor their usage regularly. Use tools to track resource performance. Adjust as needed to keep things efficient. Proper management saves costs. It ensures reliable service.
Credit: www.geeksforgeeks.org
Frequently Asked Questions
How To Host A Java Web Server?
To host a Java web server, install Java and Apache Tomcat on your server. Configure Tomcat for your application. Deploy your Java web application using WAR files. Ensure your server has adequate resources and security settings for optimal performance. Regularly update software to maintain security and stability.
How To Run A Java Program On A Web Server?
Install a Java servlet container like Apache Tomcat. Deploy your Java program as a WAR file. Configure server settings as needed. Access the program through the server’s URL.
How Do I Host A Web Application On A Server?
Choose a server that supports your application. Install necessary software, like web server and database. Upload your application files using FTP or SSH. Configure server settings for security and performance. Finally, test the application and ensure it’s live and accessible.
How To Run Java Web Service?
Install Java Development Kit (JDK) and Apache Tomcat. Create a web service using Java API for XML Web Services (JAX-WS). Deploy it on Tomcat by copying the service WAR file to the ‘webapps’ directory. Start Tomcat and access your service via the browser or client application.
Conclusion
Setting up a Java web service on a server is straightforward. Follow the steps carefully for a smooth process. Begin by choosing the right server platform. Install the necessary software and configure your environment. Deploy your Java application using appropriate tools.
Test your service to ensure it works properly. Remember, practice helps in understanding the process better. If needed, seek help from online forums or communities. Hosting Java web services can enhance your web applications. Keep learning and exploring new techniques.
Your skills will improve with time and experience.


