
Are you ready to give your WordPress site a fresh new look but unsure how to upload a new theme? You’re not alone.
Many WordPress users find themselves stumped at this stage, but don’t worry—it’s easier than you think! Imagine how thrilled your visitors will be when they see a vibrant, updated design. Your website can stand out and truly reflect your brand’s personality with just a few clicks.
In this guide, we’ll walk you through the process step-by-step, ensuring you can confidently upload and activate a stunning new theme on your WordPress site. Stick around to discover how you can transform your website and make a lasting impression.
Credit: thimpress.com
Choosing The Right Theme
Selecting the perfect theme is key to making your WordPress site stand out. Uploading a new theme involves navigating to the Appearance section in your dashboard. From there, you can easily install and activate your chosen theme to refresh your website’s look.
Free Vs Premium Themes
Free themes have limited features. They are simple and easy to use. Premium themes offer more options. They have better designs. You can customize them more. Free themes are best for beginners. Premium themes are good for advanced users. Consider your needs. Choose wisely.
Responsive Design Importance
A responsive theme is crucial. It works on all devices. Your site looks good on phones and computers. Visitors stay longer. They enjoy the experience. A responsive design helps your site grow. It’s important for success.
Seo-friendly Features
An SEO-friendly theme helps your site rank better. It is built with search engines in mind. Keywords and meta tags are easy to add. Clean code is important. It speeds up your site. Faster sites rank higher. Choose themes with SEO options. They help you get more visitors.
Preparing For Installation
Start by accessing your WordPress dashboard. Navigate to the Appearance section and select Themes. Click on Add New to upload your theme file. Follow the prompts to activate and customize your new theme effortlessly.
Backing Up Your Site
Always create a backup before changing themes. This keeps your data safe. You can use backup plugins for this. These tools save your site’s data. Save it on your computer. Or use cloud storage.
Checking Theme Compatibility
Ensure the new theme works with your WordPress version. Check if it supports your plugins. Look for recent updates. Avoid themes not updated in a year. Check user reviews. They help find potential issues.
Installing A Child Theme
A child theme keeps changes safe during updates. It inherits features from the parent theme. Install it before making changes. Use a plugin to create it. This makes the process easier. A child theme is a wise choice.
Accessing The WordPress Dashboard
Open your web browser. Type your site URL. Add /wp-admin to the end. Press enter. A login screen will appear. Enter your username. Enter your password. Click the Log In button. You will now see your WordPress dashboard. This is where you manage your site.
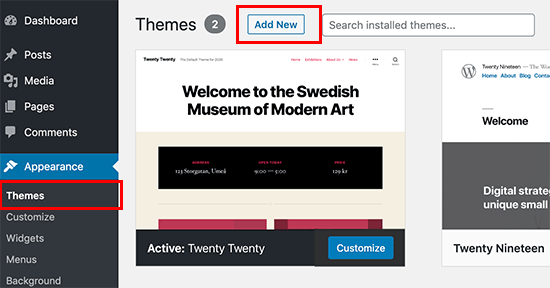
Look at the left side of the dashboard. Find the word Appearance. It is in the menu. Click on Appearance. A drop-down will appear. Find the word Themes. Click on Themes. Now you can see all your themes. You can add new ones here.

Credit: wpmarmite.com
Uploading A Theme Via The Dashboard
Find the WordPress Theme Directory in your dashboard. It’s easy to use. First, go to Appearance. Then click on Themes. You will see an option called Add New. Click it. Now you can browse many themes. Use the search bar to find one you like. Click Install on the theme you choose. Wait for a bit. Then, click Activate. Your new theme is ready.
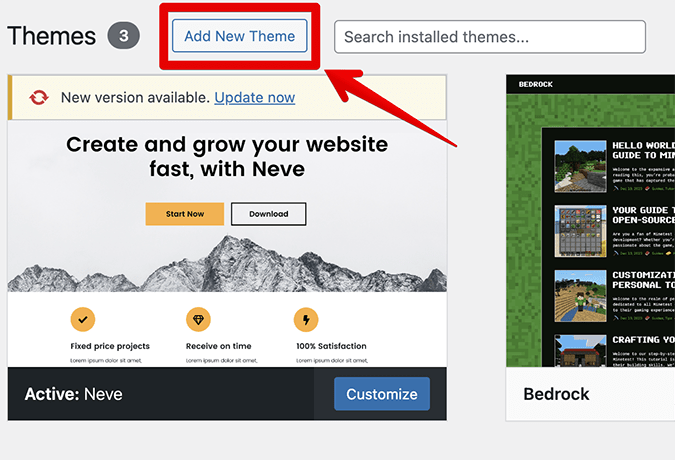
Start at the dashboard. Go to Appearance and click Themes. Click Add New at the top. Now, look for Upload Theme. Click it. A button will say Choose File. Click it to find the theme file on your computer. The file should end in .zip. Select the file and click Install Now. Once uploaded, click Activate. Your theme is now live.
Installing A Theme Via Ftp
Connecting to Your Server is simple. First, use an FTP client. Enter your server’s address. Use your username and password. Click ‘connect’. Wait a few seconds. You are now connected.
Uploading Theme Files is easy. Find your theme files. They are in a ZIP folder. Unzip them first. Open your FTP client. Navigate to “wp-content/themes” folder. Drag your theme folder here. Let it upload. This may take a few minutes.
Activating the Theme is the final step. Log into your WordPress dashboard. Go to “Appearance” and click on “Themes”. Find your new theme. Click “Activate”. Your theme is now live. Check your site to see the changes.
Credit: www.crazyegg.com
Customizing Your New Theme
The WordPress Customizer helps change your site’s look. You can find it in the dashboard. Start by picking colors for your site. You can also change the site’s title and tagline. Always remember to save changes. This way, your site will look how you want.
Themes come with settings. These settings let you tweak your site. Look for the theme settings in the dashboard. Here, you can change fonts and layouts. Some themes allow you to upload a logo. Make sure to explore all options for the best look.
Widgets add extra features to your site. They can show your latest posts. Menus help users navigate your site. You can add them from the widgets and menus section. Drag and drop the items you need. Arrange them to suit your needs.
Troubleshooting Common Issues
Encountering difficulties while uploading a new WordPress theme? Ensure file compatibility and check upload limits. Navigate to your WordPress dashboard, click ‘Appearance’, then ‘Themes’, and proceed to ‘Add New’. Choose your theme file, and activate it.
Fixing Installation Errors
Installation errors can be tricky. First, check your internet connection. Then, ensure the theme is compatible with your WordPress version. Sometimes, themes need updates. Visit the theme’s website for details. If the error persists, try reinstalling the theme. Use the WordPress support forum for help. It’s free and easy.
Resolving Compatibility Problems
Compatibility issues occur with plugins or WordPress updates. Disable all plugins first. Then, activate one plugin at a time. Check for conflicts with the theme. If a plugin causes issues, find an alternative. Always keep WordPress and themes up to date.
Restoring Previous Themes
Sometimes new themes don’t work. You might want to go back. Go to your WordPress dashboard. Click on Appearance and then Themes. Find your old theme. Click Activate to restore it. Check your site to ensure everything looks right. Backup your site regularly. It helps avoid these problems.
Finalizing Your Theme Setup
Testing your new theme is vital. Check the layout and design. Ensure everything looks good on different browsers. Use tools to check compatibility. Ask friends to view the site. Feedback helps improve the theme.
Optimizing for performance is important. Slow sites frustrate visitors. Compress images to reduce load time. Use caching plugins for speed. Keep the theme updated. Fast sites rank better in search engines.
Ensuring mobile compatibility is essential. More people use phones than computers. Check your theme on various devices. Use responsive design features. Adjust layout for small screens. Mobile-friendly sites keep visitors happy.
Frequently Asked Questions
How Do I Install A New WordPress Theme?
To install a new WordPress theme, navigate to your dashboard. Click on “Appearance,” then select “Themes. ” Choose “Add New” and search for your desired theme. Once found, click “Install” and then “Activate” to apply it.
Can I Upload A Theme Manually In WordPress?
Yes, you can upload a theme manually. Download the theme ZIP file first. Go to “Appearance” > “Themes” > “Add New” > “Upload Theme. ” Choose the file and click “Install Now. ” Activate the theme once installed.
Where Can I Find Themes For WordPress?
You can find WordPress themes in the official WordPress repository. There are also many premium theme marketplaces like ThemeForest, Elegant Themes, and StudioPress. Always ensure themes are compatible with your WordPress version.
Why Can’t I Upload A Theme In WordPress?
There might be several reasons. Check your file permissions and server settings. Ensure the theme is compatible with your WordPress version. File size limits may also restrict uploads, so verify your server’s configurations.
Conclusion
Switching to a new WordPress theme is simple. Follow the steps in this guide. First, choose a theme that fits your site. Download it from a trusted source. Next, log in to your WordPress dashboard. Go to “Appearance” and click “Themes.
” Then, select “Add New” and upload your theme file. Activate the theme after installation. Check your site for any changes. Make sure everything looks good and works well. Updating your theme can refresh your site’s look. It’s a great way to enhance your website’s appeal.
Happy theming!


