
Are you struggling with uploading files to WordPress? You’re not alone.
Navigating the intricacies of WordPress can be a daunting task, especially when you’re eager to enhance your website with new content or features. But don’t worry—this guide is here to simplify the process for you. Imagine having the power to effortlessly upload images, documents, and media files, making your WordPress site more engaging and vibrant.
With just a few steps, you can transform your site into a dynamic platform that captivates your audience. You’ll learn not only how to upload files efficiently but also how to ensure they enhance your site’s performance and aesthetics. Ready to take control of your WordPress uploads and elevate your online presence? Keep reading, and you’ll discover the secrets to mastering this essential skill.
Credit: www.dreamhost.com
Preparing Your Files
Always choose the right file format for your content. Use JPEG for photos. Use PNG for graphics. These formats keep your files small. They also keep the quality high. Avoid BMP or TIFF. These files are too large.
Make sure your files are optimized. Use an image editor to reduce the size. This helps pages load faster. It improves the user experience. Don’t forget to check the resolution. It should fit your website’s needs.
Name your files properly. Use clear and short names. Avoid spaces in names. Use hyphens instead. This helps search engines find your files. It also keeps your site organized. Remember, good names are easy to understand.
Accessing The WordPress Dashboard
First, find your WordPress login page. It’s usually at yourwebsite.com/wp-admin. Enter your username and password. Click the login button. If you forget your password, use the “Forgot Password” link. Check your email for reset instructions. It’s easy to log in after you reset.
Once inside, see the dashboard. The dashboard is the main screen. Look for the left-hand menu. It has many options. Click posts to add a new blog. Click media to upload files. The dashboard helps you manage your site. Take time to explore every option. Get familiar with each section.
Uploading Media Files
The Media Library in WordPress makes uploading easy. Click on “Media” in the dashboard. Then select “Add New”. A new screen will appear. You can upload files from here. Click “Select Files” to browse your computer. Choose your image or video. WordPress will upload them for you.
Another way is the Drag and Drop Method. Open the Media Library in WordPress. Find the “Add New” button. Click it. Now, drag your file from your computer. Drop it in the upload area. WordPress will start uploading right away.
Uploading via URL is also possible. First, go to “Media” then “Add New”. Look for “Insert from URL” option. Paste your URL in the box. Click “Insert”. WordPress will add your media. It’s simple and quick.
Adding Files To Posts And Pages
Images make your posts pretty. Use the media library to add them. Click on the Add Media button. Select the image you want. Click Insert to add it. Adjust the size if needed. Drag to move it around.
Videos can make your content fun. Find the video you like. Copy the video URL. Go to your post editor. Paste the URL where you want it. WordPress will embed it for you. Check it to make sure it works.
Sometimes you need to add documents. Click Add Media in your post. Upload your document file. Select it and click Insert. Your file will be linked in your post. Readers can now download it easily.
Managing Uploaded Files
Folders help keep files tidy. WordPress does not offer folders by default. Plugins can help create folders. They make finding files easier. Drag files into folders to organize. Use folders to separate file types. For example, images in one folder. Documents in another. This keeps files neat and easy to find.
Click on a file to edit details. Change the title, description, or alt text. Alt text helps search engines. It also helps people who can’t see images. Keep details clear and simple. This makes files more useful. Files with good details are easier to search. They also look better on your site.
Extra files take up space. Remove files you don’t need. Go to the media library. Select files you want to delete. Click delete to remove them. This keeps your site clean. It also makes your site faster. Less clutter means easier file management. Always check before deleting. Some files might be linked to posts.

Credit: www.youtube.com
Troubleshooting Common Issues
Uploading large files can be tricky. WordPress has a file size limit. This means you can’t upload files that are too big. If your file is too big, you might see an error. To fix this, you can use a plugin to increase the limit. Or, you can ask your host for help. Always check the size of your files before uploading.
Some files don’t work well with WordPress. This means they are not compatible. If a file doesn’t upload, it might be the wrong type. Always use supported file formats like JPEG, PNG, or PDF. Also, update your plugins and themes regularly. This helps keep everything working smoothly.
Error messages can be confusing. They tell you something went wrong. When you see an error, read it carefully. It gives clues about the problem. Some errors need technical help. For simple errors, try uploading again. If errors persist, check your internet connection. Or, clear your browser cache.
Utilizing Plugins For Enhanced Uploads
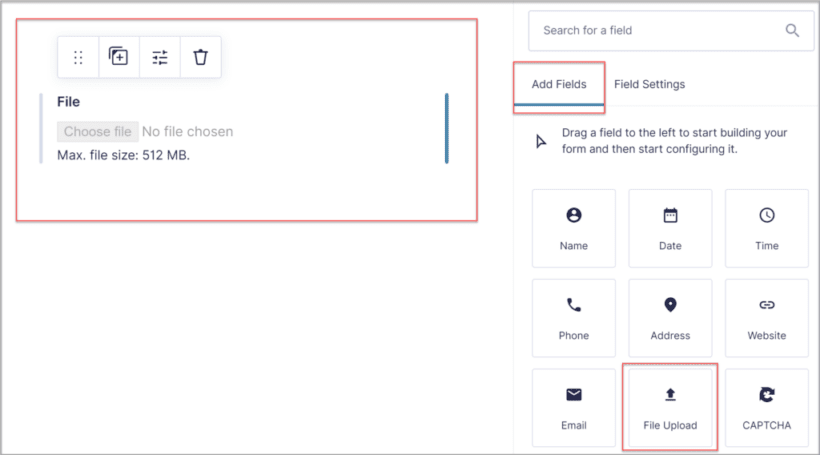
Plugins can make uploads easy. Some popular ones are WPForms and NextGEN Gallery. Each has unique features. WPForms helps with file uploads. NextGEN is perfect for images. They offer user-friendly interfaces.
Installing a plugin is simple. Go to your dashboard. Click on “Plugins” then “Add New”. Search for the plugin name. Click “Install” and then “Activate”. Configuration is easy too. Follow the setup guide provided. Adjust settings to fit your needs. Save changes once done.
Plugins offer many benefits. They speed up the upload process. Make it more secure. Provide extra features not in WordPress. Users find them helpful. They improve site functionality.
Credit: barn2.com
Frequently Asked Questions
How Do I Upload Files To WordPress?
To upload files to WordPress, navigate to your dashboard. Click on ‘Media’ then ‘Add New’. Drag and drop your files or select them from your computer. Ensure your files meet WordPress’s size and type requirements. Once uploaded, they’ll be available in your media library for use.
Can I Upload Images Directly To WordPress?
Yes, you can upload images directly. Go to ‘Media’, then ‘Add New’. Drag and drop your image files or select them from your computer. WordPress supports various image formats like JPEG, PNG, and GIF. After uploading, you can use images in posts, pages, or galleries.
What File Formats Are Supported By WordPress?
WordPress supports several file formats. For images, you can upload JPEG, PNG, and GIF files. Documents like PDFs and DOCs are also supported. Audio formats such as MP3 and video formats like MP4 can be uploaded too. Always check your WordPress settings for any restrictions.
How Do I Optimize Files For Upload?
Optimize files by reducing their size without losing quality. Use image compression tools like TinyPNG for images. For videos, adjust resolution and format. Smaller files upload faster and improve website performance. Ensure the file format is compatible with WordPress before uploading.
Conclusion
Uploading files to WordPress is simple and essential. Follow the steps carefully. First, log into your WordPress dashboard. Use the Media Library for uploading files. Click “Add New,” then select your files. Once uploaded, use them anywhere on your site.
Make sure files are optimized for web use. This ensures fast loading times. Regularly update your content for better engagement. Remember, practice makes perfect. Keep exploring WordPress features. You’ll become more comfortable over time. Enjoy creating and sharing your content.
Happy blogging!


