
Are you looking to give your WordPress site a personalized touch? Creating a custom menu might just be the game-changer you need.
Imagine your visitors navigating your site with ease, finding exactly what they need, when they need it. A well-crafted menu enhances user experience, making your site not only more attractive but also more functional. But how do you go about setting up a custom menu in your WordPress theme without feeling overwhelmed?
Don’t worry; you’re not alone, and it’s simpler than you might think. In this guide, you’ll discover step-by-step instructions that will empower you to craft a navigation menu tailored specifically to your needs. So, if you’re ready to take control and make your website truly shine, keep reading to unlock the secrets of seamless site navigation.
Choosing The Right Theme
Selecting the right theme is very important. The theme should be responsive and user-friendly. Check if the theme supports custom menus. Some themes might limit menu options. Look for themes with flexible settings.
The theme should match your site’s purpose. A good theme helps with easy navigation. This makes the site look professional. Always check the theme’s reviews and ratings. This helps in making a good choice.
Consider if the theme is updated regularly. Themes that get updates are more secure. Also, check if the theme has good support. You might need help setting up.

Credit: www.wpelemento.com
Accessing The WordPress Dashboard
First, you need to log in to your WordPress account. Use your username and password. Once logged in, you see the dashboard. The dashboard is the main control panel. Here, you will find many options. Menus is one of the options. It’s located under Appearance. Click on Appearance to expand the menu list.
From the list, choose Menus. This takes you to the menu page. On this page, you can create or edit menus. Menus help users navigate your site. A good menu is easy to use. It guides visitors to important pages. Make sure your menu is clear and simple.
Navigating To Menu Settings
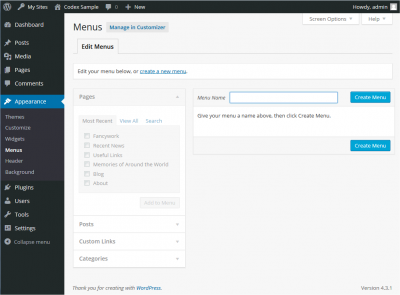
Start by logging into your WordPress dashboard. Look for the Appearance section on the left. Click it. Then, select Menus from the dropdown list. This is where you can create a custom menu. Ensure you are on the right page by checking the top title. It should say Edit Menus.
You will see a menu name box. Type a name for your menu. This helps you remember what the menu is for. Then, click the Create Menu button. Now, you have a new menu. Ready to add items?
Creating A New Menu
Start by clicking on the “Appearance” tab. Then select “Menus”. You’ll see an option to create a new menu. Click it. A box will appear asking you to name your menu. Choose a name that helps you remember its use. For example, “Main Menu” or “Footer Links”. Keep it short and clear. Once done, click the “Create Menu” button.
After naming, choose where to show the menu. Look for the “Menu Settings” section. You’ll see options like “Primary”, “Footer”, or “Social”. Check the box next to your desired location. Remember, you can show one menu in many places. Click “Save Menu” to finish.
Adding Items To The Menu
You can add pages and posts to your menu easily. Just select the pages or posts you want. Click “Add to Menu” button. They will appear in your menu. You can change their order by dragging. It’s simple to organize them. Keep your menu neat.
Adding custom links lets you link to other sites. Enter the URL of the site you want. Type the text for the link. Click “Add to Menu”. Your custom link will show up. You can put it anywhere. Arrange it with other items.
Categories help group your posts. Add them to your menu for easy access. Select the categories you want. Click “Add to Menu”. They will be part of the menu now. This helps people find related posts fast. Your site will be organized and tidy.
Organizing Menu Structure
Drag and Drop Items makes organizing easy. Click an item and drag it where you want. It’s simple to rearrange your menu. Place important links at the top. Less important links can go below. This way, users find what they need fast.
Creating Submenus helps group related items. Drag an item slightly to the right. This makes it a submenu. Now, items are in categories. Users can see all options at a glance. This method keeps your menu tidy. It also makes navigation smoother.
Customizing Menu Appearance
Create a custom menu in a WordPress theme to enhance your site’s look. Adjust colors, fonts, and layout for better navigation. Personalize menu items to match your brand’s style effortlessly.
Using Css Classes
CSS classes help change the look of your menu. They make it unique. Add a class to a menu item for a special style. Go to the menu settings in your WordPress dashboard. Find the “CSS Classes” option. Type the class name you want to use. You can add colors or change fonts. Use CSS to make these changes. This way, your menu will match your website style. Make sure your changes are easy to read.
Menu Icons
Icons make your menu more fun. They help users understand better. Add icons next to menu words for a clear look. Go to the WordPress menu settings. Choose a menu item. Look for the “Icon” option. Pick an icon that fits the menu item. Use simple icons for a clean look. Icons should not be too big. They should not be too small either. This will help your visitors find what they need quickly.
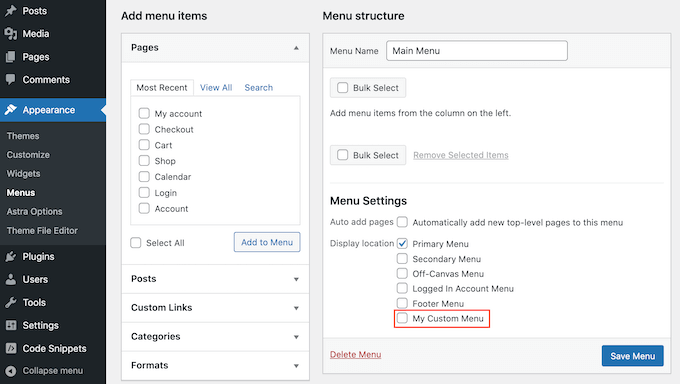
Assigning Menu To Theme Locations
Assigning a menu to a theme location is simple. First, go to the WordPress Dashboard. Then, click on Appearance and select Menus. You will see a list of menus. Choose the one you want. Now, look for Menu Settings. Here, you will find different theme locations. These are places where your menu can appear. Check the box next to the location you prefer. Finally, click on the Save Menu button. This will assign the menu to your chosen location.
Remember, some themes have multiple locations. These might include header, footer, or sidebar. Choose the location that fits your site best. This helps users find their way around your site. It makes your website look neat and organized.
Saving And Previewing The Menu
Click on the Save Menu button after making changes. This step is very important. Without saving, changes won’t appear. After saving, it’s time to preview. Click on the Preview button to see your menu. This helps to catch any mistakes. Fix errors before going live.
A preview shows how the menu looks. It is better to make adjustments early. Adjustments make sure everything is perfect. Check if links work properly. Ensure that each item in the menu is correct. Check if the design fits your theme. A perfect preview means you are ready to go live!
Credit: www.wpbeginner.com
Troubleshooting Common Issues
Creating a custom menu in a WordPress theme often presents challenges. Users may encounter issues with menu items not displaying correctly. Troubleshooting involves checking theme settings and ensuring proper menu location assignment.
Menu Not Showing
Sometimes, the menu disappears. Check the menu settings first. Make sure the menu is assigned to a theme location. This helps the menu appear on your site.
Another reason could be a plugin conflict. Disable all plugins. Then, activate them one by one. This helps find the conflicting plugin.
If the menu still doesn’t show, look at the theme’s code. Sometimes, code errors cause problems. Check if the theme is updated. Updates fix issues. If you cannot fix it, ask for help from theme support.
Styling Conflicts
Styling conflicts make menus look odd. Check the CSS code. Sometimes, CSS code overrides menu styles. Use the Inspect tool in your browser. This tool helps find the conflicting CSS.
Themes may have different styles. Some themes use custom styles. Check the theme’s documentation for styling tips. This helps you fix styling conflicts. If you need more help, contact the theme developer. They often provide support for styling issues.
Credit: codex.wordpress.org
Frequently Asked Questions
How Do I Start Creating A Custom Menu?
To start creating a custom menu, navigate to the WordPress dashboard. Go to ‘Appearance’ and then click ‘Menus’. Here, you can create a new menu or modify an existing one. Simply add pages, categories, or custom links to your menu structure.
Save your changes once you’re done.
Can I Add Custom Links To My Menu?
Yes, you can easily add custom links to your menu. In the WordPress menu editor, select ‘Custom Links’. Enter the URL and link text, then click ‘Add to Menu’. Arrange the link in your preferred order within the menu structure and save your changes to update the menu.
How Do I Assign A Menu To A Location?
Assigning a menu to a location is simple. In the WordPress menu editor, find the ‘Menu Settings’ section. Select a display location from the available options like header, footer, or sidebar. Save your changes to ensure the menu appears in your desired location on your website.
Can I Create A Dropdown Menu In WordPress?
Yes, creating a dropdown menu is straightforward. In the menu editor, drag and drop menu items under a parent item. Indent them slightly to create a hierarchy. Save your changes to enable the dropdown feature, which organizes your menu and enhances user navigation on your website.
Conclusion
Creating a custom menu in WordPress is easy. Start with the dashboard. Use the menu editor. Add pages, links, and categories. Drag and drop to arrange them. Choose your display location. Preview changes to ensure they look right. Save your work often.
Custom menus help visitors navigate your site. Make the menu simple and clear. Keep it organized. This improves user experience. Visitors find information quickly. Custom menus also help with SEO. They make your site more structured. A well-organized menu boosts engagement.
Enhance your WordPress site with thoughtful menu design.


