
Looking to give your WordPress site a professional touch? Adding a logo to your WordPress theme is a simple yet powerful way to boost your brand’s visibility and make a lasting impression on visitors.
Imagine your site, instantly recognizable with your unique logo sitting proudly at the top, setting the tone for your entire online presence. In this guide, you’ll discover just how easy it is to upload and customize your logo on WordPress.
We’ll walk you through the process step-by-step, ensuring you can do it yourself without any technical headaches. Whether you’re new to WordPress or just looking to refresh your site’s look, this article has got you covered. Stick with us to learn the tricks that can make your website stand out and keep visitors coming back for more.
Credit: www.inmotionhosting.com
Choosing The Right Logo
A logo should be simple and easy to understand. Colors matter. Choose colors that match your brand. Shapes can make a logo stand out. Keep your design clean. Avoid clutter. Text should be clear. Use bold fonts for impact. Test your logo on different backgrounds. Check if it looks good.
Save your logo in PNG or SVG format. These formats keep quality high. Use a small file size for faster loading. A logo should be under 200KB. It helps with page speed. Dimensions matter too. A square logo fits most places. Test the size on your site. Make sure it looks good on all devices.
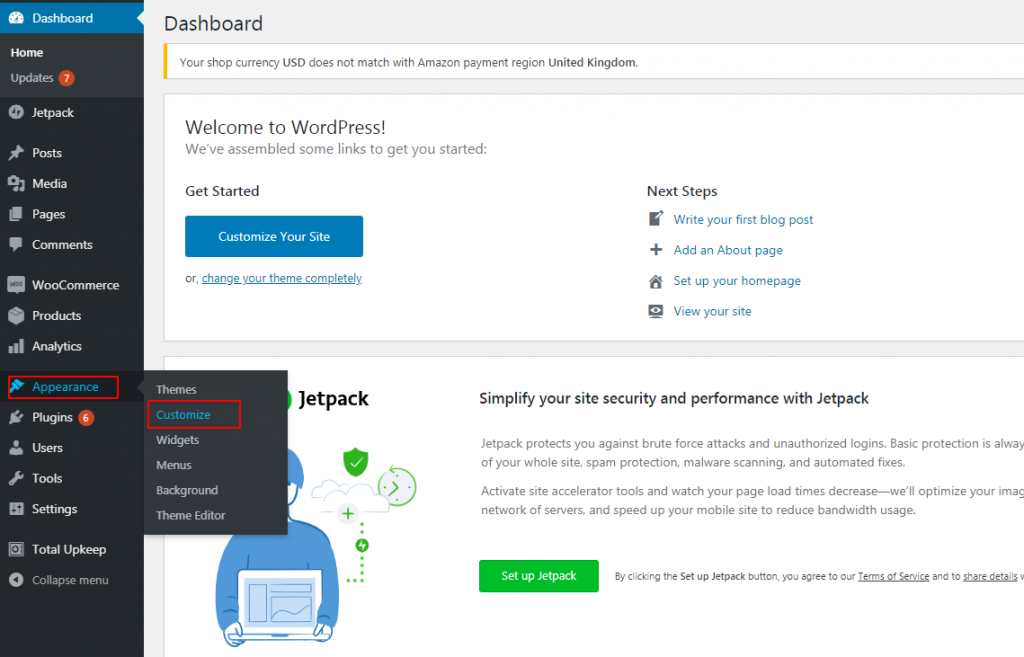
Accessing WordPress Dashboard
Accessing the WordPress dashboard is essential for customizing your theme. To add a logo, navigate to ‘Appearance,’ then ‘Customize. ‘ Select ‘Site Identity,’ and upload your logo. Adjust the size and position to fit your design. Save changes to update your theme with the new logo.
Logging Into Your Account
Start by entering your username and password on the login page. Click the login button. You will now see your WordPress Dashboard. This is the control center for your site.
Navigating To Theme Settings
Find the Appearance tab on the left menu. Click it. Then select Customize. Look for the section labeled Site Identity. Here, you can add your logo. Click on the Select Logo button. Choose your logo file from your computer. Hit the Publish button to save changes.
Uploading Your Logo
Go to your WordPress dashboard. Click on Appearance. Choose Customize. This opens the Customizer. Look for the Site Identity option. Click on it. You will see a Logo section. Click on Select Logo. Choose your logo file. Make sure the file is in a suitable format. Recommended formats are JPG, PNG, or GIF. Once selected, click Publish. Your logo will now appear on your site.
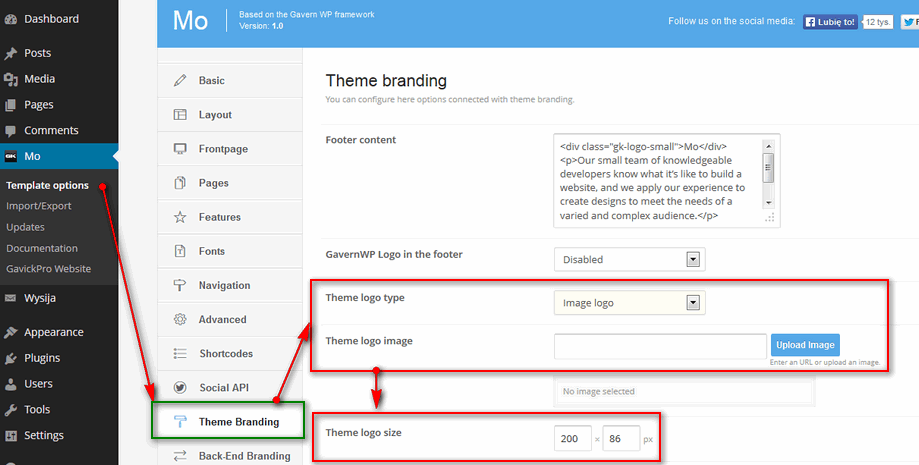
Some themes have their own settings. Go to Appearance. Click on Theme Options. Look for a Logo or Header section. Click on Upload. Select your logo file. Make sure the logo size fits. Check the theme’s recommended size. Click on Save. Your logo is now added.
Adjusting Logo Placement
WordPress lets you choose where to place your logo. You can put it on the left, right, or center of your website. Each choice gives a different look. It’s important to pick a spot that fits your theme. Think about where visitors will see it first. A logo on the left is common. A centered logo feels balanced. Right placement is less usual but unique. Try each position to see what looks best.
It’s key to make sure your logo is the right size. A big logo can look bad. A tiny logo might be hard to see. Resize your logo to fit your theme perfectly. Next, align your logo. Alignment helps your site look neat. Many themes offer top, middle, or bottom alignment. Choose one that matches your site’s style. Good alignment makes your logo stand out.
Customizing Logo Appearance
Color and style are key when updating your logo. Choose colors that match your theme. This makes the logo stand out. You can use tools to change the logo colors. Photoshop or online editors help with this. Styles can be bold or simple. Pick a style that fits your site. This creates a strong visual impact.
Color And Style Adjustments
Bright colors grab attention. Use them carefully. Dark shades can add depth. Test different styles before finalizing. Keep the logo simple yet striking. Avoid too many details. Simplicity is often best.
Responsive Design Considerations
Your logo must work on all devices. It should look good on phones and tablets. Use scalable images. SVG files are a great choice. They ensure logos look sharp. Test the logo on different screens. Adjust size and placement if needed. Responsive design keeps your logo effective.
Credit: www.gavick.com
Testing And Previewing
Discover how easy it is to add a logo to your WordPress theme. Begin by accessing the ‘Customize’ section in the WordPress dashboard. Upload your logo and preview changes instantly before saving.
Cross-device Testing
It’s important to check your logo on all devices. Different screens show images differently. A logo may look good on a computer, but not on a phone. Always preview your site on a tablet, too. This helps you see what your visitors will see. Make sure the logo is clear and not cut off. Adjust the size if needed. Proper testing ensures a great look everywhere.
Live Preview On Site
Use the WordPress customizer for live previews. This tool shows changes in real-time. It’s easy to use and helpful. Try different logo placements. Make sure it fits well with the theme. Watch out for any color clashes. The preview shows these mistakes before they go live. A good preview makes your site look professional.
Troubleshooting Common Issues
Adding a logo to your WordPress theme may seem tricky. Check your theme settings for a logo upload option. If unavailable, use a customizer or theme editor for a seamless logo integration.
Logo Not Displaying
Sometimes, the logo might not show up. Check the file type. JPEG or PNG works best. Make sure the logo is in the right folder. You might need to clear your browser cache. Refresh the page after clearing.
Resolution And Quality Problems
Low-quality logos can look bad. Use a high-resolution file. 300 DPI is good for print. 72 DPI works for web. Resize the logo to fit the space. Large logos can slow down your site. Small logos might look blurry. Test different sizes for best results.
Credit: www.hostinger.com
Finalizing Your Changes
Saving and Publishing your changes is easy in WordPress. Click the “Save” button first. This keeps your work safe. After saving, press “Publish.” Your logo is now live. Your site visitors will see it. Always remember to check your site. Make sure everything looks good. If you spot errors, fix them quickly. Review your changes before publishing. This ensures everything is perfect.
Backup and Documentation are vital. Keep a backup of your theme. This helps if things go wrong. You can restore your work easily. Document your steps. Write down what you did. This is useful for future reference. It helps you remember your process. You can share it with others. This makes teamwork easier. Backups and notes are your safety net. They protect your hard work.
Frequently Asked Questions
How Can I Upload A Logo In WordPress?
To upload a logo, navigate to your WordPress dashboard. Go to Appearance > Customize > Site Identity. Here, you’ll find an option to upload your logo. Choose your file and save changes. Your logo will appear on your website.
Can I Change My Logo Size In WordPress?
Yes, you can adjust logo size through the theme customizer. Go to Appearance > Customize. Locate the logo settings under Site Identity. Adjust dimensions as needed. Some themes may offer more specific size options for better customization.
What File Formats Are Best For WordPress Logos?
For optimal display, use PNG or JPEG formats. PNG is ideal for logos with transparency. JPEG is suitable for high-quality images without transparency. Ensure your logo is clear and properly sized to maintain visual appeal on your site.
Why Is My Logo Not Displaying Correctly?
Ensure your logo file is uploaded correctly. Check its dimensions and format. Some themes may require specific logo sizes. Also, clear your browser cache and refresh the page. If issues persist, consult your theme documentation or support.
Conclusion
Adding your logo is simple with WordPress. Follow the steps carefully. Start by accessing your theme settings. Navigate to the customization panel. Upload your logo in the designated area. Adjust the size for better visibility. Preview your changes. Ensure the logo fits your theme design.
Save your changes to finalize the process. Personalizing your site enhances its brand identity. A well-placed logo makes your site memorable. Regularly update the logo if needed. Keep your website looking fresh. Remember, a clear logo strengthens brand recognition. Your website now represents your unique identity.


