
Have you ever felt that your WordPress theme lacks the flair and personality you want for your website? Fonts play a crucial role in defining the overall look and feel of your site.
They can enhance your brand’s identity, improve readability, and make your content more engaging. But how do you add a new font to your WordPress theme without breaking a sweat? You’re about to uncover the secrets of doing just that.
Imagine your website standing out with a unique, eye-catching font that perfectly aligns with your brand’s voice. With a few simple steps, you can transform your site’s appearance and captivate your audience right from the first glance. Get ready to take control of your website’s style and make a lasting impression. Keep reading, because the power to personalize your WordPress theme is at your fingertips!
Credit: www.hostinger.com
Why Add Custom Fonts
Custom fonts make your website look unique and different. They give your site a special feel. Fonts can show your brand’s personality. Some fonts are fun, others are serious. Choose a font that matches your message.
Regular fonts can look boring. Visitors might leave if they don’t like the look. Custom fonts can hold their attention. They make the text more readable and engaging. People enjoy reading when the font is nice.
Choosing The Right Font
Font style affects how people see your website. Some fonts are fun. Others look serious. Picking the right one is important.
Think about your audience. Kids might like playful fonts. Business sites need clean fonts. Make sure the font is easy to read.
Font size matters too. Big fonts are easy to read. Small fonts might be hard. Choose a size that works for everyone.
Different fonts show different moods. Happy fonts make people smile. Serious fonts feel professional. Think about what your site needs.
Color is important. Dark fonts on light backgrounds are easy to read. Bright colors might hurt the eyes. Choose wisely for a good look.
Many websites offer free fonts. Google Fonts has many choices. Fontsquirrel is another good site. Check out Adobe Fonts for more.
Make sure the font fits your theme. Not all fonts work with every style. Test them before using.
Using Google Fonts
First, visit the Google Fonts website. Choose the font you like. Click the plus sign to add it. A small box appears at the bottom. Click it to open. You will see a code. Copy this code. Now, go to your WordPress dashboard. Find Appearance and then Editor. Paste the code in the header.php file. Save changes. The new font is now added.
After adding the font, you can change its style. Go to the style.css file. Find the text element you want to style. Use font-family property. Add the name of your new font. You can also change the font-size. Use font-weight for bold or light styles. Save your changes. Your text now looks different and unique.
Adding Fonts Via Custom Css
Accessing Theme Customizer is the first step. Log into your WordPress dashboard. Navigate to Appearance and click on Customize. Now you are in the Theme Customizer. Here, you can make changes and see them live.
For Writing Custom CSS, find the Additional CSS section. Click to open a blank box. In this box, you can add your custom CSS code. To change fonts, use the font-family property. Type the CSS rule for your desired font. Make sure to save your changes. Check the preview to see how it looks. If satisfied, click Publish.
Uploading Custom Fonts
Different fonts come in various file formats. The most common formats are TTF, OTF, and WOFF. Each format works with different browsers. TTF and OTF are older but widely used. WOFF is modern and preferred for web use. Check the font’s compatibility before uploading. Some formats may not work on all devices. Ensure your chosen font supports multiple browsers.
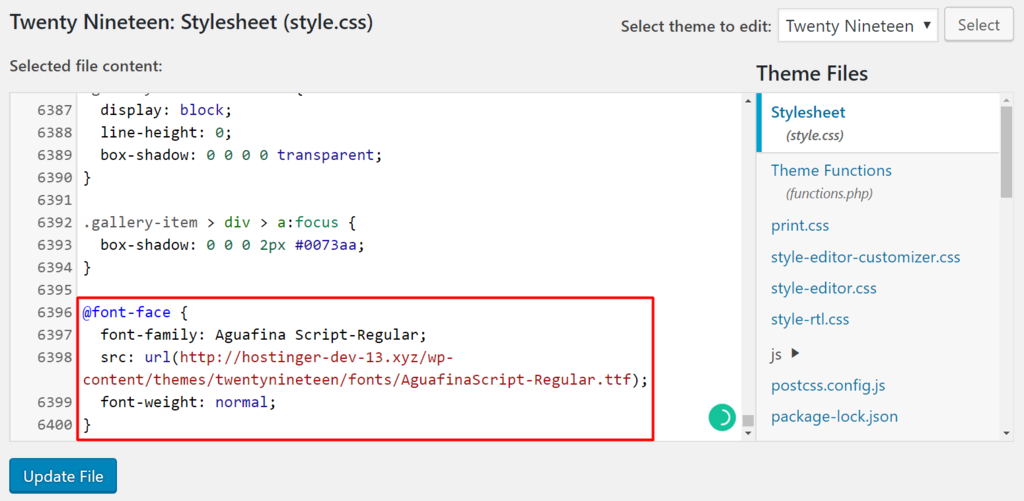
First, locate your theme folder. Use an FTP client to access it. Find the folder named fonts. Upload your font files here. Ensure the files are in the right format. After uploading, edit your theme’s CSS file. Include the new font in the CSS. Use the @font-face rule to define the font. Specify the path to your uploaded font files. This makes your custom font available.
Credit: www.greengeeks.com
Integrating Fonts With @font-face
The @font-face rule lets you add custom fonts. This helps your website look unique. You can use any font from your computer. First, you need to find the font file. It should be in formats like .ttf or .woff. Save this file in your theme folder.
After saving the font file, open the style.css file in your theme. Add the @font-face code at the top. Make sure to write the correct path to the font file. Use the font-family name to apply the font. You can now use this font anywhere on your site. Just use the same font-family name.
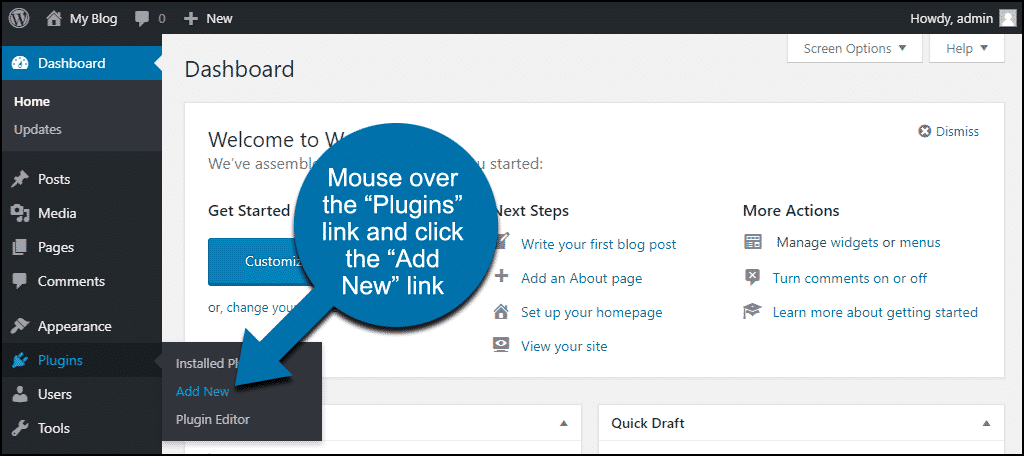
Using Font Plugins
Explore font plugins to easily add new fonts to your WordPress theme. These tools allow customization without coding. Enhance your site’s appearance by selecting unique fonts that reflect your style.
Popular Font Plugins
Adding new fonts to a WordPress theme can be easy. Font plugins help you do it quickly. Popular ones like Google Fonts and Easy Google Fonts are great choices. They offer a wide range of fonts. You can choose any style you like. These plugins are user-friendly. Even beginners can use them without any trouble. They also provide many customization options. This makes your website look unique and attractive.
Configuring Plugin Settings
After you install the font plugin, it’s time to configure it. Go to the WordPress dashboard. Find the plugin settings. Click on it to open the options. You can pick any font you want from the list. Adjust the font size and style to fit your theme. Save the changes once you’re done. Check your site to see how the new font looks. Enjoy the fresh look of your website!

Credit: www.youtube.com
Testing And Troubleshooting
Different browsers can display fonts differently. Test your font in Chrome, Firefox, and Safari. Check if the font looks the same. Sometimes, fonts may not appear correctly. Use tools like BrowserStack to test. This helps see how your font looks everywhere. Make sure text is readable in all browsers. Always keep users in mind. A consistent look is very important.
Fonts can sometimes have problems. They may not load properly. Check your theme settings first. Ensure the font files are uploaded correctly. Verify the font paths in the CSS. Look for typos in the file paths. Use browser developer tools to find errors. Cache issues can also cause problems. Clear your browser cache and try again. If issues persist, consult online forums or support.
Frequently Asked Questions
How Do I Install A New Font In WordPress?
To install a new font, access your WordPress dashboard. Navigate to “Appearance” > “Customize” > “Fonts. ” Use a plugin like Google Fonts Typography or upload custom fonts via FTP. Ensure the font is compatible and properly licensed. Preview changes, then publish to apply the new font.
Can I Add Google Fonts To My Theme?
Yes, you can add Google Fonts to your WordPress theme. Use a plugin like “Google Fonts” for easy integration. Alternatively, manually add the font’s link to your theme’s header file. Customize your theme’s CSS to apply the new font across your site.
What Are The Best Plugins For Fonts?
Popular font plugins include “Easy Google Fonts,” “Use Any Font,” and “Custom Fonts. ” These plugins offer user-friendly interfaces for adding and customizing fonts. They support various font types and provide integration options for Google Fonts and custom uploads, enhancing your site’s typography.
How Do I Upload Custom Fonts To WordPress?
To upload custom fonts, use the “Custom Fonts” plugin or access your site’s files via FTP. Place the font files in your theme’s directory. Update the CSS file to use the new font. Ensure proper font formats are uploaded for cross-browser compatibility.
Conclusion
Adding new fonts to your WordPress theme is simple. It enhances your website’s look and feel. Start by choosing a font that matches your brand. Use Google Fonts or upload your own. Follow the steps to add it to your theme.
Remember to check how it appears on different devices. Consistency in font style improves user experience. With practice, you’ll get better at customizing your site. Now, your website can stand out with unique typography. Keep experimenting with different fonts. Your creativity is the limit.
Enjoy your redesigned website!


