
Are you looking to take control of your data and streamline file sharing? Setting up a web-hosted file server with Synology might just be the perfect solution for you.
Imagine having all your important files at your fingertips, accessible from anywhere, anytime. No more digging through cluttered folders or juggling multiple storage devices. By setting up a Synology web-hosted file server, you can effortlessly organize, share, and secure your files all in one place.
But here’s the catch: setting it up can seem daunting. That’s where we come in. This guide will walk you through every step, ensuring you understand exactly what to do, without any confusing tech jargon. You’ll discover how easy it can be to have your own web-hosted file server, and the benefits it brings to your personal or professional life are immense. So, are you ready to simplify your digital world and take the reins of your data? Let’s dive in and make your file management dreams a reality.
Choosing The Right Synology Nas
Opting for the right Synology NAS simplifies setting up a web-hosted file server. Explore user-friendly features, ensuring efficient file management and secure access for your needs. Enjoy seamless storage solutions with intuitive setup guides that cater to all skill levels.
Evaluating Storage Needs
Think about how much data you need to store. Photos, videos, and documents can take up a lot of space. Families and businesses might need more storage. Check the capacity of each Synology NAS model. Some models offer expandable storage. This means you can add more space later. Make a list of all your files. This helps you know the right size.
Understanding Performance Requirements
Consider how fast you need the file server to be. Faster models are better for streaming and sharing big files. Check the processor and memory specs. These affect how quick the NAS works. Some models offer more RAM. This helps them handle many tasks at once. Think about the number of people using the server. More users need better performance. A good NAS should meet your speed needs.
Setting Up Your Synology Nas
First, find a good place for your Synology NAS. It needs a flat surface. Connect it to a power outlet. Use the cable that came in the box. Then, connect the NAS to your router. Use an Ethernet cable. This helps the NAS talk to the internet.
Now, power up the NAS. Press the power button. Wait for the lights to turn on. The NAS is now on. It is ready for you to use. Check the lights. They should be green. If not, check your connections. Make sure all cables are tight.
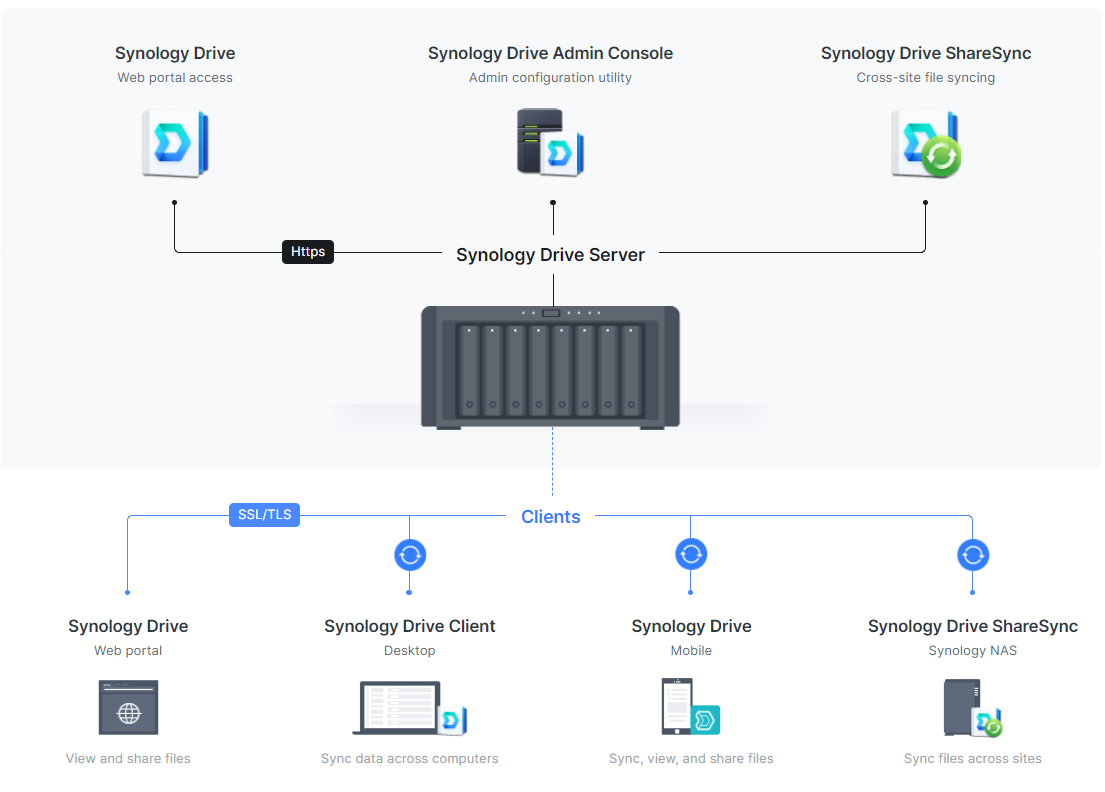
Open a web browser on your computer. Type “find.synology.com” in the address bar. Hit enter. Your NAS will appear on the screen. Click on it. Follow the setup wizard. It’s easy and fast.
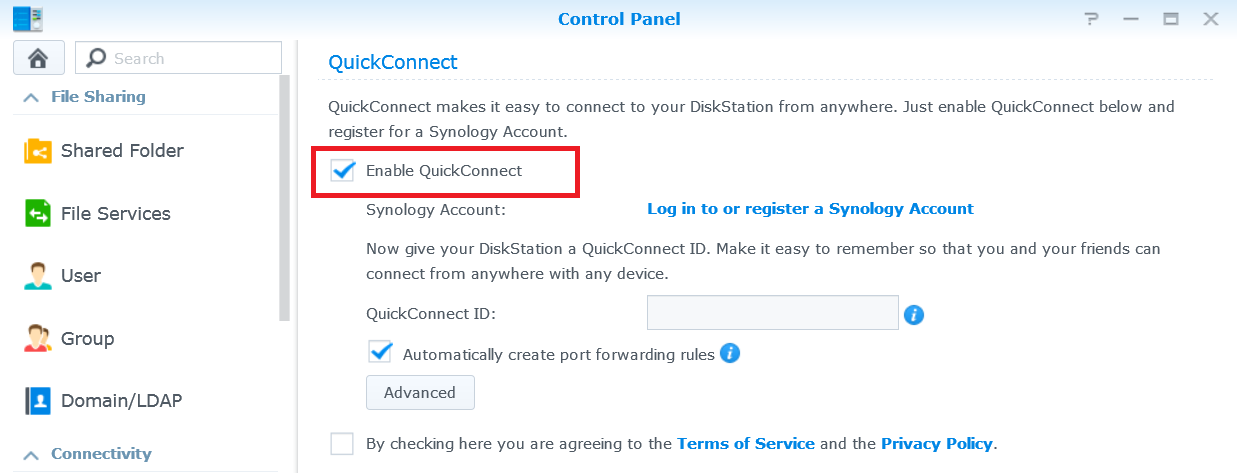
Create a username and password. Keep them safe. You will need them later. Set up QuickConnect. This helps you access your NAS from anywhere. Finally, update the software. This keeps your NAS secure. Now, your Synology NAS is ready for use.
Installing Necessary Software
Start by installing DSM on your Synology device. DSM is the operating system for Synology. It helps you manage your files and apps. You need a computer to begin. Go to the Synology website. Find the latest DSM version. Download it on your computer.
After downloading, connect your Synology device to the computer. Follow the DSM installation steps carefully. Make sure your Synology is connected to the internet. This helps with updates. Once DSM is installed, your device is ready for use.
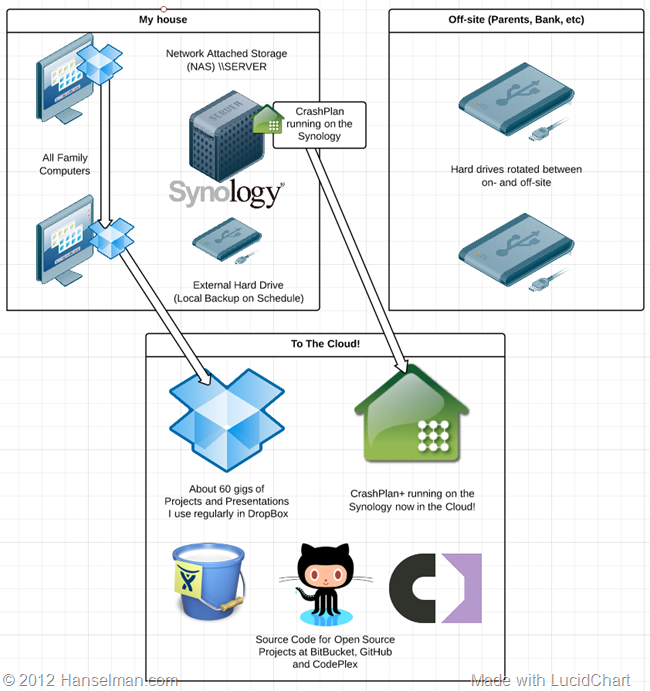
You need some essential packages for file hosting. Start with the File Station package. It lets you manage files easily. Another important package is Web Station. This package helps in hosting websites. Install PHP and MySQL packages. These are vital for running web applications.
Make sure each package is updated. Updates fix bugs and improve security. You can find these packages in the Package Center. Open Package Center on DSM. Search for each package and click install. Installing these packages is easy and quick.
Credit: www.hanselman.com
Configuring Network Settings
Assigning a static IP is important for your Synology server. This helps your devices find the server easily. Go to your router settings. Find the DHCP reservation option. Enter your server’s MAC address. Assign a fixed IP address. Save the changes. Now, your server always gets the same IP.
Port forwarding is crucial for accessing the server from outside. Open your router’s admin page. Find the port forwarding section. Add a new rule for your Synology server. Use port numbers like 5000 or 5001. Set the internal IP to the server’s static IP. Save the settings. This allows external access to your server.
Creating And Managing User Accounts
Create user accounts on the Synology server easily. Enter user names and passwords. Users need these to log in. You can set permissions for each user. This decides what they can see and do. Some users need more access. Others need less. Permissions help keep files safe and private.
Access controls decide who can enter files. Use these to keep data safe. Only allow access to trusted users. Control settings are important. They stop people from seeing things they shouldn’t. Regularly check these settings. Make sure they are correct. Update them when needed. This helps protect your data.
Setting Up File Sharing Protocols
Synology allows easy setup of SMB/CIFS for file sharing. First, go to the Control Panel. Select File Services. Then choose SMB/CIFS. Check the Enable SMB service option. This makes sharing files simple. Use this for Windows and Mac systems. It is fast and reliable. Make sure your firewall allows SMB traffic. That’s it! You are ready.
Set up FTP for basic file access. Go to the Control Panel. Click on File Services. Choose FTP. Enable FTP by checking the box. For secure transfers, use SFTP. It encrypts your files. Go to the same panel. Find the SFTP option. Check to enable. SFTP is safer than FTP. Always prefer SFTP. Safety first!
Enhancing Security Measures
Setting up a Synology web-hosted file server enhances security measures. Protect your data with secure access controls. Ensure safe file sharing and management for peace of mind.
Enabling Firewall
Firewalls protect files from bad people. They act like a guard at a gate. Synology NAS devices have built-in firewall options. Users must turn on these options. This stops attacks from outside. Firewalls help keep data safe. It’s easy to set up. Follow the steps in the system. Always update firewall rules. This keeps protection strong. Firewalls are important for security.
Implementing Ssl Certificates
SSL certificates make data safe when moving. They use strong codes. Synology supports SSL certificates. Users can use them for secure connections. Installing SSL is simple. First, get a certificate from a trusted place. Then, put it on the server. This stops others from seeing private info. SSL certificates protect data from hackers. They are key for web safety.
Monitoring And Maintenance
Keeping your system updated is very important. New updates fix bugs and improve security. Always check for updates in the Synology system. Updates help protect your data. You can set the system to update automatically. This way, you never miss an update. Always back up your data before updating. Backups keep your files safe.
Use tools to check how the server is working. Synology provides built-in tools for this. These tools show you how much storage you use. They also show how fast the server is. Check these tools regularly. They help you catch problems early. Fixing problems early keeps the server running well.
Troubleshooting Common Issues
Internet not connecting? Check your network cables. Ensure they are plugged in. Sometimes, cables come loose. Restart your router and server. This helps fix small issues. Use a ping test to check connection. Type “ping” followed by the website name. If results show, your connection works. If not, check your settings. Look at your firewall. It might block connections. Adjust settings if needed.
Can’t open files? Check your permissions. Files need correct rights. Go to the file settings. Ensure users have access rights. Sometimes files are corrupted. Run a file repair tool. It fixes damaged files. Check file paths. Paths should be correct. Wrong paths mean files won’t open. Check the server logs. Logs show errors. They help find problems. If errors show, adjust your settings.
Credit: kb.synology.com
Credit: kb.synology.com
Frequently Asked Questions
Can I Host A Website On A Synology Nas?
Yes, you can host a website on a Synology NAS using Web Station and compatible applications. It supports PHP, MySQL, and Apache. Ensure your NAS is properly configured and connected to the internet. This setup allows easy management and scalability for personal or small business websites.
How Do I Setup A Synology Nas As A Media Server?
To set up a Synology NAS as a media server, install Plex or Video Station. Ensure your NAS is connected to your network. Organize your media files and add them to the shared folder. Configure the media server app settings.
Access your media files via compatible devices.
What Is The Best File System For Synology?
The best file system for Synology is Btrfs. It offers advanced data protection, efficient snapshots, and optimized storage management. Btrfs enhances performance and reliability, making it ideal for Synology NAS users seeking robust file system capabilities.
How Do I Share Files On My Synology Nas Over The Internet?
To share files on your Synology NAS over the Internet, use Synology’s QuickConnect feature. Enable QuickConnect in your NAS settings. Share links via email or apps. Ensure your NAS and router settings allow external access for secure sharing.
Conclusion
Setting up a Synology web hosted file server is straightforward. Follow each step carefully. Your files will be accessible and secure. Remember to monitor your server regularly. Ensure your data stays protected. Enjoy the convenience of remote access. Share files easily with colleagues and friends.
This setup enhances productivity and collaboration. Always keep your software updated. Updates help maintain security and performance. With these tips, your Synology server will run smoothly. Now, start managing your files efficiently. Empower your workflow today.


