Are you looking to get better insights into your website traffic and improve your marketing strategies? Adding Google Tag Manager to your WordPress site with Elementor is a smart move.
It lets you manage all your tracking codes in one place without touching your site’s code every time. But if you’re not sure how to do it, don’t worry. This guide will walk you through the exact steps to add Google Tag Manager code to your WordPress site built with Elementor—quickly and easily.
By the end, you’ll have full control over your tags and be ready to boost your website’s performance. Keep reading to make your site smarter and your marketing sharper!
Google Tag Manager Basics
Google Tag Manager is a free tool that helps manage website tags easily. It lets you add and update tags without changing your site code. This saves time and reduces errors. Understanding the basics of Google Tag Manager is key before adding it to WordPress using Elementor.
What Is Google Tag Manager
Google Tag Manager is a tag management system. It allows you to add tracking codes to your website without editing code directly. Tags can include analytics, marketing, and other scripts. GTM organizes all these tags in one place. It works by inserting a small container code on your site. Then, you control tags from the GTM dashboard.
Benefits Of Using Gtm
GTM simplifies tag management and improves site speed. You do not need a developer for every tag update. It reduces errors by testing tags before publishing. GTM also keeps your site code clean and organized. It supports many tag types, including Google Analytics and AdWords. Tracking becomes easier, helping you understand visitor behavior better.

Credit: www.youtube.com
Preparing Your Google Tag Manager Account
Preparing your Google Tag Manager account is the first step to manage tags on your WordPress Elementor site. This process sets the foundation for tracking and analytics. It ensures that you can easily add and update tags without touching the code repeatedly.
Follow these simple steps to create your account, set up a container, and get the code snippet. These are necessary to connect Google Tag Manager with your website.
Creating A Gtm Account
Start by visiting the Google Tag Manager website. Click on “Create Account” to begin. Enter your account name, usually your company or website name. Select your country to match your location. Keep sharing data with Google off unless you want to help improve services. This step is straightforward but essential for organizing your tags.
Setting Up A Container
Next, create a container within your account. A container holds all your tags, triggers, and variables. Name the container after your website or project. Choose “Web” as the target platform since you use WordPress. Click “Create” and accept the terms of service. The container acts like a box holding all your tracking codes.
Obtaining The Gtm Code Snippet
After creating the container, Google Tag Manager shows you two code snippets. One goes in the head section of your website, the other right after the opening body tag. Copy both snippets carefully. These codes link your WordPress Elementor site to Google Tag Manager. You will add these snippets to your site to start managing tags easily.
Methods To Add Gtm Code In WordPress
Adding Google Tag Manager (GTM) code to a WordPress site using Elementor can be done in several ways. Each method offers a different approach depending on your comfort with coding and plugins. Choosing the right method ensures your GTM works smoothly for tracking and marketing purposes.
Below are common methods to add GTM code in WordPress. These options work well with Elementor-built sites.
Using Theme Functions
You can add GTM code by editing your theme’s functions.php file. This method inserts the code directly into your site’s header and body sections.
Open your theme’s functions.php file via the WordPress dashboard or an FTP client. Add a small PHP snippet that prints the GTM code in the right place. This method avoids plugins and keeps your site lightweight.
Be careful when editing theme files. A small mistake can break your website. Always back up before making changes.
Using A Plugin
Plugins make adding GTM code simple and safe. Several free plugins allow you to paste your GTM container ID without touching code.
Install a plugin like “Insert Headers and Footers” or a dedicated GTM plugin. Paste your GTM code in the plugin’s settings panel. The plugin handles placing the code correctly.
This method suits beginners or those who want quick setup without risk. Plugins also keep code updates easier.
Manually Adding Code In Header
Manually placing GTM code involves editing your site’s header.php file. This file controls the content inside the
tag of your pages.Access header.php through your theme editor or FTP. Insert the GTM script code just after the
tag starts. For full functionality, also add the no-script part after the opening tag.This method requires basic coding knowledge. It gives full control but risks errors if done incorrectly.

Credit: www.analyticsmania.com
Integrating Gtm With Elementor
Integrating Google Tag Manager (GTM) with Elementor allows you to manage website tags easily. GTM helps track user actions and improve marketing strategies. Adding GTM code in Elementor is simple with the right method.
This section explains two easy ways to add GTM code in your Elementor site. Each method fits different needs and skill levels.
Adding Code Via Elementor Header/footer Plugin
The Header/Footer plugin is a popular tool to insert code snippets. Install and activate the plugin first. Then, go to its settings in the WordPress dashboard.
Choose the option to add code to the header section. Paste your GTM container code here. Save the changes to apply the code site-wide.
This method keeps your GTM code safe during theme updates. It also works well with Elementor’s page builder. No need to edit theme files manually.
Using Elementor’s Custom Code Feature
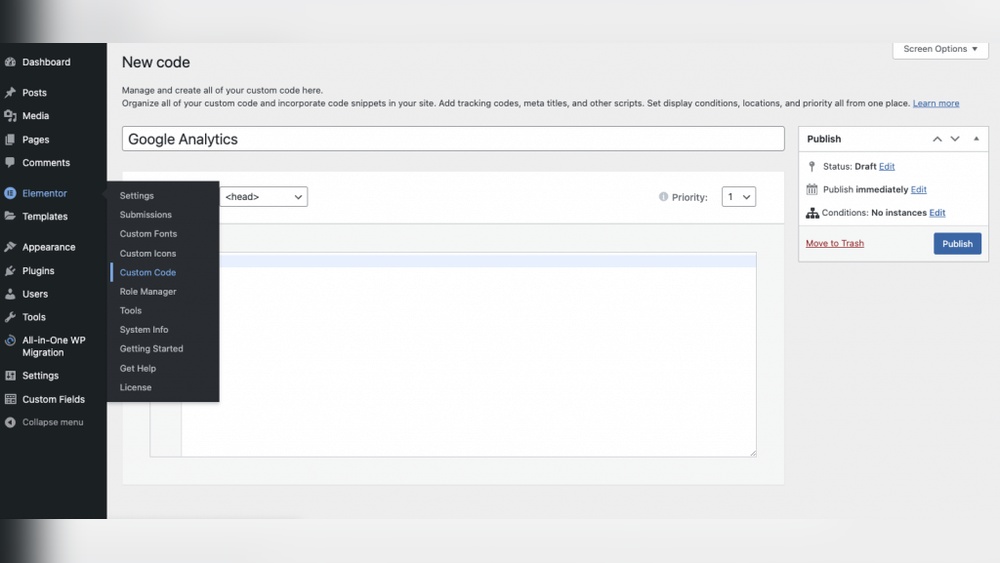
Elementor Pro offers a built-in way to add custom code. Navigate to Elementor > Custom Code in your dashboard. Click “Add New” to create a new code snippet.
Enter your GTM code in the code box. Set the location to “Header” to ensure proper loading. Assign the code to load on the entire site.
Save and publish the custom code. Elementor will load the GTM code automatically on all pages. This method requires Elementor Pro but is very user-friendly.
Verifying Gtm Installation
After adding Google Tag Manager (GTM) code to your WordPress Elementor site, verifying the installation is crucial. This step ensures your tags work properly and your data tracking is accurate. Without verification, you might miss important visitor insights or face tracking errors.
Verification also confirms that GTM connects well with your website. It helps catch issues early before they affect your analytics. Use simple tools and methods to check if GTM runs correctly on your pages.
Using Gtm Preview Mode
GTM Preview Mode shows how tags fire on your site in real time. Activate it from your GTM dashboard. Then, visit your WordPress site in the same browser.
You will see a debug panel at the bottom. This panel lists all active tags, triggers, and variables. It helps confirm if your GTM code loads and triggers correctly.
Check pages where you expect tags to fire. Look for errors or missing tags. Preview Mode is a quick way to verify your setup before going live.
Checking With Tag Assistant
Google Tag Assistant is a free Chrome extension. It scans your site to detect Google tags, including GTM. Install the extension and enable it on your WordPress site.
Tag Assistant reports if GTM code is present and working. It also shows tag firing status and any errors. Use this tool for a clear, easy GTM status check.
This method is helpful for beginners. It provides visual feedback and troubleshooting tips. Make sure to refresh your site while using Tag Assistant.
Troubleshooting Common Issues
Sometimes GTM does not appear or work as expected. Check if the code snippet is placed correctly in Elementor. The code must go in the header or body as instructed.
Clear your site cache and browser cache. Old cached versions can block GTM updates. Also, disable conflicting plugins that might block scripts.
Verify your GTM container ID matches the one in your account. Mistyped IDs cause tracking failures. Use Tag Assistant and Preview Mode to spot problems quickly.
Best Practices For Gtm In WordPress
Using Google Tag Manager (GTM) in WordPress with Elementor can improve your website tracking. Following best practices helps avoid common problems. It keeps your site running smoothly and your data accurate.
Organizing your GTM setup is important. It reduces errors and saves time. Security also plays a key role. Protect your GTM account to keep your data safe.
Avoiding Code Duplication
Insert the GTM code only once in your WordPress site. Multiple copies can cause tracking errors. Use Elementor’s custom code feature or your theme’s header section. Check your site source code to confirm the code appears once.
Keeping Gtm Updated
Regularly check your GTM container for changes. Remove unused tags and triggers to speed up your site. Test new tags in preview mode before publishing. Keep your GTM and WordPress plugins updated to avoid compatibility issues.
Securing Your Gtm Account
Use strong passwords and enable two-factor authentication on your Google account. Limit user access to trusted team members only. Review permissions often and remove inactive users. Keep your GTM container private to protect your data.

Credit: www.wpelemento.com
Frequently Asked Questions
How Do I Install Google Tag Manager In Elementor?
To install GTM in Elementor, get your GTM code from Google. Use a plugin or add code in Elementor’s header. This activates tracking across your site without editing theme files.
Can I Add Google Tag Manager Without A Plugin?
Yes, you can add GTM code manually via the theme’s header. php file or Elementor’s custom code feature. However, plugins simplify the process and reduce errors.
Where To Find Google Tag Manager Container Id?
Your GTM container ID is in your Google Tag Manager account dashboard. It starts with “GTM-” followed by letters and numbers, needed to embed the code correctly.
Will Google Tag Manager Slow Down My WordPress Site?
No, GTM loads asynchronously, so it minimally impacts site speed. Proper implementation ensures your WordPress site remains fast and responsive.
Conclusion
Adding Google Tag Manager code to your WordPress site using Elementor is simple. Follow the steps carefully for best results. This tool helps track your website’s performance easily. You control tags without changing the code later. Keep your site organized and ready for updates.
Start tracking important data to improve your site. Taking a few minutes now saves time in the future. Keep learning and adjusting for better results.