
Creating a subdomain with Namecheap might sound technical, but it’s much simpler than you think. Imagine having a sleek, organized website where each section has its own unique address.
This is what subdomains offer. Whether you’re launching a blog, setting up a shop, or creating a dedicated space for customer support, subdomains can make your site more efficient and user-friendly. But here’s the real kicker: mastering subdomains can significantly boost your website’s SEO and user experience, giving you an edge over your competition.
Curious to find out how you can leverage this simple trick to enhance your online presence? Stick around, and let’s dive into the step-by-step process that will empower you to set up your first subdomain with ease.
Credit: www.namecheap.com
What Is A Subdomain?
Creating a subdomain might seem like a daunting task at first, but once you understand what a subdomain is, it becomes surprisingly simple and incredibly useful for website management. A subdomain allows you to organize and compartmentalize different sections of your website under a single domain name. Think of it as creating rooms within your house, each serving its own purpose, yet all part of the same structure. This concept can streamline your web presence and enhance user navigation. Let’s dive deeper into the essence of subdomains and how you can effectively leverage them using Namecheap.
A subdomain is essentially a prefix added to your main domain name, creating a unique web address that directs users to specific sections of your site. Imagine you own the domain “example.com.” A subdomain could be something like “blog.example.com” or “shop.example.com.” This technique helps you organize content effectively without needing a separate domain.
Why is this important? It allows you to tailor content to specific audiences or functions without cluttering your main site. Subdomains can host different software applications or serve as testing grounds for new ideas. This flexibility can be a game-changer in how you manage your online presence.
Why Use Subdomains?
Subdomains can enhance your site’s functionality by providing clear pathways for users. They help visitors quickly find the section of your site relevant to them. For example, if you run an e-commerce site, a subdomain like “shop.example.com” can create a dedicated space for your store, separate from other content.
Additionally, subdomains can assist with SEO by allowing targeted keywords for different sections. This means you can optimize each subdomain for specific search queries, potentially increasing traffic to those areas. It’s a win-win for both navigation and search visibility.
How To Create A Subdomain With Namecheap
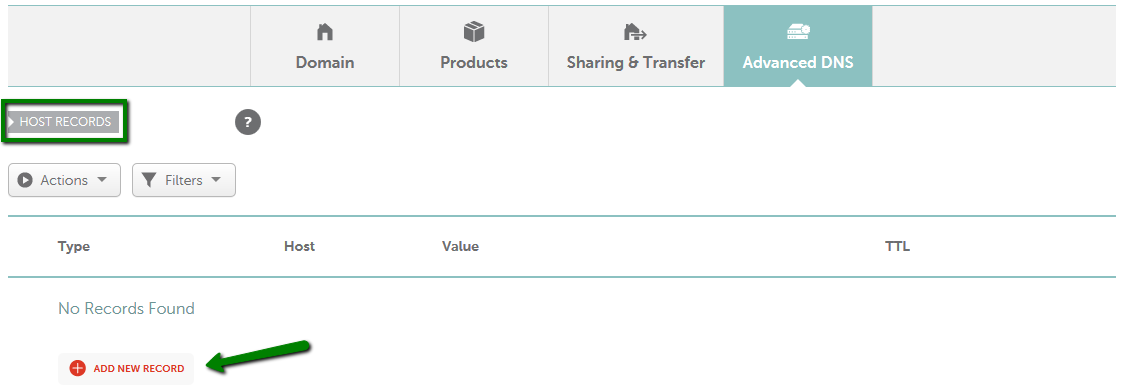
Creating a subdomain using Namecheap is straightforward and requires just a few steps. First, log into your Namecheap account and go to your domain list. Select the domain you want to add a subdomain to, and navigate to the “Advanced DNS” tab.
Once there, look for the “Add New Record” button and click it. Choose “A Record” or “CNAME Record,” depending on your needs, and enter your desired subdomain in the “Host” field. Specify the IP address or URL to redirect to, then save your changes.
Within minutes, your subdomain will be active, ready to serve its purpose. It’s a small step with potentially big benefits for your site organization and user experience.
Are Subdomains Right For Your Website?
Consider your website’s structure and audience. Do you have multiple sections that could benefit from dedicated spaces? Subdomains might be the perfect solution. They offer flexibility in design and functionality, enabling you to cater to diverse needs.
Think about future growth. As your site expands, subdomains can accommodate new ventures without disrupting your existing framework. They’re an investment in your site’s scalability. So, what’s stopping you from enhancing your website structure today?
Benefits Of Using Subdomains
Subdomains offer many advantages for website management and growth. They help organize content, improve SEO, and enhance user experience. Understanding these benefits can guide effective website development.
Enhance Website Organization
Subdomains create separate sections of your website. This helps keep content organized. Each section can have its own focus and design. This separation makes navigation easier for visitors.
Boost Seo Performance
Using subdomains can improve search engine optimization. Each subdomain can target specific keywords. This can lead to better search engine rankings. More visibility can mean more traffic.
Improve User Experience
Subdomains can enhance user experience. They allow for targeted content delivery. Visitors find what they need faster. This leads to higher satisfaction and return visits.
Facilitate Content Management
Subdomains make managing content easier. They allow for different content management systems. This flexibility can streamline updates. It also helps in maintaining a clean website structure.
Support Business Expansion
Subdomains support business growth. They allow testing new markets or products. Businesses can target different audiences. This can expand reach without affecting the main site.
Accessing Your Namecheap Account
Creating a subdomain in your Namecheap account is simple. First, log in to your dashboard. Navigate to “Domain List” and select the domain. Under “Advanced DNS,” click “Add New Record” to set up your subdomain quickly.
Accessing your Namecheap account is the first step towards creating a subdomain with ease. Whether you’re a seasoned web user or a beginner, accessing your account efficiently can save you time and hassle. With a few simple steps, you can dive right into managing your domain settings and adding subdomains to expand your online presence.Understanding The Namecheap Dashboard
Once you log in, you’ll find yourself on the Namecheap dashboard. It’s your central hub for managing all your domain-related activities. Familiarize yourself with the dashboard layout; it will make your future tasks smoother and quicker.Logging Into Your Account
To access your Namecheap account, go to the Namecheap homepage. Click on the “Sign In” button at the top right corner. Enter your username and password, then click “Sign In” again.Forgot Your Password?
Don’t worry if you can’t remember your password. Click on “Forgot your password?” on the sign-in page. Follow the instructions to reset it. You’ll be back in your account in no time.Security Measures
Consider enabling two-factor authentication for an added layer of security. This ensures that even if someone gets hold of your password, they won’t be able to access your account without your phone. It’s a simple step that can protect your valuable domain assets.Exploring The Domain List
After logging in, head to the “Domain List” section. Here, you’ll find all your registered domains in one place. This is where you’ll start when you want to create a subdomain.Why Subdomains Matter
Have you ever wondered why businesses use subdomains? They’re a great way to organize your website into distinct sections. For instance, if you run a blog on your website, you could create a subdomain like blog.yourwebsite.com. It keeps things tidy and improves user experience. Accessing your Namecheap account is not just a technical step; it’s the gateway to enhancing your online footprint. Once you’re in, the possibilities are endless. What’s your next move to make your website more dynamic?
Credit: www.youtube.com
Navigating To Domain List
Find the Domain List in your Namecheap account dashboard. This step is essential for creating a subdomain. Access your domain settings to proceed.
Navigating the Namecheap dashboard can feel a bit like finding your way through a new city. But once you get the hang of it, you’ll be zipping around like a local. One of the key areas you’ll want to explore is the Domain List. This is where you manage your domains, and creating a subdomain is just a few clicks away. First things first, log into your Namecheap account. It’s like opening the door to your digital home. Use your email and password to get started. Once inside, you’ll see your dashboard, which is your central hub for managing everything.Locating The Domain List
On the left-hand side of the dashboard, you’ll notice a menu. Click on “Domain List.” This section is like a directory of all the domains you own. It’s neatly organized, making it easy to find the domain you want to work with.Selecting The Right Domain
Do you have multiple domains? No problem. Scroll through the list until you find the one you want to add a subdomain to. Click on “Manage” next to that domain. This will open up a new set of options specific to that domain.Understanding The Options
Once you’re in the domain management section, you’ll see various settings. Look for the “Advanced DNS” tab. This is where the magic happens. Here, you can create and manage subdomains with ease.Creating Your Subdomain
In the “Advanced DNS” section, you’ll find an option to add a new record. Choose “CNAME Record” or “A Record,” depending on your needs. Enter the desired subdomain name and point it to the correct IP address or domain. Save your changes, and just like that, your subdomain is ready to use! Navigating to the Domain List is straightforward once you know where to click. Have you ever felt overwhelmed by a new dashboard? With a bit of exploration, it becomes second nature. What subdomain project are you excited to start today?Selecting The Domain For Subdomain Creation
Selecting the right domain is crucial for subdomain creation. A subdomain helps organize your website efficiently. It can also enhance user experience. But choosing the correct domain needs careful thought. This process involves understanding your website’s structure and purpose. You must ensure the main domain aligns with your subdomain goals. Let’s explore how to select the ideal domain for your subdomain creation.
Evaluate Your Domain Portfolio
Begin by evaluating your existing domain portfolio. Identify domains that match your subdomain’s purpose. This ensures consistency across your website. A consistent domain strategy boosts brand recognition. It also helps users navigate your site effortlessly.
Consider Domain Relevance
Ensure the main domain is relevant to the subdomain’s content. Relevance improves search engine ranking. It also enhances user trust and engagement. Choose a domain that reflects the subdomain’s theme or topic. This makes it easier for visitors to find the content they seek.
Check Domain Availability
Always check the availability of your chosen domain. Use Namecheap’s domain search tool for this task. This step helps avoid conflicts with existing websites. Ensure your selected domain is unique and available. A unique domain prevents potential legal issues. It also aids in establishing a distinct online presence.
Analyze Domain Keywords
Analyze keywords related to your subdomain. Keywords improve search visibility. They also attract more visitors to your site. Ensure the main domain incorporates relevant keywords. This strategy enhances the SEO potential of your subdomain.
Plan For Future Expansion
Think about future expansion while selecting your domain. Choose a domain that allows room for growth. This ensures your website can adapt to changing needs. A flexible domain strategy supports long-term success. Planning for growth avoids the need for frequent domain changes.
Seek Expert Guidance
Consult with experts if needed. They can provide valuable insights. Expert advice ensures you make informed decisions. It also helps avoid common domain selection pitfalls. Guidance from professionals can streamline the subdomain creation process.
Entering The Subdomain Details
Creating a subdomain on Namecheap involves entering the subdomain details correctly. Provide the desired subdomain name and ensure it aligns with your main domain. Follow the steps accurately to set up the subdomain for your website.
Creating a subdomain can be an exciting step in managing your online presence, allowing you to organize and direct traffic to specific parts of your website. When working with Namecheap, entering the subdomain details is a straightforward process that can be completed in a few minutes. This task involves choosing a name for your subdomain and defining its path, each of which are critical for ensuring your subdomain is both functional and easy to navigate. ###Choosing A Subdomain Name
Selecting a subdomain name is an opportunity to be creative yet practical. A good subdomain name should be short, relevant, and easy to remember. Think about what you’re trying to achieve with this subdomain. Are you creating a blog, a shop, or a gallery? Tailor the name to match its purpose. This way, visitors immediately understand what to expect when they visit your subdomain. For instance, if you’re setting up a blog, a subdomain like “blog.yourwebsite.com” is straightforward and effective. ###Defining The Subdomain Path
The subdomain path is crucial as it determines where the subdomain will point within your website’s file structure. Picture it as a specific folder or directory where all the relevant content for this subdomain resides. You can use an existing folder or create a new one, depending on how you want to organize your files. It’s essential to maintain a clean and logical directory structure. This not only helps in managing your content but also aids in troubleshooting potential issues. Imagine stumbling upon an error because of a misplaced file; such situations can be avoided with a well-defined path. Always double-check your paths for accuracy before finalizing your subdomain setup. By the way, have you ever considered how a well-organized subdomain can improve your site’s navigation? It’s akin to having a well-labeled filing cabinet—everything is in its place, and you know exactly where to find it. Taking the time to enter your subdomain details carefully can pay off in a seamless user experience and efficient site management.Configuring Dns Settings
Create a subdomain on Namecheap by accessing the DNS settings. Navigate to the “Domain List” tab, then choose your domain. Add a new record with your desired subdomain name.
Configuring DNS settings for your subdomain on Namecheap can seem daunting, but it doesn’t have to be. Once you understand the steps, you’ll find it’s a straightforward process that empowers you to tailor your web presence effectively. Let’s dive into the essentials of configuring DNS settings for your subdomain, ensuring your website functions seamlessly.Locating Dns Settings
First, you need to locate your DNS settings in Namecheap. Log in to your Namecheap account and navigate to the “Domain List” section. Click on “Manage” next to the domain you’re working with, and you’ll see the “Advanced DNS” tab. Here’s where the magic happens. You’ll be presented with a dashboard that allows you to control your DNS records. Think of this as your command center for all things DNS-related.Updating Dns Records
Once you’ve located your DNS settings, it’s time to update your DNS records. To create a subdomain, you’ll need to add a new record. Click on “Add New Record” and select “CNAME Record” from the dropdown menu. Enter your desired subdomain in the “Host” field. For example, if you want “blog.yourdomain.com,” type “blog.” Then, input the target domain or IP address in the “Value” field. This tells the DNS where to direct traffic for your subdomain. Save your changes, and voilà—your subdomain is now configured! Updating DNS records might seem technical, but it’s all about ensuring your visitors reach the right destination. Don’t forget to give DNS propagation time, which can take up to 48 hours. Have you ever configured DNS settings before? What tips do you have for making the process smoother? Share your insights in the comments below!Verifying Subdomain Setup
Creating a subdomain with Namecheap can enhance your site’s navigation. Once you’ve set up your subdomain, verifying its configuration is crucial. This step ensures your subdomain functions correctly and is accessible to users.
Testing Subdomain Accessibility
First, open your web browser. Type your subdomain URL in the address bar. Hit enter and wait for the page to load. If the subdomain appears, it is accessible. Ensure the content loads without errors. Check links and images on the page. Verify all elements are displayed correctly.
Troubleshooting Common Issues
If your subdomain isn’t accessible, start with DNS settings. Ensure they’re correctly configured. Check for typographical errors in the URL. Look at domain propagation status. It may take time for changes to reflect globally. Examine server settings for restrictions. Review firewall configurations that might block access. Contact Namecheap support for persistent issues.
Managing Subdomains
Creating a subdomain on Namecheap is straightforward. Navigate to your account dashboard, select your domain, and find the option for subdomains. Enter the desired subdomain name and save changes.
Managing subdomains on Namecheap is a straightforward task. It allows you to organize your website efficiently. Subdomains can enhance your site’s structure. They help in creating separate sections under a main domain. With Namecheap, managing these subdomains is simple. Let’s explore how you can edit and delete subdomains effectively. ###Editing Subdomain Settings
Editing subdomain settings is crucial. It lets you update configurations as needed. Log in to your Namecheap account first. Navigate to the “Domain List” section. Select the domain with the subdomain you want to edit. Click on the “Manage” button. Go to the “Advanced DNS” tab. Here, you can see all subdomain settings. You can change the subdomain’s IP address. Adjust the TTL value to manage cache time. Ensure that new settings match your requirements. Save changes to update your subdomain configuration. Regularly check settings to maintain optimal performance. ###Deleting Unwanted Subdomains
Unwanted subdomains can clutter your domain management. Removing them is easy with Namecheap. Go to your Namecheap account dashboard. Access the “Domain List” section. Select the relevant domain. Click “Manage” and then “Advanced DNS.” Find the subdomain you wish to delete. Click on the trash icon next to it. Confirm deletion to remove the subdomain. Deletion is permanent, so ensure it’s unnecessary. Removing unused subdomains keeps your domain tidy. It also prevents accidental access to outdated content.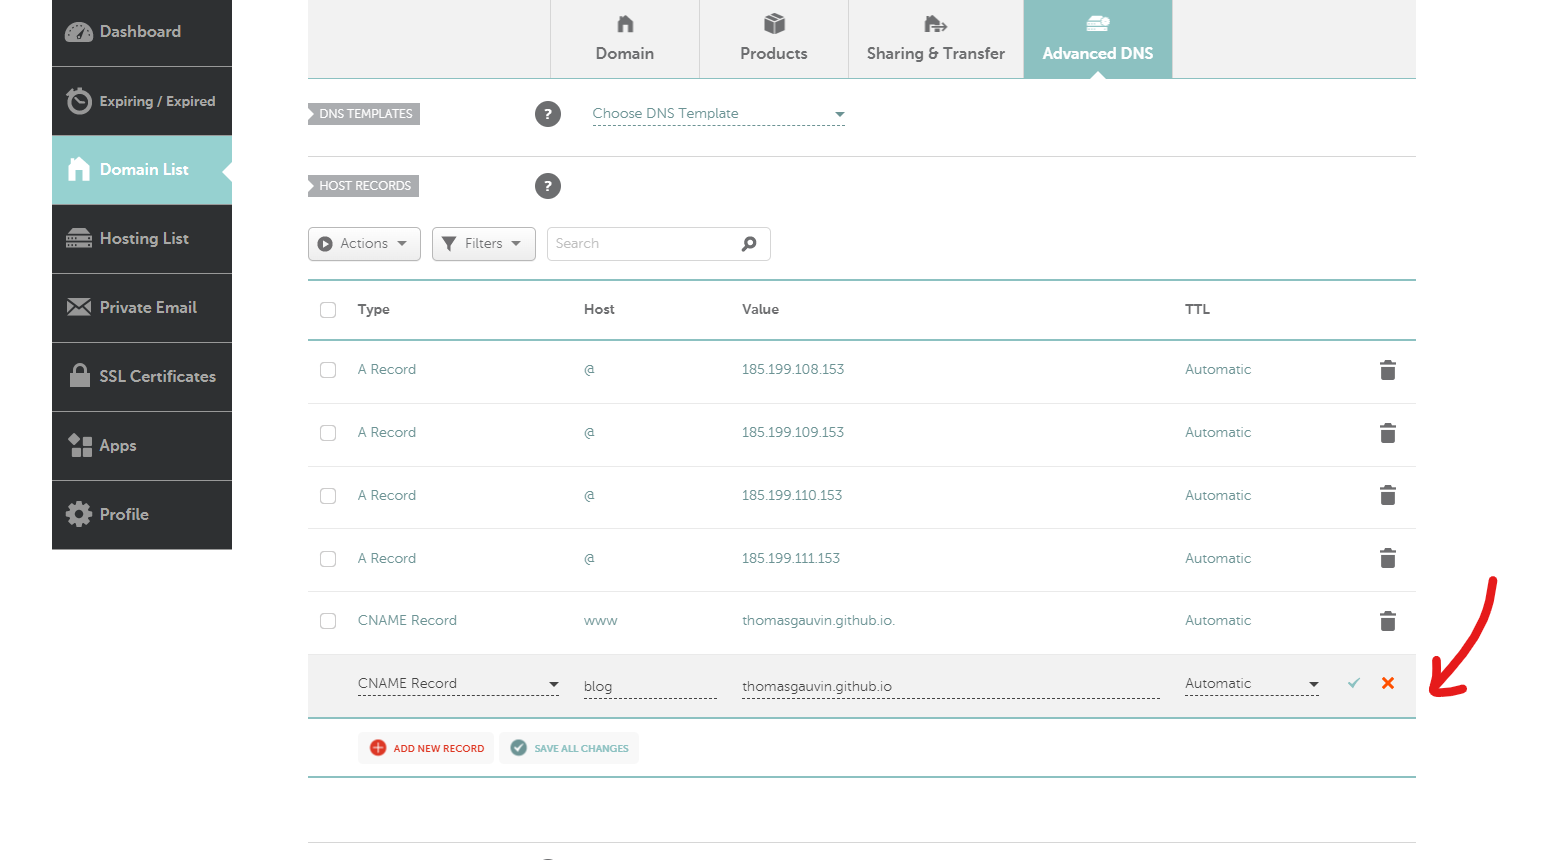
Credit: thomasgauvin.com
Frequently Asked Questions
How Do I Create A Subdomain In Namecheap?
Log into Namecheap and go to the Domain List. Select “Manage” next to your domain. Click “Advanced DNS” and choose “Add New Record. ” Select “A Record” or “CNAME Record” for your subdomain, input details, and save changes. Ensure DNS settings propagate.
How Do I Create My Own Subdomain?
Log into your web hosting account and access the domain management section. Choose “Create Subdomain,” enter your desired name, and link it to a specific directory. Save changes to activate your new subdomain.
Why Are Subdomains Bad For Seo?
Subdomains can dilute SEO efforts by splitting authority between domains. Search engines treat subdomains as separate websites. This might weaken keyword ranking and backlink benefits. Managing multiple subdomains can also complicate SEO strategies. Keeping content under one domain enhances authority and improves search engine visibility.
Is Creating Subdomains Free?
Creating subdomains is typically free if your web hosting provider includes them in your plan. Check with your hosting service for specific details. Some providers might have limitations or fees based on the number of subdomains. Always review your hosting plan’s features to confirm.
Conclusion
Creating a subdomain on Namecheap is straightforward. It enhances your site’s organization. Subdomains help manage different sections easily. They improve user navigation. Setting them up is quick and simple. Follow the steps carefully for best results. Subdomains offer flexibility for various purposes.
They can host a blog, store, or forum. Remember to monitor your subdomain’s performance. Regular checks ensure optimal functionality. Utilize this feature to expand your online presence. Subdomains can be a valuable tool for your website. With Namecheap, setting them up is hassle-free.
Start organizing your website better today!


