
Are you ready to take your website live but feeling a bit overwhelmed by the technicalities? Adding a domain to your hosting account can seem daunting at first, but with Namecheap, it’s a simple process.
Imagine having the power to connect your unique domain name with your hosting account seamlessly. This guide is designed to walk you through each step with clarity and ease, ensuring you can focus on what truly matters—bringing your vision to life online.
By the end of this article, you’ll have the confidence and know-how to add your domain to your hosting like a pro, unlocking the full potential of your online presence. Dive in and discover how straightforward it can be with our step-by-step approach.
Choosing The Right Hosting Plan
Adding a domain to hosting is a crucial step. A hosting plan decides your website’s performance and capacity. Picking the right plan ensures your site runs smoothly. It affects loading speed, uptime, and security. It’s vital for a seamless experience.
Assessing Your Needs
Start by evaluating your website goals. Do you need a simple blog or an e-commerce site? Consider the site’s expected traffic. More visitors demand higher resources. Assess your budget. Hosting plans vary in cost. Choose a plan that fits your financial capacity.
Comparing Hosting Types
There are several hosting types available. Shared hosting suits small sites with limited traffic. It’s cost-effective but shares resources with other sites. VPS hosting offers more control and dedicated resources. It’s ideal for growing sites. Dedicated hosting provides full server access. It’s perfect for large websites needing maximum performance.
Consider your site’s future growth. Opt for a plan that can scale with your needs. Research features like bandwidth, storage, and customer support. These aspects influence your site’s functionality. Make an informed decision to ensure your site’s success.
Purchasing A Domain With Namecheap
Purchasing a domain with Namecheap is a straightforward process. It offers a user-friendly platform. You can easily find and buy a domain. This is an essential step for your online presence. With Namecheap, you ensure a smooth start for your website journey.
Searching For Available Domains
Start by visiting Namecheap’s homepage. Use the search bar to find your domain. Enter your desired domain name. Click the search button to see available options. Namecheap will show a list of possible domains. You can choose from various extensions. This includes .com, .net, .org, and more. Pick the one that best fits your needs. Make sure it’s easy to remember and relevant.
Completing The Purchase
Once you’ve selected a domain, add it to your cart. Review your selection carefully. Proceed to checkout when ready. Namecheap will ask for your account details. If you’re new, create an account first. Follow the prompts to enter your payment information. Namecheap supports multiple payment methods. After payment, your domain is yours. You’ll receive a confirmation email shortly.
Setting Up Your Hosting Account
Easily add a domain to your Namecheap hosting account by accessing the cPanel. Navigate to the ‘Domains’ section, select ‘Addon Domains,’ and enter your new domain. Save changes and your domain is ready.
Setting up your hosting account with Namecheap is like unlocking a new level of your website journey. It’s an essential step that ensures your domain is ready to go live on the internet. Whether you’re a novice or have some experience, this guide breaks down the process into manageable steps. You’re not alone if the thought of setting up hosting makes you anxious. I once felt the same way. But the sense of accomplishment that comes after setting it up is unbeatable. ###Accessing Your Namecheap Dashboard
First, log in to your Namecheap account. Once logged in, head over to the dashboard where all your purchased products are listed. Locate the domain you want to add to hosting. This is your starting point for configuring hosting settings. Click on the “Manage” button next to your domain. This takes you to a page where all the domain settings are available at your fingertips. ###Configuring Hosting Settings
Navigate to the “Hosting” section. Here, you can add your domain to a new or existing hosting plan. If you have already purchased a hosting plan, click on the “Add Domain” button. Simply enter the domain name and follow the prompts. If you need to purchase hosting, select a plan that fits your needs. Consider factors like expected traffic and storage requirements. After adding the domain, wait a short while for the DNS settings to propagate. You might be wondering, how long does this take? Usually, it’s quick, but it can take up to 24 hours. Now, your domain is connected to your hosting account. Ready to publish content and reach your audience? It’s as simple as that. Isn’t it satisfying to see your domain and hosting working together seamlessly? With these steps, you’ve taken a significant leap towards launching your online presence.Credit: help.mailgun.com
Linking Your Domain To Hosting
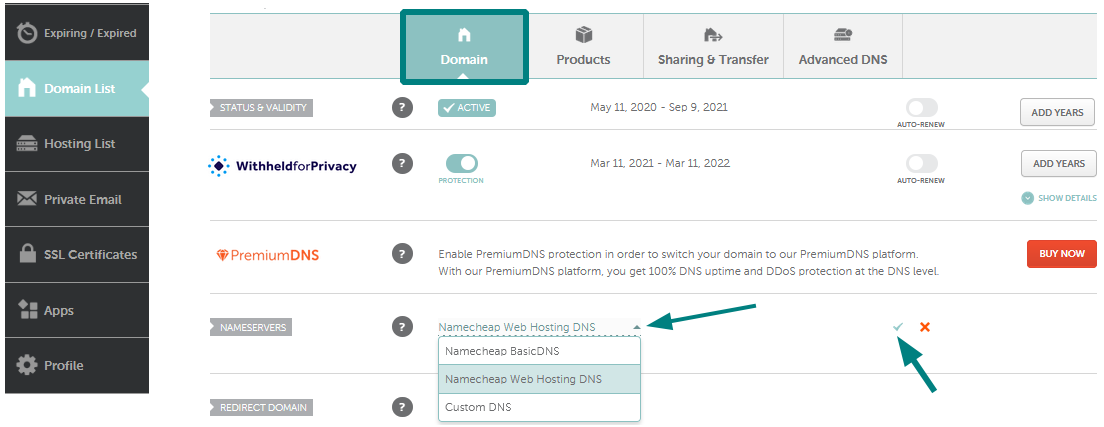
Connecting your domain to hosting with Namecheap is simple. First, access your Namecheap account. Then, navigate to the Domain List and select your domain. Finally, choose the “Manage” button and update the DNS settings to point to your hosting provider.
Linking your domain to hosting can feel like deciphering a secret code, but it’s simpler than you might think. Once you’ve purchased your domain from Namecheap, the next step is to connect it to your hosting service. This connection is crucial for making your website accessible to the world. Whether you’re launching your first blog or an e-commerce store, understanding this process is key. ###Updating Dns Settings
To get started, you’ll need to update your DNS settings. Think of DNS as your website’s GPS coordinates, directing traffic to the right location. Log into your Namecheap account and navigate to your domain list. From there, find the domain you want to link and click on “Manage”. Under the “Nameservers” section, choose “Custom DNS” and enter the nameservers provided by your hosting provider. Save your changes. It may take a few hours for these changes to propagate across the internet. Have you ever waited in line for hours, just to realize you were in the wrong queue? Updating your DNS settings correctly ensures your website visitors don’t experience the same frustration. ###Verifying Domain Connection
Once your DNS settings are updated, it’s time to verify that your domain is correctly connected to your hosting. This step ensures your website is live and functioning as intended. Visit your hosting provider’s control panel and look for an option to verify or test domain connectivity. This might be under a section like “Domain Management” or “Website Settings”. If everything is set up correctly, you should see a confirmation message. If not, double-check your DNS entries for any typos or errors. Have you ever sent a letter to the wrong address? Verifying your domain connection ensures your website’s mail is delivered to the right place. Remember, the process might seem daunting, but with careful attention to detail, you can master it. Do you have any tips or tricks for linking domains? Share your insights in the comments!Installing A Website Platform
Installing a website platform is a crucial step in getting your domain fully functional and ready to showcase your content. With Namecheap, adding a domain to hosting is a straightforward process. But, to make your site truly shine, you’ll need a reliable content management system (CMS). Let’s dive into how you can choose and set up the perfect CMS for your site, making your digital presence both dynamic and user-friendly.
Choosing A Content Management System
Picking the right CMS is like choosing the foundation for your home. You want it to be sturdy, versatile, and easy to build upon. WordPress is a popular choice, known for its flexibility and vast range of plugins. If you’re looking for simplicity and speed, consider Joomla or Drupal, which offer robust features without the bloat.
Are you planning to run an online store? Then platforms like Shopify or WooCommerce might be the best fit for you. Think about your site’s goals and the features you need. Your choice will shape how easily you can manage and update your content.
Setting Up Cms On Namecheap
Once you’ve chosen your CMS, setting it up on Namecheap is the next step. Namecheap provides a handy tool called Softaculous, which simplifies the installation process. You can find it within your hosting control panel. Softaculous offers one-click installations for many popular CMS platforms.
After accessing Softaculous, select your preferred CMS and follow the on-screen instructions. You’ll need to enter details like your site name, description, and admin credentials. This process usually takes just a few minutes, and you’ll have your CMS ready to go.
Imagine how empowering it is to have your site up and running so quickly. Have you ever wondered why some websites stand out more than others? A well-chosen and properly set up CMS can make all the difference. Now, you’re ready to customize, add content, and start engaging with your audience!
Credit: www.namecheap.com
Testing Your Website
Testing your website is crucial after adding your domain to Namecheap hosting. It ensures your site runs smoothly and is accessible to users. This process involves checking domain accessibility and ensuring proper functionality. Both are vital steps to guarantee your website performs well.
Checking Domain Accessibility
First, verify that your domain is accessible online. Open a browser and type your domain name. Your website should appear without errors. If it doesn’t, check your DNS settings. Ensure they point to Namecheap’s servers correctly. This step confirms your domain is live and reachable.
Ensuring Proper Functionality
Once your domain is accessible, test your website’s functionality. Navigate through your pages to check links and content. Ensure forms and buttons work correctly. Test images and videos for proper display. Functionality tests help identify broken links or missing elements. Fixing these issues improves user experience and site performance.
Troubleshooting Common Issues
Encountering issues while adding a domain to Namecheap hosting can be frustrating. But don’t worry. Many users face common problems. Understanding these can save you time and stress. Below, we address some frequent issues and their solutions.
Resolving Dns Propagation Delays
DNS propagation can take up to 48 hours. This delay is normal. During this time, changes spread across the internet. If your domain isn’t working, check DNS settings first. Ensure they’re correctly entered. Use online tools to verify DNS records. Patience is key here. Wait for changes to take effect.
Fixing Platform Installation Errors
Platform installation errors can disrupt your setup. These might occur due to incorrect settings. First, review your installation steps. Ensure all details are correct. Check server requirements. Sometimes software needs specific versions. Install necessary updates if needed. A clean reinstallation might help resolve persistent issues.
Credit: help.mailgun.com
Frequently Asked Questions
How Do I Add A Domain To Namecheap Hosting?
Log into your Namecheap account. Go to the “Domain List” tab. Click “Manage” next to your domain. Select “Advanced DNS” and add your hosting nameservers. Save changes to connect the domain to Namecheap hosting.
How Do I Add A Domain To My Existing Hosting?
Log into your hosting account. Find the “Domains” or “Add Domain” section. Enter your new domain name. Follow the prompts to link it to your hosting. Ensure DNS settings are correctly configured. Check your hosting plan supports multiple domains before proceeding.
Does Namecheap Domain Come With Hosting?
Namecheap domains do not include hosting. You need to purchase hosting separately to host your website. Namecheap offers various hosting plans to meet different needs. Choose a hosting package that suits your requirements for seamless website management.
How Do I Add A Domain To Hosting A Cpanel?
Log in to cPanel, go to “Domains” section, click “Addon Domains,” enter new domain details, and save.
Conclusion
Adding a domain to Namecheap hosting is straightforward. Follow the steps, and you’re set. First, log into your Namecheap account. Next, head to the “Domain List” tab. Choose the domain you want to add. Click “Manage” and find the “Nameservers” section.
Switch to Namecheap’s hosting nameservers. Save your changes. Wait for DNS propagation. This may take a few hours. Once complete, your domain links to hosting. You’re ready to build your site. Enjoy your new online presence with Namecheap. Keep exploring and learning.
Happy hosting!


