
Have you ever felt overwhelmed managing multiple email accounts? You’re not alone.
If you’re using Namecheap email and want to streamline your communication by integrating it with Gmail, you’re in the right place. Picture this: all your emails, organized and accessible from a single platform, saving you time and reducing stress. Sounds like a dream, right?
In this guide, you’ll discover the simple steps to make this happen. Imagine no longer having to juggle between different email services, and instead, enjoying a seamless experience where everything you need is just a click away. By the end of this article, you’ll be equipped with the knowledge to effortlessly merge your Namecheap email with Gmail, making your digital life easier and more efficient. Let’s dive in and simplify your email management once and for all.

Credit: www.linkedin.com
Setting Up Namecheap Email
Integrating Namecheap email with Gmail can streamline communication. Begin by accessing Gmail settings to add your Namecheap email account. This setup helps manage emails efficiently, keeping them organized in one place.
Setting up your Namecheap email to work seamlessly with Gmail is not only convenient but also enhances your email management. Imagine having all your emails in one place without the hassle of switching between platforms. This guide will walk you through the process, making it easy for you to stay organized and efficient. ###Creating Your Namecheap Email Account
First things first, you need to create your Namecheap email account. Log into your Namecheap account and navigate to your Domain List. Click on the “Manage” button next to the domain you wish to use for your email. Under the “Advanced DNS” tab, find the “Mail Settings” section. Here, you can activate the Email Forwarding feature if you haven’t already done so. Once activated, proceed to create your email account by selecting the “Private Email” tab and clicking on “Manage.” Choose “Create New Mailbox” and input your desired email address and password. Keep your password secure but easily memorable. You now have a Namecheap email account ready to configure with Gmail. ###Configuring Email Forwarding
Configuring email forwarding ensures that emails sent to your Namecheap address are automatically sent to your Gmail account. Return to the “Mail Settings” section under “Advanced DNS.” Enter your Gmail address in the forwarding field. This simple step ensures that all incoming mail will reach your Gmail inbox. But it doesn’t stop there. Want to send emails from your Namecheap address through Gmail? You can do that too. Open your Gmail account, go to settings, and click on “Accounts and Import.” Add your Namecheap email under “Send mail as” and confirm the verification process. This setup keeps your professional email identity intact while leveraging the power of Gmail’s user-friendly interface. Have you ever considered how this integration could streamline your daily tasks? It’s a game-changer for productivity. By taking these steps, you’re not just setting up an email account. You’re enhancing your workflow, ensuring every email is just a click away. Give it a try and experience the difference it makes in managing your communications.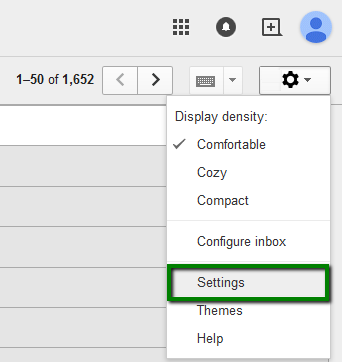
Credit: www.namecheap.com
Linking Namecheap Email To Gmail
Linking your Namecheap email to Gmail is a smart move. It streamlines your communication. You can manage emails from different accounts in one place. This integration simplifies email management. You save time and reduce hassle. Follow these easy steps to link your Namecheap email to Gmail.
Accessing Gmail Settings
First, open Gmail and log in. Look for the gear icon on the top right. Click it to open the settings menu. Select “See all settings” from the dropdown. This takes you to the settings page. Here, you find various options to customize your Gmail experience.
Adding Namecheap Email Account
Go to the “Accounts and Import” tab. You will see several options. Find “Add a mail account” and click it. A pop-up window will appear. Enter your Namecheap email address here. Follow the prompts to complete the setup. You may need server details from Namecheap. This connects your Namecheap email to Gmail.
Configuring Smtp Settings
Configuring SMTP settings is essential for using Namecheap email with Gmail. It allows Gmail to send emails using your Namecheap domain. This ensures professional communication. The process involves a few simple steps. Follow these to seamlessly integrate your email services.
Locating Smtp Server Information
First, find your SMTP server details on Namecheap. Log in to your Namecheap account. Navigate to the “Email” section. Find and note the SMTP server details. These usually include server name, port, and security type.
Entering Smtp Details In Gmail
Open Gmail and go to “Settings.” Click on “Accounts and Import.” Find “Send mail as” and click “Add another email address.” Enter your Namecheap email address. Select “Next Step” to proceed.
Enter the SMTP server information from Namecheap. Include the server name and port number. Choose the correct security type. Enter your Namecheap email password. Click “Add Account” to complete the setup.
Gmail will send a verification email. Check your Namecheap email for this message. Click the link in the email to verify your email address. Your Namecheap email is now configured with Gmail. Enjoy seamless email sending from your domain.
Managing Emails Efficiently
Integrating Namecheap email with Gmail streamlines your inbox, offering seamless management. Connect through Gmail’s settings for unified access, ensuring efficient email handling. This setup enhances productivity, allowing easy email tracking and reply from one platform.
Managing emails efficiently can drastically enhance your productivity. Whether you’re dealing with a flood of messages or trying to keep track of important conversations, strategic email management is key. When you connect your Namecheap email with Gmail, you gain access to powerful tools to streamline this process.Organizing Emails With Labels
Labels in Gmail offer a simple way to categorize your emails. Unlike folders, you can apply multiple labels to a single email, providing flexibility. Imagine having a “Work” label for professional emails and a “Urgent” label for high-priority tasks—it’s like having your own customized filing system. To create a label, click on the “More” option in the left sidebar, select “Create new label,” and give it a relevant name. Once created, you can easily drag and drop emails into these labels. This allows you to find what you need without sifting through endless threads.Using Filters For Automation
Automation can be your best friend when managing emails. Filters in Gmail let you automatically sort incoming messages based on criteria you set. You can automatically label, archive, or even forward emails without lifting a finger. Set up a filter by clicking on the down arrow in the Gmail search box. Enter your criteria, such as a specific email address or keyword, and choose what you want Gmail to do with these emails. For instance, you could filter all emails from your boss into a “Priority” label, ensuring you never miss an important update. Have you ever thought about how much time you could save with these simple tricks? By organizing with labels and automating with filters, you can reduce clutter and focus on what truly matters. Give it a try and watch your email management become a breeze. By efficiently managing emails, you’re not just tidying up your inbox; you’re creating a system that supports your workflow. How will you use these tools to enhance your email experience?Troubleshooting Common Issues
Setting up Namecheap Email with Gmail can bring convenience and efficiency. Sometimes, users encounter issues during the integration process. These problems can disrupt your email experience. Let’s dive into common issues and their solutions.
Resolving Connection Problems
Connection problems often arise during setup. First, check your internet connection. A stable connection is crucial for seamless integration. Verify your server settings. Ensure the incoming and outgoing server details are accurate. Incorrect details cause connection failure. Double-check your port numbers. Use recommended ports for SMTP and IMAP.
Firewall settings might block connections. Adjust settings to allow Gmail access. Security software can interfere with email connections. Temporarily disable them to test connectivity. Sometimes, browser issues affect email access. Clear browser cache for better performance. Update your browser to the latest version.
Fixing Email Delivery Errors
Email delivery errors frustrate users. Ensure your email address is correct. Typos lead to delivery failures. Check spam settings in Gmail. Legitimate emails may be marked as spam. Adjust settings to avoid missed emails. Verify your Namecheap DNS settings. Improper DNS settings affect email delivery.
Sender authentication is vital. Use SPF and DKIM to authenticate emails. These protocols enhance email delivery reliability. Monitor your email quota. Exceeding limits may result in delivery errors. Regularly check your inbox size and manage storage. Keep an eye on email forwarding settings. Improper settings cause forwarding errors.
Enhancing Security Measures
Enhancing security measures for your Namecheap email with Gmail is vital. Protecting your email accounts from unauthorized access ensures peace of mind. Implementing strong security protocols keeps your data safe from potential breaches. Let’s explore some effective strategies to bolster your email security.
Enabling Two-factor Authentication
Two-factor authentication adds an extra layer of security. It requires a second verification step beyond the password. This can be a code sent to your phone. Activating two-factor authentication in Gmail is easy. Navigate to your account settings. Follow the prompts to enable this feature. This reduces the risk of unauthorized access significantly.
Regularly Updating Passwords
Passwords should be updated regularly. Changing them every few months is recommended. Use a mix of letters, numbers, and symbols. Avoid common words or simple sequences. Strong passwords enhance security. Consider using a password manager. It helps store and generate complex passwords. This makes updates more manageable.

Credit: www.youtube.com
Frequently Asked Questions
How Do I Use My Domain Email With Gmail?
To use your domain email with Gmail, go to Gmail settings. Click on “Accounts and Import. ” Add your domain email under “Send mail as” and “Check mail from other accounts. ” Follow the prompts to configure SMTP and POP3 settings.
Save changes to start sending and receiving emails.
How Do I Integrate Email With Gmail?
To integrate email with Gmail, go to Gmail settings. Click “Accounts and Import,” then “Add a mail account. ” Follow the prompts to link your email address. This lets you send and receive emails from other accounts within Gmail, simplifying email management.
Is Namecheap Email Pop3 Or Imap?
Namecheap email supports both POP3 and IMAP protocols. These allow users to manage their email efficiently. IMAP is ideal for accessing email from multiple devices, while POP3 is suitable for downloading emails to a single device. Choose based on your email management needs.
Can I Use Cpanel Email In Gmail?
Yes, you can use cPanel email in Gmail. Set up Gmail to fetch emails from your cPanel account. Use the “Accounts and Import” settings in Gmail to link your cPanel email. This allows you to manage and send emails from your cPanel account through Gmail.
Conclusion
Connecting Namecheap email with Gmail is simple and beneficial. It helps keep all your emails in one place. You can manage your emails more efficiently. The process is easy and quick to set up. Just follow the steps we discussed.
This integration can save time and reduce stress. It also helps in maintaining a clear inbox. Start using these tips today for better email management. Remember, practice makes perfect. Keep exploring and adjusting settings to suit your needs. Enjoy a more organized digital life with these handy tools.


