
Are you ready to take control of your website by using Namecheap hosting with your GoDaddy domain? It might sound tricky, but it’s easier than you think.
Imagine having the power to manage your domain and hosting separately, giving you more flexibility and better options. In this guide, you’ll discover simple, step-by-step instructions to connect your GoDaddy domain to Namecheap hosting. By the end, you’ll feel confident making your website work exactly how you want.
Keep reading to unlock the full potential of your online presence!

Credit: www.youtube.com
Choosing Namecheap Hosting Plan
Picking the right hosting plan from Namecheap is important for your website’s success. The plan you choose affects your site’s speed, security, and how much traffic it can handle. It also impacts your budget. Take time to understand your needs and match them with the best plan. This will help your website run smoothly and grow over time.
Comparing Hosting Options
Namecheap offers several hosting types. Shared hosting is good for small sites. It is affordable and easy to use. VPS hosting gives more control and power. It fits medium to large websites. Dedicated hosting offers full server control for big sites. There is also WordPress hosting, designed for WordPress users. Compare each option based on your website size, traffic, and budget.
Selecting The Right Plan
After choosing the hosting type, look at the plans available. Check storage space, bandwidth, and the number of websites allowed. Consider features like SSL certificates and backups. Think about your website’s future growth. Pick a plan that can grow with your needs. Avoid plans with too many limits. Choose one that gives you good value and reliable support.
Purchasing Namecheap Hosting
Purchasing Namecheap hosting is the first step to connect your GoDaddy domain. This process is simple and quick. It lets you have a reliable hosting service for your website. Follow the steps below to buy hosting from Namecheap.
Creating A Namecheap Account
Start by visiting the Namecheap website. Click on the “Sign Up” button at the top right corner. Fill in your email, username, and password. Confirm your details carefully. Submit the form to create your account. Check your email for a verification link. Click the link to activate your account. Now you can log in to your new Namecheap account.
Completing The Order Process
Choose the hosting plan that fits your needs. Click “Add to Cart” to start the purchase. Review your order in the shopping cart. Enter your billing details accurately. Select a payment method. Complete the payment securely. After payment, you will get a confirmation email. This email contains your hosting account details. Save it for future reference. Your Namecheap hosting is now ready to use.
Accessing Godaddy Domain Settings
Accessing your GoDaddy domain settings is the first step to connect your domain with Name Cheap hosting. It allows you to manage DNS records and point your domain to the hosting server. This process is simple and can be done quickly from your GoDaddy account dashboard.
Before changing any settings, make sure you have your GoDaddy login details ready. Keep your domain name handy to avoid confusion. Follow these steps to find the domain settings you need.
Logging Into Godaddy Account
Open your web browser and go to the GoDaddy website. Click the “Sign In” button at the top-right corner. Enter your username or customer number and password. Click “Sign In” to access your account dashboard.
Use the “Keep me signed in” option only on private devices. This helps protect your account from unauthorized access. If you forgot your password, use the “Forgot Password” link to reset it.
Navigating To Domain Manager
After logging in, find the “My Products” section on the dashboard. Look for the “Domains” area and click “Manage All.” This opens the Domain Manager where all your domains are listed.
Find the domain you want to connect with Name Cheap hosting. Click on the domain name to open its settings page. Here, you can update DNS, change name servers, and manage other domain features.

Credit: www.youtube.com
Updating Dns Records
Updating DNS records is a key step when using Namecheap hosting with a GoDaddy domain. It tells the internet where to find your website. Without the right DNS settings, visitors cannot reach your site. This process involves changing your domain’s nameservers to point to Namecheap.
Changing nameservers may sound technical. Yet, it is simple and quick. Follow the steps carefully to avoid downtime and keep your website live.
Locating Nameserver Settings
Start by logging into your GoDaddy account. Go to the “My Products” section. Find your domain name and click on it. Scroll down to the “Nameservers” area. This is where you will make changes.
Look for an option like “Manage DNS” or “DNS Settings.” Click on it to open the detailed DNS records. You will see current nameservers here. Make a note of them in case you need to revert.
Changing To Namecheap Nameservers
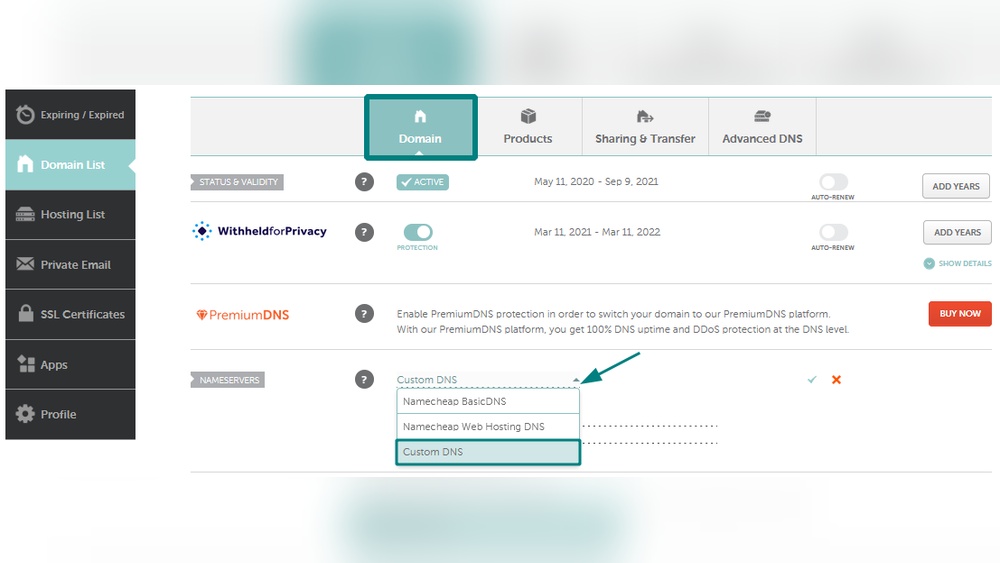
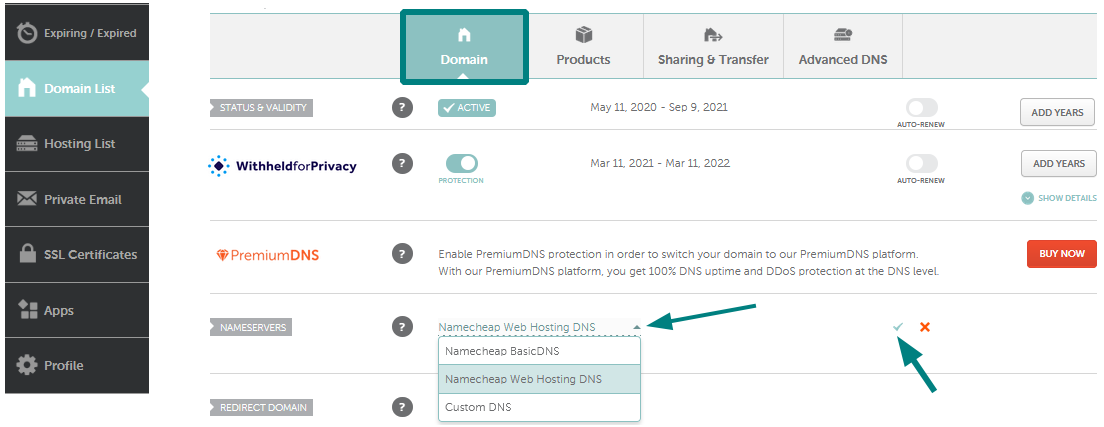
Next, choose the option to change nameservers. Select “Custom” instead of “Default.” Enter the nameservers provided by Namecheap hosting. Usually, they look like ns1.namecheap.com and ns2.namecheap.com.
Double-check the spelling of each nameserver. Save the changes and confirm any prompts. It can take up to 48 hours for the new settings to spread worldwide. During this time, your website may appear offline.
After propagation, your domain will point to Namecheap servers. Your hosting and domain will work together smoothly. This simple update connects your GoDaddy domain to Namecheap hosting.
Verifying Domain Connection
Verifying the connection between your Name Cheap hosting and GoDaddy domain is important. This step ensures your website works properly. After setting up, you must confirm the domain points to the hosting server. This process includes waiting and checking your site online.
Waiting For Dns Propagation
DNS propagation takes time. It can last from a few minutes to 48 hours. During this period, changes to your domain’s DNS settings spread across the internet. You might see your website load from the old server or show errors. Patience is key here. Avoid making changes repeatedly, as this may delay the process.
Checking Website Accessibility
After propagation, test if your website loads correctly. Open a browser and type your domain name. The site should show your Name Cheap hosted content. Clear your browser cache if you see old pages. Use online tools to check DNS status globally. Confirm the domain directs visitors to the new hosting server. If problems persist, review DNS settings or contact support.
Setting Up Hosting Environment
Setting up your hosting environment is the first step to getting your website live. This process prepares your Namecheap hosting space to work with your GoDaddy domain. It involves accessing the control panel and uploading your website files or installing a content management system (CMS). Follow these steps to create a smooth setup for your site.
Accessing Namecheap Cpanel
Start by logging into your Namecheap account. Find the hosting section and click on the domain linked to your hosting plan. Look for the cPanel access button and click it. The cPanel is the control center where you manage your website files and settings. It is user-friendly and easy to navigate. You can manage databases, emails, and security from here.
Installing Cms Or Uploading Files
Once inside cPanel, find the “Softaculous Apps Installer” or “Auto Installer” option. Choose your preferred CMS like WordPress, Joomla, or Drupal. Click the install button and follow the on-screen instructions. If you have custom website files, use the “File Manager” in cPanel. Upload your files to the public_html folder. This folder is the root directory for your website. After uploading, check your domain to see if the site loads correctly.
Troubleshooting Common Issues
Troubleshooting common issues helps keep your website running smoothly. Problems may arise while using Namecheap hosting with a GoDaddy domain. Understanding these issues saves time and stress. This section covers two frequent challenges and how to fix them quickly.
Dns Propagation Delays
DNS changes do not update instantly. It can take up to 48 hours for all servers worldwide to recognize the new settings. During this time, your site might not load correctly. Patience is key. Avoid making repeated changes, as this can cause more delay. Use online tools to check DNS status. They show if your domain points to Namecheap hosting properly.
Ssl Certificate Setup
SSL certificates protect your website and improve trust. Setting up SSL on Namecheap hosting for a GoDaddy domain requires a few steps. First, buy or get a free SSL from Namecheap. Then, activate it in your hosting account. Next, update your domain’s DNS to support SSL. Finally, test the website with https to ensure it works. Errors during setup often involve missing steps or DNS delays. Follow each step carefully for success.
Credit: www.namecheap.com
Optimizing Website Performance
Optimizing website performance is key to keeping visitors happy. Fast websites reduce bounce rates and improve search rankings. Using Name Cheap hosting with a GoDaddy domain means you can control many aspects of your site’s speed. Simple steps can make your website load faster and perform better.
Enabling Caching
Caching saves copies of your website pages. Visitors get these copies instead of loading pages from scratch. This reduces server load and speeds up page display. Enable caching through your hosting control panel or a WordPress plugin. Set cache expiration times to keep content fresh but fast.
Using Cdn Services
A Content Delivery Network (CDN) stores your website files on servers worldwide. Visitors get files from the closest server. This cuts down loading times significantly. Many CDN providers offer easy integration with Name Cheap hosting. Activate CDN to serve images, scripts, and stylesheets quickly to global users.
Frequently Asked Questions
How Do I Connect Namecheap Hosting To Godaddy Domain?
To connect Namecheap hosting to a GoDaddy domain, update your domain’s nameservers in GoDaddy. Use Namecheap’s nameservers found in your hosting dashboard. This links your domain to Namecheap’s servers, enabling your website to load correctly.
Can I Keep My Godaddy Domain With Namecheap Hosting?
Yes, you can keep your domain registered with GoDaddy while hosting with Namecheap. Simply point your domain’s DNS to Namecheap’s hosting servers. This setup separates domain registration from hosting, offering flexibility and control.
What Dns Settings Are Required For Namecheap Hosting On Godaddy?
Set your GoDaddy domain’s nameservers to Namecheap’s default nameservers. Alternatively, update A records to Namecheap’s IP address. This ensures your domain directs visitors to your Namecheap-hosted website without issues.
How Long Does Dns Propagation Take After Connecting Hosting?
DNS propagation usually takes 24 to 48 hours but can be faster. During this time, your domain updates across the internet. Your site might be intermittently accessible until propagation completes.
Conclusion
Using Name Cheap hosting with a GoDaddy domain is simple and effective. Just follow the steps carefully to connect your domain and hosting. This setup helps your website work smoothly. You control both services without confusion. Keep your login details safe for easy access later.
Check your site after setup to ensure everything runs well. With this guide, managing your website becomes easier and clear. Enjoy the benefits of using two trusted providers together. Your online presence is now ready to grow steadily.


