
Are you looking to move your domain from GoDaddy to Namecheap? You’re in the right place!
Whether you’re seeking better pricing, enhanced features, or simply a change, transferring your domain doesn’t have to be a daunting task. In this guide, you’ll discover a step-by-step process that makes the switch smooth and hassle-free. Imagine having the freedom to manage your domain in a user-friendly interface while saving on costs.
We’ve broken down the steps so you can follow along easily, ensuring a seamless transition. Keep reading to unlock the secrets to a successful domain transfer and put yourself in control of your online presence.

Credit: www.youtube.com
Preparation Steps
Start by unlocking your domain at GoDaddy. Next, get the authorization code. Then, initiate the transfer on Namecheap. Enter the code when prompted. Check your email for confirmation. Finally, approve the transfer to complete the process.
Transferring a domain from GoDaddy to Namecheap can seem like a daunting task, but with the right preparation, it becomes a straightforward process. Before you dive in, it’s essential to ensure you have everything ready to make the transfer smooth and hassle-free. These preparation steps will guide you through checking your domain’s eligibility and unlocking it for the transfer.Check Domain Eligibility
Start by confirming that your domain is eligible for transfer. Domains must be registered for at least 60 days before they can be transferred. If your domain is newly registered, you’ll need to wait until this period is over. Double-check if your domain is not involved in any ongoing disputes or holds, as these can prevent a successful transfer. Make sure your domain contact information is up-to-date. Incorrect details can lead to transfer delays or failures.Unlock Domain
Once your domain is eligible, the next step is to unlock it. Domains are typically locked to prevent unauthorized transfers. Log into your GoDaddy account and navigate to your domain settings. Here, you will find the option to unlock your domain. Unlocking your domain is a crucial step; without it, the transfer cannot proceed. Have you ever had an experience where a simple oversight led to unnecessary delays? Ensuring your domain is unlocked can save you from this hassle. While these steps might seem simple, overlooking them can cause significant setbacks. Are you ready to move forward with your domain transfer, or do you have lingering questions?
Credit: www.youtube.com
Gather Necessary Information
Begin by collecting essential details like your Godaddy login credentials and domain authorization code. Verify your domain’s eligibility for transfer and ensure contact information is updated. This preparation simplifies the process and avoids delays in transferring your domain to Namecheap.
Transferring your domain from GoDaddy to Namecheap can be a smooth process when you gather all the necessary information upfront. It’s like preparing for a trip; the more organized you are, the less likely you’ll encounter unexpected issues. By having everything you need ready, you can ensure a seamless transition without any hiccups. Let’s delve into the critical details you need to get started. ###Locate Authorization Code
Finding your domain’s authorization code is a crucial first step. This code is like a key that unlocks the ability to transfer your domain from one registrar to another. Without it, you’ll find yourself stuck, unable to move forward. Begin by logging into your GoDaddy account. Once inside, navigate to your domain management section. Here, you’ll find all the details about your domains, including the sought-after authorization code. You might be wondering, why is this code so important? Well, it acts as a security measure, ensuring only you can authorize the transfer. It’s a safeguard against unauthorized changes to your domain, protecting your online presence. Isn’t it comforting to know that such measures are in place for your security? So, make sure you jot down this code or save it securely. You’ll need it when initiating the transfer process with Namecheap. Have you ever tried finding something in a cluttered room? The same goes for your domain information. Ensure your GoDaddy account is organized, making it easy to locate this code when needed. Embrace the habit of checking for updates or changes in your account settings regularly. This proactive approach can save you time and prevent any last-minute surprises during your transfer journey. Ready to move on to the next step? With your authorization code in hand, you’re well-prepared to continue the transfer process confidently.Initiate Transfer On Namecheap
Start the transfer of your GoDaddy domain to Namecheap with ease. First, unlock your domain at GoDaddy. Then, get the authorization code and enter it on Namecheap.
Transferring a domain from GoDaddy to Namecheap is simple. Namecheap offers user-friendly steps to ensure a smooth process. Follow these steps to initiate the transfer and ensure a successful migration.Access Namecheap Transfer Page
First, visit the Namecheap website. Locate the “Transfer” option in the menu. It is usually at the top of the page. Click on it to access the transfer page. This page allows you to start the domain transfer process. Make sure you have your domain details ready.Enter Domain Details
On the transfer page, you will see a field. Enter your domain name here. Ensure the domain is spelled correctly. Double-check for typos. Click “Search” to proceed. The system will verify if the domain is eligible for transfer. If eligible, you will see further instructions. Make sure you have the authorization code from GoDaddy. You will need it to complete the transfer process.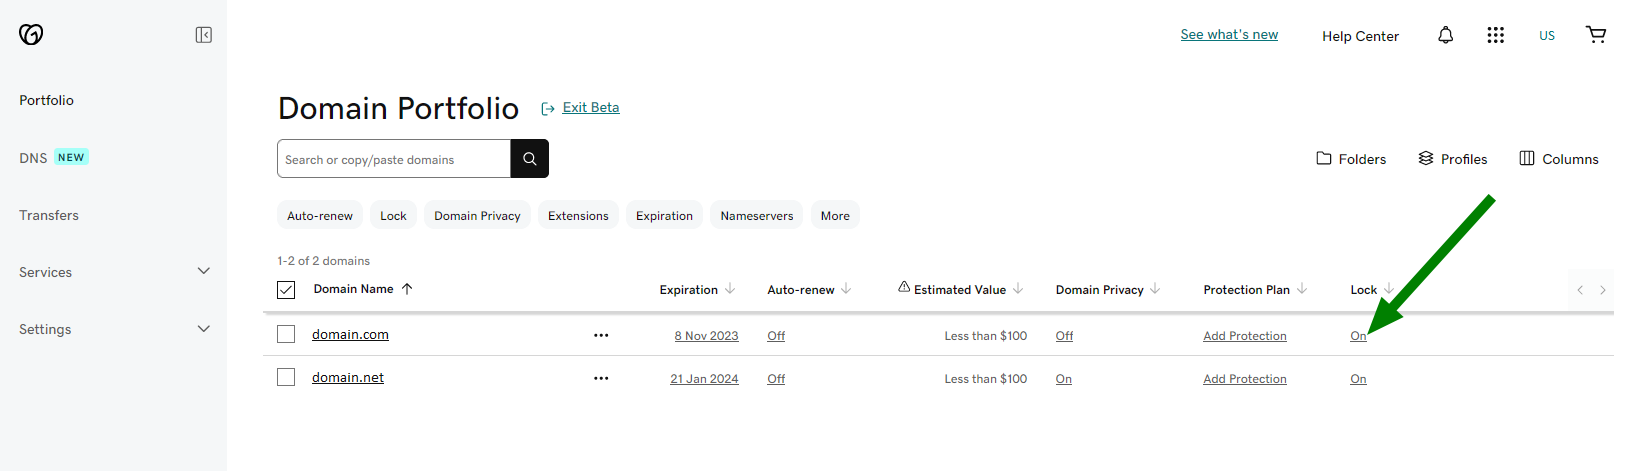
Credit: www.namecheap.com
Verify Transfer Request
Verify the transfer request to move your GoDaddy domain to Namecheap. Ensure all transfer codes are correct. Double-check the domain status to avoid transfer issues.
Transferring your domain from GoDaddy to Namecheap can seem like a daunting task, but breaking it down into manageable steps can make it much easier. One of the most crucial steps in this process is to verify the transfer request. This ensures that your domain is securely and accurately transferred without any interruptions or errors. By taking a few minutes to verify the details, you save yourself from potential headaches down the road.Confirm Via Email
After initiating the transfer, keep an eye on your inbox. You’ll receive an email from GoDaddy asking you to confirm the transfer request. Click the confirmation link in the email to verify that you authorize the transfer. This step is crucial because it acts as a security measure, ensuring that only you can approve the domain transfer. If you’re like me and prone to missing emails, consider setting a reminder to check your spam folder. You don’t want to delay your transfer because of a misplaced email.Monitor Status
Once you’ve confirmed the transfer, it’s time to monitor its status. Log in to your Namecheap account and navigate to the “Domain Transfers” section. Here, you’ll see the status of your pending transfer. Monitoring the status is important because it keeps you informed about any issues that might arise. If there are any hiccups, you’ll be able to address them promptly. Think of it like tracking a package; knowing where it is gives you peace of mind. You wouldn’t want your domain to get lost in the digital ether, would you? Now that you’ve confirmed and are monitoring your transfer, what’s your next step?Completion And Final Steps
Transferring a domain from GoDaddy to Namecheap is a straightforward process. Following the initial steps, you reach the final stage. This involves a few essential tasks to ensure the transfer is complete. Let’s explore these final steps to secure your domain with Namecheap.
Check Domain On Namecheap
Once the transfer is initiated, it may take some time to complete. Visit your Namecheap account to check the domain status. Ensure the domain appears under “Domain List” in your dashboard. This confirms the transfer is successful. If it doesn’t appear, verify the transfer status with Namecheap support.
Update Dns Settings
After confirming the domain is on Namecheap, update the DNS settings. Navigate to the “Domain List” and select your domain. Click “Manage” next to your domain. This will take you to the DNS settings page. Here, you can update the DNS records to match your website’s hosting. Ensure all records are correct to avoid downtime.
Finally, double-check all settings and ensure everything is in order. With these steps, your domain transfer to Namecheap is complete. Enjoy your new home for your domain!
Troubleshooting Common Issues
Transferring a domain from GoDaddy to Namecheap can be smooth. Yet, some users face common issues during the process. Knowing these issues can save time and effort. Below are solutions for frequent problems.
Expired Domains
Domains must be active for transfer. An expired domain cannot move. First, renew your domain on GoDaddy. Once active, start the transfer process again. Check the domain’s status regularly. This ensures it’s ready for transfer.
Incorrect Authorization Code
The authorization code is crucial. It acts as a password for the transfer. Request the code from GoDaddy. Ensure you copy it correctly. Even one wrong character can cause issues. Double-check the code before entering it on Namecheap. If the code fails, request a new one. Repeat the process if needed. This ensures a smooth transfer.
Frequently Asked Questions
Can You Transfer A Domain From Godaddy To Namecheap?
Yes, you can transfer a domain from GoDaddy to Namecheap. Unlock your domain on GoDaddy first. Obtain the authorization code. Initiate the transfer on Namecheap. Follow the instructions provided by both registrars. Ensure the domain is eligible for transfer. The process usually completes within 5-7 days.
How Do I Move My Domain To Namecheap?
Transfer your domain to Namecheap by unlocking it with your current registrar. Obtain the transfer authorization code. Initiate the transfer on Namecheap’s website. Confirm the transfer via email. Wait for the process to complete. Ensure your domain meets Namecheap’s transfer requirements.
How Can I Transfer My Domain From Godaddy?
To transfer your domain from GoDaddy, unlock it first. Obtain the authorization code. Initiate the transfer with your new registrar. Confirm the transfer request via email. Ensure your domain details are up-to-date.
How To Add Godaddy Domain To Namecheap Hosting?
Change DNS settings in GoDaddy to point to Namecheap’s servers. Access GoDaddy account, select the domain, and update nameservers. Use Namecheap’s provided nameservers from your hosting account. Allow 24-48 hours for DNS propagation. Your domain will now be linked to Namecheap hosting.
Conclusion
Transferring a domain is simpler than it seems. Godaddy to Namecheap transfer requires a few steps. Unlock your domain on Godaddy. Get the authorization code. Start the transfer on Namecheap. Enter the code when prompted. Follow the instructions carefully. Wait for confirmation from Namecheap.
Your domain transfer completes in a few days. Keep all emails handy. They are important for tracking. Moving domains improves flexibility. Manage your domains easily with Namecheap. Simplified management. Enhanced control. Happy transferring!


