
Are you thinking about switching your domain from GoDaddy to Namecheap? You’re not alone.
Many people are making the move for better pricing and customer service. But if you’re worried about the transfer process, don’t be. This guide will walk you through each step, ensuring a smooth transition. Imagine having the control and peace of mind knowing your domain is in the right hands.
Keep reading, and you’ll discover how easy this transfer can be, unlocking potential savings and improved service for your online presence. Let’s get started on making your domain switch effortless and worry-free.
Preparing For Transfer
Transferring your domain from GoDaddy to Namecheap can be straightforward. Preparing for transfer is crucial. It ensures a smooth transition. You need to follow specific steps. Each step is essential for a successful transfer. Let’s explore these steps in detail.
Unlocking Your Domain
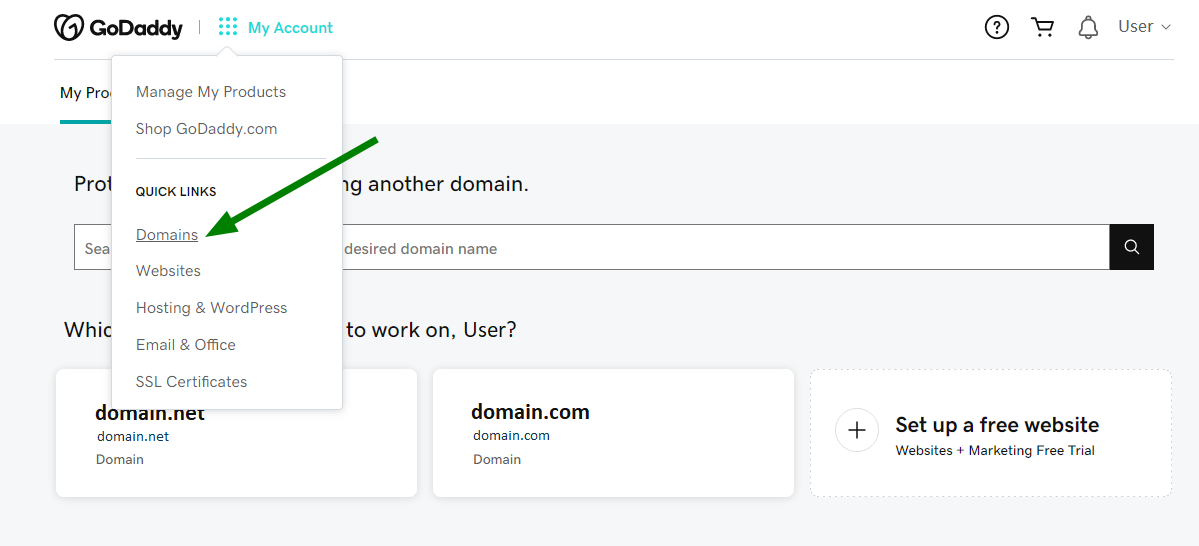
Before transferring, unlock your domain. Log into your GoDaddy account. Navigate to the domain settings. Find the lock icon. Click to unlock. This step is vital for transfer. Without unlocking, you cannot move your domain.
Disabling Domain Privacy
Domain privacy hides your details. Disable it for a transfer. Go to your account dashboard. Locate the privacy settings. Turn off domain privacy. This allows Namecheap to access your information. Privacy must be disabled during transfer.
Obtaining Authorization Code
The authorization code is essential. It is like a password for your domain. Request it from GoDaddy. You might find it in domain settings. Write it down carefully. You will need it for the transfer process.
Credit: www.namecheap.com
Initiating Transfer On Namecheap
Transferring a domain from GoDaddy to Namecheap is simple. Start by unlocking your domain at GoDaddy. Obtain the authorization code, then initiate the transfer on Namecheap. Complete the process by entering the code and confirming the transfer. Your domain will soon be with Namecheap.
Initiating a domain transfer from GoDaddy to Namecheap involves a few simple steps. Namecheap makes it easy with its user-friendly interface. Follow these steps to ensure a smooth transition. This guide will help you initiate the transfer process on Namecheap. ###Accessing The Transfer Page
First, log in to your Namecheap account. If you don’t have one, create it. Once logged in, locate the “Domains” tab at the top of the page. Click on it to open a dropdown menu. From the dropdown, select “Transfer.” This will take you to the transfer page. It’s the starting point for moving your domain. ###Entering Domain Information
On the transfer page, enter the domain you wish to transfer. Ensure it is typed correctly without spaces or errors. Click “Search” to check its availability for transfer. If the domain is eligible, proceed to the next step. This process verifies that your domain can be moved to Namecheap. ###Applying The Authorization Code
Before proceeding, obtain the authorization code from GoDaddy. This code is crucial for transferring your domain. Once you have the code, enter it in the provided field on Namecheap’s transfer page. Double-check the code for accuracy. After entering the code, click “Add to Cart.” This action begins the official transfer process. Your domain is now on its way to Namecheap.Confirming Domain Transfer
Transferring your domain from GoDaddy to Namecheap involves several steps. First, unlock your domain on GoDaddy. Then, obtain the transfer authorization code and initiate the transfer process on Namecheap’s platform.
Transferring your domain from GoDaddy to Namecheap can seem daunting, but confirming the transfer is a crucial step that ensures everything goes smoothly. This part of the process is straightforward, yet it demands your attention to detail. By following a few simple steps, you can be confident that your domain is on its way to its new home.Approving Transfer Via Email
Once you’ve initiated the transfer, check your email inbox for a confirmation message from GoDaddy. This email includes a link or button to approve the transfer. Clicking this link confirms your intent to transfer the domain, a step some users overlook. Ensure that your contact details in the GoDaddy account are current. The approval email is sent to the address on file, and outdated information can delay your transfer. Have you ever missed an important email because of an outdated email address? If the email doesn’t arrive within a few hours, check your spam or junk folders. Sometimes legitimate emails are mistakenly flagged. This step ensures you don’t miss any critical updates.Monitoring Transfer Progress
After approving the transfer, you can monitor its progress through your Namecheap account. Log in and navigate to the domain management section to view the status. It’s reassuring to see your domain transitioning to its new home. The transfer process usually takes a few days. Patience is key here, as domain transfers involve coordination between registrars. Have you ever tracked a package across the country? This is similar, but thankfully, it doesn’t take as long. If you notice any issues or delays, reach out to Namecheap support. They can provide insights and help resolve problems. Their customer service is often praised for its responsiveness and helpfulness. By confirming your domain transfer, you take an active role in managing your online assets. This step ensures the process proceeds without unnecessary hiccups. Taking these simple actions can save you time and frustration, making your domain transfer experience seamless.
Credit: www.youtube.com
Post-transfer Steps
Transferring your domain from GoDaddy to Namecheap is a straightforward process. After the transfer, a few crucial steps remain to ensure your domain functions correctly. These post-transfer actions help verify ownership and update essential settings. Let’s dive into these necessary tasks.
Verifying Domain Ownership
First, confirm your domain ownership. Log into your Namecheap account. Check the domain list. Ensure your newly transferred domain appears there. Click on the domain name. Look for any verification prompts. Follow any instructions provided. This step ensures you have full control.
Updating Dns Settings
Next, update the DNS settings. Access the DNS settings from your Namecheap dashboard. Look for the DNS management section. Enter the correct DNS records. These might include A records, CNAME, or MX records. Accurate DNS settings ensure your website and emails function smoothly. Double-check each entry for errors. Save changes and test your website’s accessibility.
Troubleshooting Common Issues
Transferring a domain from GoDaddy to Namecheap can be smooth. Yet, sometimes issues arise that need troubleshooting. This section will guide you through common problems that can occur during the transfer process. By understanding these issues, you can ensure a seamless transition.
Resolving Authorization Code Errors
Authorization codes are crucial for domain transfers. Double-check the code from GoDaddy. Ensure no spaces or extra characters. Verify the code matches exactly. If errors persist, contact GoDaddy support for assistance. They can provide a new code if necessary. This step is essential for a successful transfer.
Handling Transfer Delays
Transfer delays can be frustrating. Check if the domain is unlocked. Confirm the email address linked to your account is correct. Sometimes, transfers take longer due to registry restrictions. Be patient and monitor the status regularly. Reach out to Namecheap support if the delay exceeds the expected timeframe. They can offer further insights and help expedite the process.
Tips For A Smooth Transfer
Transferring your domain from GoDaddy to Namecheap can feel overwhelming. But with the right guidance, it becomes straightforward. Follow these tips to ensure your domain transfer is smooth and hassle-free.
Checking Domain Eligibility
First, ensure your domain is eligible for transfer. Domains must be at least 60 days old. This is a rule set by ICANN, the internet authority. Also, make sure the domain is not locked. A locked domain cannot be transferred. You can check the lock status in your GoDaddy account. If it’s locked, unlock it for the transfer process.
Ensuring Contact Information Accuracy
Next, verify your contact information. Accurate details are crucial during the transfer. Check your email address listed with GoDaddy. This email will receive important transfer information. Update any outdated contact information. Confirm that your email settings allow messages from Namecheap. This ensures you receive all necessary communications during the transfer process.
Credit: www.exemplifi.io
Frequently Asked Questions
Can You Transfer A Domain From Godaddy To Namecheap?
Yes, you can transfer a domain from GoDaddy to Namecheap. Unlock your domain at GoDaddy first. Obtain the authorization code. Initiate the transfer at Namecheap using the code. Confirm the transfer via email. The process usually completes within five to seven days.
Can I Transfer My Website From Godaddy To Another Host?
Yes, you can transfer your website from GoDaddy to another host. Backup your files and databases first. Update your domain’s DNS settings to point to the new host. Contact the new hosting provider for specific instructions. Ensure everything works correctly after the transfer.
How Do I Transfer My Website To Namecheap?
Transfer your website to Namecheap by updating DNS settings and migrating files to their hosting. Follow their step-by-step guide. Contact support for assistance during the transfer process. Ensure domain settings are correctly configured for seamless transition. Backup your website data before starting the transfer to avoid any loss.
How Can I Transfer My Domain From Godaddy?
To transfer your domain from GoDaddy, unlock it in your account settings. Obtain the authorization code. Initiate the transfer with your new registrar using the code. Approve the transfer via email. The process typically completes within 5-7 days. Ensure your domain is eligible for transfer.
Conclusion
Switching your domain from GoDaddy to Namecheap is straightforward. Follow the steps with care. Ensure your domain is eligible for transfer. Unlock your domain and get the authorization code. Input this code on Namecheap’s transfer page. Verify your email for confirmation.
Wait for the transfer to complete. It usually takes a few days. Namecheap offers a user-friendly interface and competitive pricing. Enjoy the benefits of better service. Now, your domain is in good hands. Happy managing!


