
Are you thinking about transferring your domain name to Namecheap but don’t know where to start? You’re in the right place!
Whether you’re looking for better pricing, improved features, or simply a change in service, transferring your domain can seem daunting. But don’t worry; it’s easier than you think. In this guide, we’ll walk you through the entire process step-by-step, ensuring a smooth transition without any hiccups.
Imagine the peace of mind you’ll have knowing your domain is in safe hands, ready to boost your online presence. Stay with us, and by the end, you’ll be fully equipped to make the switch effortlessly. Ready to take control of your domain? Let’s dive in!
Credit: www.hostinger.com
Choosing The Right Domain Registrar
Transferring your domain to Namecheap is simple and efficient. Start by unlocking your domain at your current registrar. Then, get the transfer code and enter it on Namecheap’s website to begin the process.
Choosing the right domain registrar is crucial for ensuring your website’s success. With so many options available, it’s easy to feel overwhelmed. But don’t worry, finding a registrar that aligns with your needs is simpler than you think. Consider what matters most to you. Is it affordability, customer support, or perhaps the ease of transferring domains? Each registrar offers different benefits. ###Research And Compare Registrars
Take the time to explore various domain registrars. You might be surprised by the differences in pricing and services. Look for registrars with good reviews and strong reputations. Namecheap, for example, is known for its competitive pricing and excellent customer support. ###Check For Hidden Fees
Hidden fees can turn a great deal into a costly mistake. Always read the fine print before committing to a registrar. Some may charge extra for privacy protection or renewal. You want a registrar that’s transparent about their costs. ###Evaluate Customer Support
When things go wrong, you want a registrar that’s there for you. Reliable customer support can be a lifesaver. Imagine facing a technical glitch and having no one to help. Namecheap offers 24/7 support, giving peace of mind. ###Consider Transfer Policies
If you plan to transfer your domain to Namecheap, check the registrar’s transfer policies. Some registrars make it easy, while others complicate the process. Namecheap provides straightforward instructions, ensuring a hassle-free transfer. ###Look For Added Features
Beyond the basics, some registrars offer extra features. These can include email hosting, website building tools, or security enhancements. Think about what your website needs and choose a registrar that provides those services. Your choice of registrar can impact your website’s future. Take the time to research and compare options before making your decision. Are you ready to find the perfect fit for your domain needs?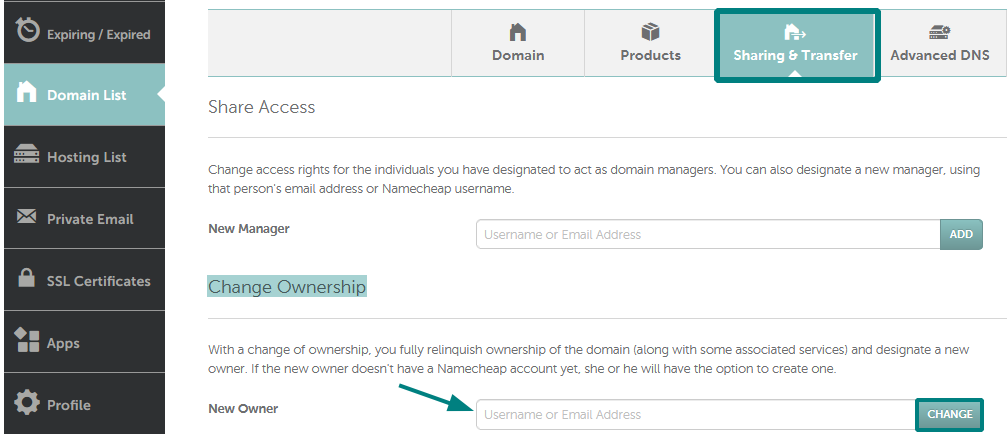
Credit: www.namecheap.com
Preparing Your Domain For Transfer
Transferring a domain to Namecheap involves simple steps. Ensure your domain is unlocked and obtain the authorization code. Update your contact information for a smooth transfer process. Namecheap offers user-friendly guidance throughout, making it easy even for beginners to follow.
Transferring your domain to Namecheap can be a smooth process if you prepare adequately. This preparation ensures that your domain is ready for a seamless transition. By following a few simple steps, you can avoid common pitfalls and make the transfer process efficient and hassle-free. ###Unlocking Your Domain
Before transferring your domain, you need to unlock it. Domains are often locked by registrars to prevent unauthorized transfers. Visit your current registrar’s website and access your account settings to unlock the domain. Look for the option labeled “Lock” or “Registrar Lock.” Disable the lock to make your domain eligible for transfer. It’s a straightforward process but crucial to initiate the transfer. ###Disabling Privacy Protection
Privacy protection hides your contact information in the WHOIS database. While this is great for security, it can block the transfer process. Navigate to your domain settings and turn off privacy protection. Some registrars call this “WHOIS protection” or “Domain privacy.” Ensure your contact details are visible before proceeding to the next step. This might feel like a privacy risk, but it’s temporary. ###Obtaining The Authorization Code
The authorization code, also known as the EPP code, is essential for transferring your domain. This unique code acts like a password for your domain. Contact your current registrar to request it; this option is usually available in your account portal. Make sure to store this code securely. Without it, Namecheap cannot initiate the transfer. Do you have everything ready? If so, you’re one step closer to successfully transferring your domain.Starting The Transfer Process
Transferring your domain to Namecheap can be a smooth process if you know the steps involved. Whether you’re looking for better pricing, superior customer support, or an improved interface, Namecheap often makes a compelling case for switching. Let’s dive into the initial steps to kickstart your domain transfer and ensure it goes off without a hitch.
Accessing Namecheap Account
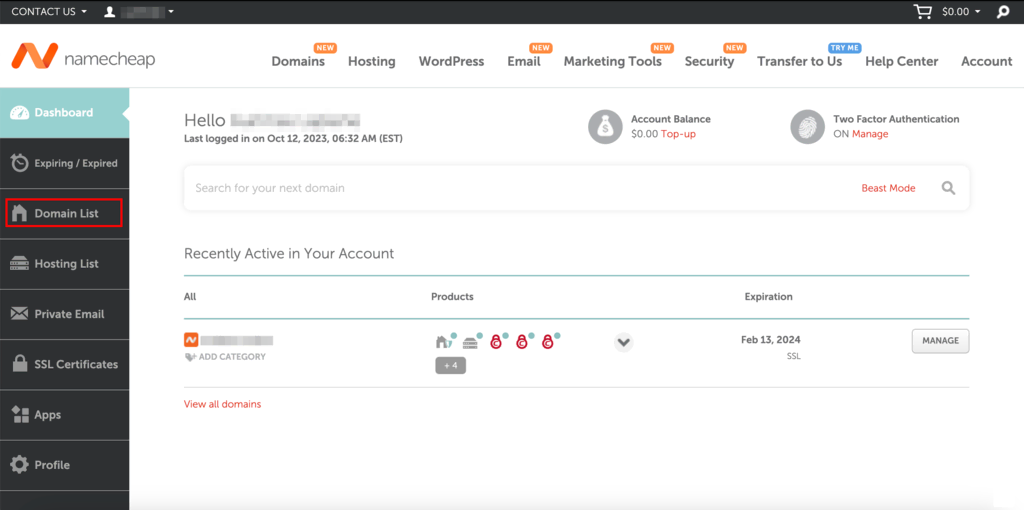
First, log into your Namecheap account. If you don’t have one, take a moment to sign up. It’s quick, and their interface is user-friendly, making navigation a breeze. Once logged in, head over to the dashboard, where you will find all the tools necessary for the transfer.
Isn’t it reassuring knowing that everything you need is right there at your fingertips? Take a moment to familiarize yourself with the layout. It’s much easier to navigate when you know where things are.
Initiating Domain Transfer
To initiate the domain transfer, click on the ‘Transfer’ tab. You’ll be prompted to enter the domain name you wish to transfer. Double-check the spelling—one small mistake can lead to unnecessary delays. After entering the domain, follow the on-screen instructions.
Do you remember the first time you transferred a domain? It might have felt daunting, but with Namecheap’s clear guidance, it’s like having a helpful friend by your side. The process is designed to be intuitive, reducing any potential stress.
Once initiated, ensure your domain is unlocked with your current registrar and that you have your authorization code ready. These are crucial steps that prevent hiccups during the transfer. Keep this information handy, and you’re set for a smooth transition.
Have you ever wondered why some people struggle with domain transfers? Often, it’s the little details that get overlooked. By staying organized and following these steps, you can avoid common pitfalls.
Taking the time to understand the transfer process not only saves you time but also ensures your domain lands safely in its new home. With Namecheap, you’re choosing a service that values simplicity and efficiency, making your domain management an easy task.
Completing The Transfer
Completing the transfer of your domain to Namecheap is the final step. This stage is crucial to ensure your domain moves smoothly. Here, you’ll confirm the transfer and monitor its progress.
Confirming The Transfer
Check your email for a confirmation message. This email is from your current registrar. It contains a transfer approval link. Click the link to confirm the transfer. This step is vital to proceed. Without confirmation, the transfer stalls.
Ensure you have access to the registered email. If not, update it promptly. This ensures you receive important notifications. Monitor your inbox regularly during this process.
Monitoring Progress
After confirming, the transfer begins. It usually takes five to seven days. You can track progress in your Namecheap account. Look for updates under the ‘Domain List’ section.
If issues arise, Namecheap provides support. Contact them for assistance. They offer guidance to resolve transfer problems. Stay patient and attentive during this stage. Once complete, you will receive a notification. Your domain is now successfully transferred to Namecheap.
Post-transfer Steps
Transferring your domain name to Namecheap is a straightforward process. Once completed, you need to ensure everything is set up correctly. Post-transfer steps are crucial for seamless domain function and security. Follow these steps to make sure your domain is fully operational. Let’s dive into these essential tasks.
Updating Dns Settings
After transferring your domain, update the DNS settings. This ensures your website points to the correct server. Log into your Namecheap account. Navigate to the domain list. Select your domain. Click on “Manage” to access domain settings. Update DNS details to match your hosting provider. Double-check entries to avoid errors. Proper DNS setup ensures your site remains accessible.
Checking Domain Status
Verify the status of your domain post-transfer. This confirms successful transfer completion. Go to your Namecheap dashboard. Find the domain in your account list. Ensure it shows as active and not pending. An active status means your domain is ready for use. If issues arise, contact Namecheap support for assistance. Regular status checks prevent unexpected downtime.
Troubleshooting Common Issues
Transferring a domain name to Namecheap is usually straightforward. Yet, issues can arise during the process. Addressing these common problems can save time and frustration. Let’s explore typical challenges and their solutions.
Transfer Delays
Transfer delays often occur due to pending verifications. Ensure the domain is unlocked. Also, confirm your contact information is correct. Sometimes, registrars delay releases. Be patient, but follow up if needed. Check your email for any required confirmations.
Authorization Code Errors
Authorization code errors are common during transfers. Double-check the code for accuracy. Ensure there are no extra spaces or incorrect characters. If the code doesn’t work, request a new one from your current registrar. Keep the code secure until the transfer completes.

Credit: www.youtube.com
Frequently Asked Questions
How Do I Transfer My Existing Domain To Namecheap?
To transfer your domain to Namecheap, unlock it at your current registrar. Obtain the transfer code (EPP). Visit Namecheap’s website, enter the domain and EPP code, then complete the checkout process. Confirm the transfer via email. The transfer usually completes within 5-7 days.
How Long Does It Take To Transfer A Domain To Namecheap?
Transferring a domain to Namecheap typically takes 5-7 days. This period may vary based on registrar response times. Ensure all domain contact information is updated to avoid delays. Keep an eye on your email for any transfer approval requests.
Can I Transfer A Domain From Godaddy To Namecheap?
Yes, you can transfer a domain from GoDaddy to Namecheap. Unlock your domain at GoDaddy first. Obtain the transfer authorization code. Initiate the transfer process on Namecheap. Follow their instructions to complete the transfer. Ensure your domain is eligible for transfer and not within 60 days of registration or previous transfer.
How Do I Transfer My Domain Name From One Website To Another?
To transfer a domain, unlock it and get an authorization code. Initiate transfer with new registrar, confirm email verification. Ensure domain privacy settings allow transfer. Complete transfer process within 5-7 days. Contact support for assistance if needed.
Conclusion
Transferring your domain to Namecheap is straightforward. Follow the steps carefully. Ensure all settings are correct. Double-check your domain details. Confirm with your current registrar. Namecheap offers great support. Contact them for assistance if needed. Enjoy your new domain home.
Remember to keep your domain information updated. Regular checks prevent issues. Namecheap’s user-friendly interface makes managing domains easy. A secure choice for domain hosting. Now, your domain is in good hands. Feel confident with Namecheap’s reliable service. Have peace of mind as you move forward.
Consider exploring Namecheap’s other features. They offer valuable tools for your website needs.


