
Are you planning to move your website to a new web host but worried about transferring your domain name? You’re not alone.
Many website owners face this challenge, and it can seem daunting at first. However, understanding the process can save you time and prevent potential hiccups. Imagine your domain name as your website’s address on the internet. Naturally, you want to make sure it travels smoothly to its new home.
This guide will show you exactly how to transfer your domain name to another web host without losing sleep over it. By following these simple steps, you can ensure a seamless transition and keep your online presence intact. Keep reading to discover how you can easily take control and make the switch with confidence.
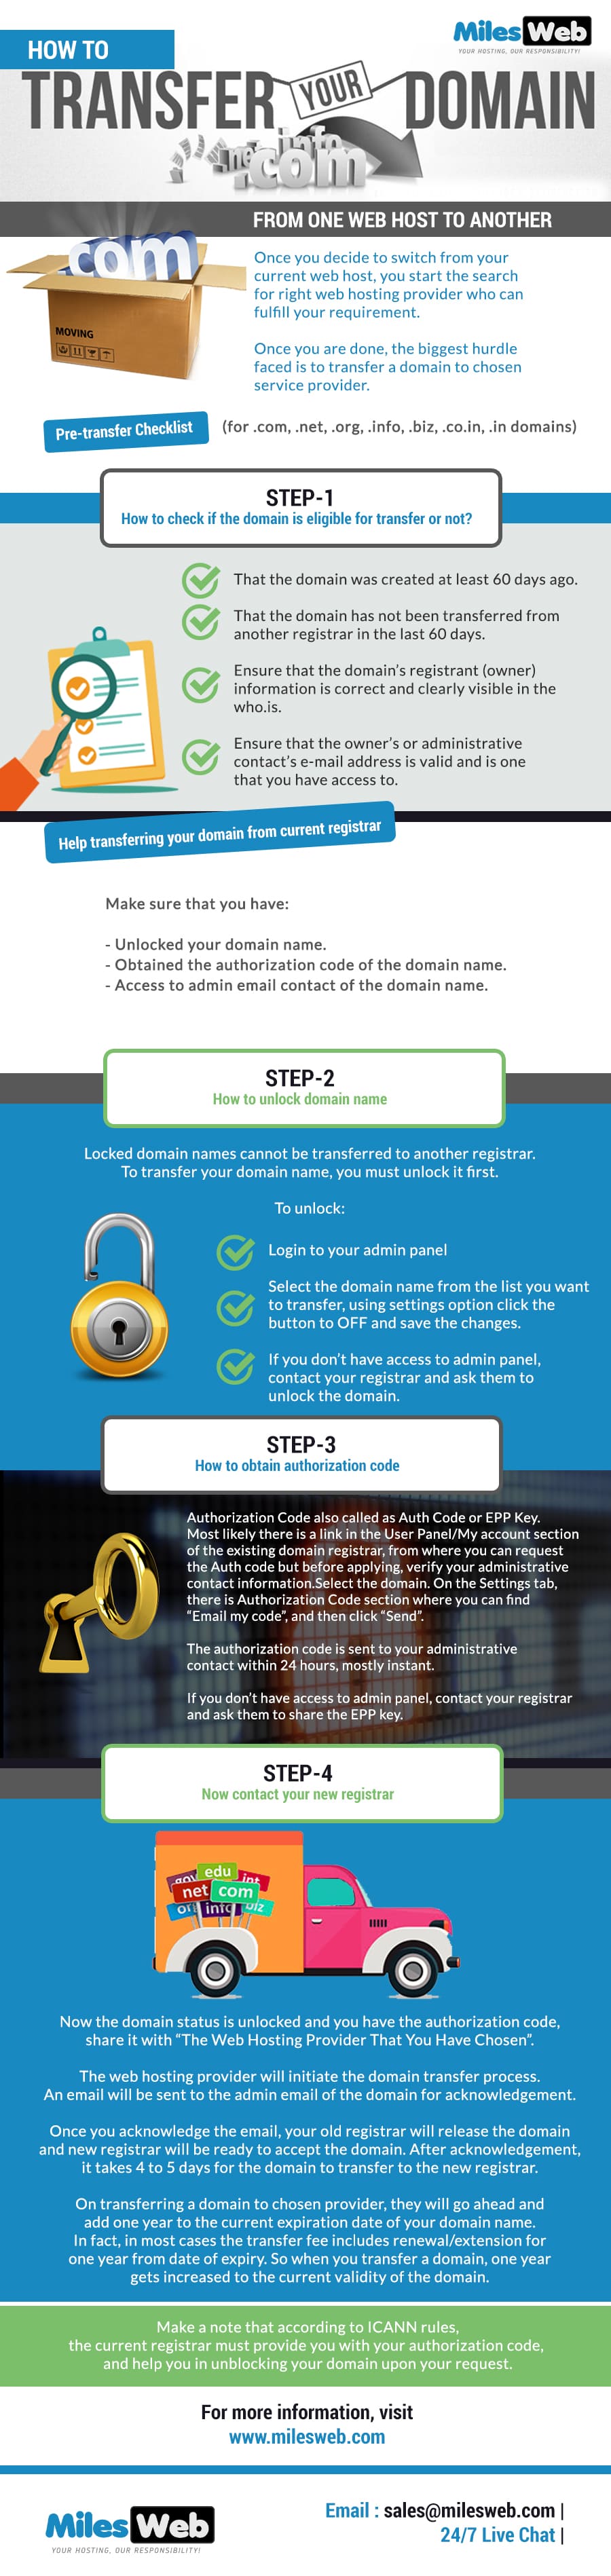
Credit: www.milesweb.com
Choosing A New Web Host
First, think about what your website needs. Do you need more storage or faster speed? Maybe you want better support or extra features. Make a list of these needs. This will help you find the right host.
Now, look at different hosting providers. Check their prices, features, and customer reviews. Some hosts may offer free transfers. Others might have better security options. Create a table to compare them.
| Provider | Price | Features | Reviews |
|---|---|---|---|
| Host A | $5/month | Basic, 24/7 support | Good |
| Host B | $10/month | Advanced, Free SSL | Very good |
| Host C | $8/month | Intermediate, Daily backups | Average |

Credit: www.nexcess.net
Preparing For Domain Transfer
Transferring a domain name to a new web host involves several steps. First, unlock your domain and get the authorization code from your current provider. Then, initiate the transfer with the new host, ensuring all settings are correct for a smooth transition.
Backing Up Website Data
Backing up your website data is very important. You need to protect your files. Save all your website data on your computer. Use a reliable backup tool to help you. This will prevent data loss. Ensure the backup includes all files. Check if you have saved everything. This will give you peace of mind.
Checking Domain Eligibility
Check if your domain is ready for transfer. The domain must be over 60 days old. Ensure there are no locks on it. Unlock the domain if needed. You will need an authorization code. Request it from your current registrar. This code is important for transfer. Make sure your contact details are updated. This helps in smooth transfer.
Updating Domain Name Settings
The domain name is often locked by default. This keeps it safe from unauthorized changes. To start, you need to unlock your domain name. Log into your domain registrar account. Find the option to unlock. It’s usually in the domain settings. Click to unlock. Now, your domain is ready to move.
An authorization code is needed for transfer. This code is like a password. Go to your domain account settings. Look for the section titled “Authorization Code” or “EPP Code”. Request the code. It might be sent to your email. Keep this code safe. You will need it for the transfer process.
Initiating Domain Transfer
First, find the transfer option in your domain’s dashboard. This is important. Next, unlock the domain for transfer. You need to disable any privacy protection. Get your transfer authorization code. Your current registrar provides this. Now, go to the new web host. Submit the transfer request there. Use the authorization code. Ensure all details match your current records. Pay any transfer fees needed. This process may take a few days.
Check your email for a transfer confirmation. This is sent by your current registrar. Confirm the transfer by clicking the link. Verify all domain details. Ensure no mistakes. Your contact information must be correct. Confirm everything matches. Wait for the final email. This confirms the transfer is complete. Keep checking your email. You might get updates or requests for more information.
Completing The Transfer Process
Monitoring transfer status is crucial. Check your email for updates. Your new host might send notifications. Log into your domain account. Look for the transfer section. It shows progress and status. Sometimes, it takes a few days. Be patient during this time.
Ensure all details are correct. Double-check domain name spelling. Verify new host information. Any mistake can delay transfer. Keep your old host’s info handy. It helps in case of issues. Contact support if problems arise. They guide you through solutions.
Confirming Successful Transfer
After the process completes, check your domain. Visit the website and see if it loads. Verify with both old and new hosts. They should confirm the transfer. Ensure settings are accurate. Update DNS records if needed. Proper settings ensure smooth operation.
Test email and website functions. Make sure everything works. If issues persist, consult support. They can offer assistance. Celebrate once transfer is successful. Your domain is now with a new host. Enjoy your new hosting service.
Post-transfer Checklist
Transferring a domain name to another web host requires a clear checklist. First, unlock the domain and obtain the authorization code. Then, update DNS settings to ensure a smooth transition.
Testing Website Functionality
Ensure all pages load correctly. Check links and buttons. Verify images display properly. Test forms for submissions. Make sure videos play smoothly. Confirm login areas work. Monitor loading speed. Check mobile and desktop views. Fix any broken elements.
Updating Dns Records
Log into your domain registrar. Locate DNS settings. Update the nameservers. Point them to the new host. Wait for changes to propagate. This might take a few hours. Check if the site loads from the new host. Ensure email settings are correct. Monitor for any issues.
Troubleshooting Common Issues
Delays can be frustrating. Check with your current registrar first. They may have pending actions. Ensure all fees are paid. Sometimes delays happen because of incorrect contact details. Update them if needed. Use the right authorization code. Double-check it for errors. Patience is key. Transfers can take up to seven days. Always verify the transfer status regularly.
DNS conflicts can disrupt transfers. Start by checking your DNS settings. Ensure they point to the correct server. Incorrect settings can cause errors. Update them if necessary. Sometimes, old settings linger. Clear your DNS cache. This helps in refreshing settings. Contact your web host if issues persist. They can assist with further troubleshooting. Always keep a backup of your settings. This is helpful for quick restores.

Credit: designpowers.com
Frequently Asked Questions
Can I Transfer My Domain Name From One Web Host To Another?
Yes, you can transfer your domain name between web hosts. Unlock your domain and get the transfer code. Initiate the transfer with your new host. Follow their instructions to complete the process. Ensure your domain details are up-to-date to avoid issues.
Transfers may take a few days to finalize.
How Do I Transfer A Domain Name To A New Website?
To transfer a domain, unlock it and obtain the authorization code. Initiate the transfer with the new registrar. Confirm the transfer via email. Update DNS settings to point to the new website. Ensure domain registration is active.
What Is The Easiest Way To Transfer A Domain Name?
Unlock your domain at the current registrar, obtain an authorization code, and initiate the transfer with the new registrar. Ensure your domain’s contact information is up-to-date for verification emails. Follow the registrar’s instructions to complete the transfer process smoothly.
How Do I Transfer A Domain To A New Provider?
Unlock your domain and obtain the transfer authorization code. Initiate the transfer on the new provider’s website. Confirm the transfer through email verification. Wait for completion, usually within 5-7 days. Update DNS settings if necessary.
Conclusion
Transferring a domain to another host is straightforward. Follow the steps carefully. Begin by unlocking your domain. Update your contact information. Request an authorization code. Initiate the transfer with your new host. Remember, patience is key during this process. It might take a few days.
Ensure your new host meets your needs. The right host can boost your website’s performance. Double-check each step to avoid delays. You’re on your way to a smoother web experience. Enjoy the benefits of your new hosting service!


