
Are you looking to transfer your domain from Wix to Namecheap? If so, you’re in the right place.
Navigating the process of domain transfer might seem daunting, but with the right guidance, you can accomplish it smoothly and efficiently. Imagine the peace of mind you’ll have knowing your domain is managed by a provider like Namecheap, renowned for its affordability and excellent customer service.
By the end of this guide, you’ll be equipped with the knowledge to make this transition seamless and stress-free, unlocking new possibilities for your website. Keep reading to discover the simple steps and crucial tips that will empower you to successfully transfer your domain.
Preparing For Domain Transfer
Transferring a domain from Wix to Namecheap involves a few simple steps. Ensure your domain is unlocked in Wix. Obtain the transfer code and initiate the transfer request on Namecheap. Follow the on-screen instructions to complete the process smoothly.
Preparing for a domain transfer from Wix to Namecheap involves several steps. Understanding these steps ensures a smooth transition. Proper preparation helps avoid common pitfalls. This guide covers key actions before starting your domain transfer.Check Domain Eligibility
First, confirm your domain is eligible for transfer. Domains registered less than 60 days ago cannot transfer. Ensure your domain is older than 60 days. Check the domain’s status. It should not be expired or on hold. Verify your contact information. It must be up-to-date for verification purposes.Unlock Domain
Next, unlock your domain in Wix. Locked domains cannot transfer to another registrar. Log in to your Wix account. Navigate to the domain settings. Find the option to unlock your domain. Click to unlock it. This action makes the domain available for transfer. Once unlocked, you will receive an authorization code. This code is crucial for the transfer process. Keep it safe and accessible. It will be needed during the transfer to Namecheap.Obtaining Transfer Code
To transfer a domain from Wix to Namecheap, obtaining the transfer code is essential. Access your Wix account, navigate to ‘Domains’, and unlock your domain. Find the ‘Transfer Away’ section, and click ‘Send Transfer Code’. Check your email for the code, necessary for completing the transfer process to Namecheap.
Transferring your domain from Wix to Namecheap might sound daunting, but it’s simpler than you think. One of the critical steps in this process is obtaining the transfer code. This code is like a key that unlocks your domain’s door, allowing you to move it to a new registrar. Without it, you can’t make the transfer. So, how do you get this magical code? Let’s dive in!Access Domain Settings
First, you need to access your domain settings in Wix. Log into your Wix account and head over to the dashboard. Once there, find the “Domains” section. It’s usually nestled under the “Settings” or “Account” tab. This is where all the magic happens. Once you’re in the domain settings, you’ll see a list of domains associated with your Wix account. Select the domain you wish to transfer. Make sure you’re looking at the right domain to avoid any mix-ups.Generate Authorization Code
Now, it’s time to generate the authorization code. Within the domain settings, there should be an option labeled “Transfer Domain” or something similar. Click it, and Wix will guide you through the process of generating your code. You’ll receive this code via email or directly in your Wix account dashboard. Check your email and spam folders if you don’t see it right away. This code is essential, so keep it safe and handy for the transfer process. Have you ever found yourself wondering if domain transfers are worth the hassle? Obtaining the transfer code is just one step, but once you have it, you’re well on your way to more control over your web presence. So, what’s stopping you? Secure that code and take the next step in your domain journey!Initiating Transfer On Namecheap
Transferring a domain from Wix to Namecheap is simple. Start by unlocking your domain on Wix. Obtain your EPP code. Then, initiate the transfer on Namecheap using the code.
Transferring your domain from Wix to Namecheap might seem like a daunting task, but breaking it down into manageable steps can make the process smooth and hassle-free. Initiating the transfer on Namecheap is a critical part of the journey. By following the correct steps, you can ensure that your domain is safely moved without any hiccups. Engage yourself in this exciting task, and before you know it, your domain will be in its new home. Are you ready to dive into the specifics? ###Log Into Namecheap Account
First things first, you need to access your Namecheap account. If you don’t have one, creating an account is quick and straightforward. Once logged in, navigate to your dashboard. This is your control center where you’ll manage the domain transfer. Reflect on how you felt when you first logged into a new platform. There’s always a mix of excitement and curiosity. Logging into Namecheap is no different. It’s the first step to taking control of your domain’s destiny. ###Enter Domain And Transfer Code
After logging in, locate the transfer section. Here, you’ll need to input your domain name. Be precise and double-check for any typos. You’ll also need a transfer code, often referred to as an EPP code. This is crucial for authorizing the transfer. It’s like the key that unlocks the door to your domain’s new home. Remember, the transfer code is usually provided by your current registrar, in this case, Wix. If you’re unsure where to find it, don’t hesitate to reach out to Wix support. It’s always better to ask than to assume. Consider the first time you completed a complex task on your own. The sense of accomplishment was rewarding, wasn’t it? Transferring your domain successfully will give you that same sense of achievement. By approaching each step methodically, you’re not just transferring a domain; you’re mastering a valuable skill. Are you ready to embrace the challenge?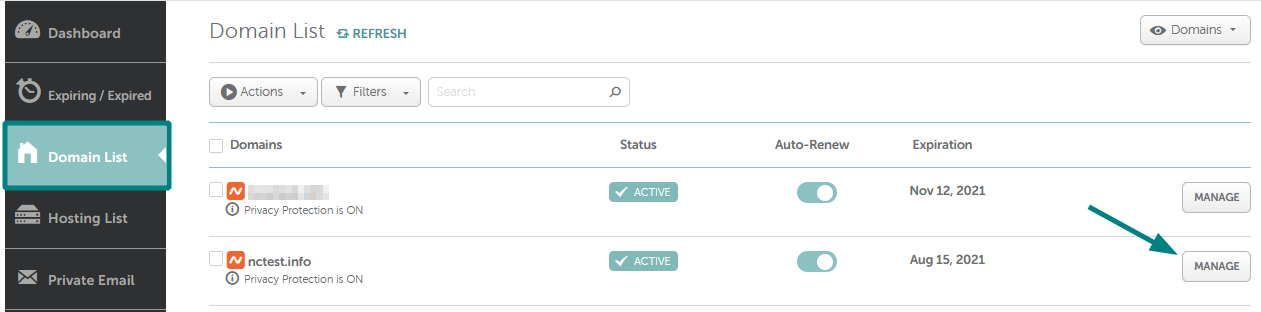
Credit: www.namecheap.com
Completing The Transfer Process
Easily move your domain from Wix to Namecheap by updating your domain settings. Unlock domain transfer in Wix and obtain your EPP code. Complete the process by entering the code on Namecheap. Enjoy seamless domain management on Namecheap.
Completing the transfer process from Wix to Namecheap is a crucial step. It ensures your domain smoothly transitions without any issues. You’ll need to pay attention to several key details. These ensure the transfer is successful and hassle-free. Let’s dive into the steps involved.Verify Transfer Details
Before proceeding, double-check all transfer details. Ensure the domain name is spelled correctly. Confirm the contact information is up-to-date. This includes your email address. It’s vital for receiving important notifications. Make sure the domain status is unlocked. Check that the EPP code is correct. These steps prevent any transfer delays or errors.Approve Transfer Request
Once details are verified, approve the transfer request. You will receive an email from Namecheap. This email contains a transfer approval link. Click the link to confirm your intent. This step is necessary to finalize the process. Without approval, the transfer cannot proceed. Ensure you complete this within the time frame. This guarantees a smooth transition to your new registrar.Post-transfer Actions
Completing the transfer of your domain from Wix to Namecheap involves several post-transfer actions. Update DNS settings and ensure email forwarding works correctly. Secure your domain by enabling privacy protection and verifying contact information.
Transferring your domain from Wix to Namecheap is just the beginning. Once the transfer is complete, there are essential steps to ensure your domain functions as expected. These post-transfer actions can seem daunting, but they’re crucial for a seamless transition. From updating your DNS settings to renewing your domain registration, each step plays a vital role in maintaining your online presence. Let’s delve into the necessary actions you need to take after transferring your domain. ###Update Dns Settings
Once your domain is safely under Namecheap’s management, the next critical step is updating your DNS settings. These settings tell the internet where to find your website. Without them, your site might become invisible to visitors. To update, log into your Namecheap account and navigate to the “Domain List” tab. Here, you’ll find your recently transferred domain. Click “Manage” and then head over to the “Advanced DNS” tab. This is where you’ll add your DNS records. Whether it’s A records, CNAME, or MX records, ensure they match what your hosting provider requires. If you’re unsure, your hosting provider’s support team can guide you. Have you ever wondered why your website isn’t loading properly? Often, it’s due to incorrect DNS settings. ###Renew Domain Registration
After ensuring your DNS settings are correct, focus on renewing your domain registration. This step is crucial for maintaining ownership of your domain. At Namecheap, you’ll receive notifications as your renewal date approaches, but it’s wise to set a personal reminder. Log into your account, navigate to “Domain List,” and check the expiration date of your domain. Here, you can also enable auto-renewal. This feature ensures you never miss a renewal, safeguarding your domain from accidental expiry. Consider the consequences of a missed renewal—your domain could become available for others to purchase. How would it feel if your hard-earned domain was snatched away? By staying proactive about renewal, you ensure continued access to your digital real estate. Taking these steps not only secures your domain but also gives you peace of mind. Are there any other post-transfer actions you prioritize? Share your thoughts and experiences in the comments!
Credit: www.youtube.com
Troubleshooting Transfer Issues
Transferring a domain from Wix to Namecheap can sometimes pose challenges. These issues might delay the transfer process. Understanding common problems and knowing where to seek support can smoothen your experience.
Common Problems
Domain lock status often causes transfer issues. Ensure your domain is unlocked in Wix. Check the admin email connected to your domain. Confirm it is active and accessible. Receiving the transfer code is crucial. Verify that your domain is eligible for transfer. It must be older than 60 days.
Sometimes, DNS settings can create obstacles. Adjust them properly before starting the transfer. Incorrect authorization code entry can also hinder progress. Double-check the code you enter on Namecheap.
Seeking Support
Encountering issues during the transfer might need expert help. Namecheap offers a dedicated support team. Contact them for guidance on your domain transfer. They can assist with any technical problems. Wix also provides customer support for domain issues. Reach out to their team for help with initial steps.
Online forums are valuable resources. They offer advice from users facing similar problems. Explore these communities for tips and solutions. Ensure you document any errors or messages. This information is useful when contacting support.

Credit: www.youtube.com
Frequently Asked Questions
Can I Transfer My Domain Out Of Wix?
Yes, you can transfer your domain from Wix to another provider. Unlock your domain and obtain the authorization code. Ensure your domain is at least 60 days old. Follow the new registrar’s transfer process to complete the move.
How Do I Connect My Wix Domain To Namecheap?
Access your Namecheap account. Navigate to “Domain List,” then click “Manage” next to your domain. Select “Advanced DNS. ” Add Wix’s DNS records provided in your Wix account. Save changes. In Wix, go to “Domains” and connect your domain.
How Do I Transfer My Existing Domain To Namecheap?
Visit Namecheap’s website and log in. Unlock your current domain and request an authorization code from the existing registrar. Enter this code on Namecheap’s transfer page. Confirm the transfer through your email. The process usually completes within 5-7 days.
Can I Move My Wix Website To Another Host?
Wix websites cannot be moved to another host directly. You can manually recreate your site on a new host. Export your site’s content and images, then set them up on your new platform. Consider using a CMS like WordPress for easier migration.
Conclusion
Transferring your domain from Wix to Namecheap is simple. Follow the outlined steps carefully. Ensure you unlock your domain first. Update your contact details, too. Next, get your EPP code from Wix. Now, initiate the transfer on Namecheap. Enter the EPP code when prompted.
Finally, confirm the transfer through email. The process might take a few days. Be patient. Soon, your domain will be with Namecheap. Enjoy the benefits of your new registrar. Remember, help is available if needed. Namecheap offers support for smooth transitions.
Happy transferring!


