
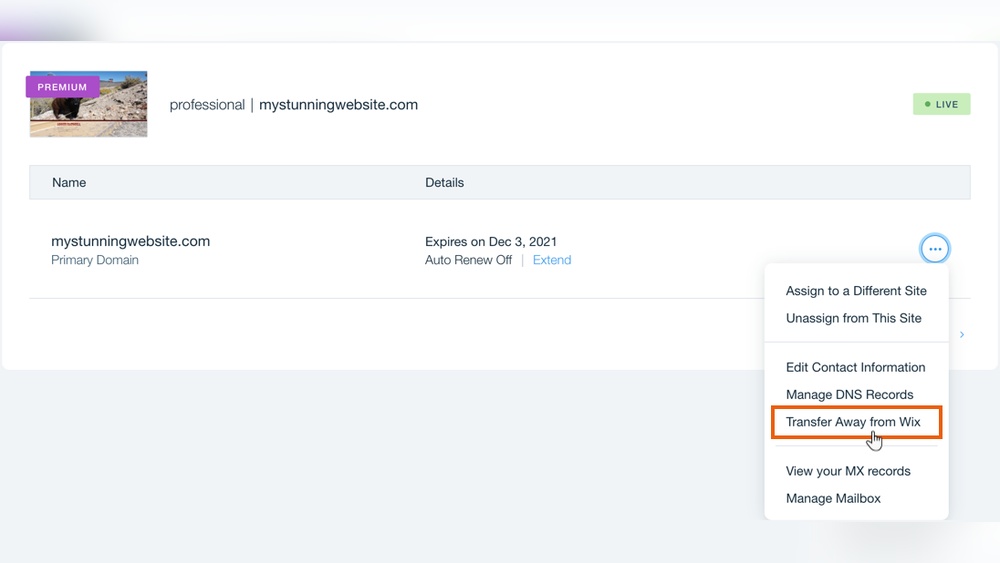
Are you ready to move your domain from Wix to a new host but don’t know where to start? Transferring your domain might seem tricky, but with the right steps, you can do it smoothly and without losing any valuable time or website traffic.
This guide will walk you through exactly what you need to do, breaking down the process into simple, clear actions. By the end, you’ll feel confident handling your domain transfer like a pro. Keep reading, and let’s make sure your website stays in the right hands—yours.

Credit: www.youtube.com
Prepare Your Domain For Transfer
Preparing your domain for transfer is the first step to move your website from Wix to another host. This process ensures a smooth transition without losing your domain name or website traffic. Follow these simple steps carefully before starting the transfer.
Check Domain Eligibility
Not all domains can be transferred immediately. Check if your domain is at least 60 days old. New domains often have a transfer lock for security reasons. Also, domains must not be expired or in a redemption period. Confirm your domain is active and ready for transfer.
Unlock Your Domain
Domains are usually locked to prevent unauthorized transfers. Go to your Wix domain settings. Find the option to unlock your domain. Turn off the domain lock to allow the transfer. Keep in mind, unlocking your domain is essential to proceed.
Obtain The Authorization Code
The authorization code is like a password for your domain transfer. Request this code from Wix in your domain management area. The code will be sent to your email. Keep this code safe and ready for the new host during the transfer process.
Choose Your New Hosting Provider
Choosing the right hosting provider is key to a smooth domain transfer from Wix. A good host keeps your site fast, safe, and online all the time. Think about what your website needs now and in the future. This step helps avoid problems later.
Focus on important features like uptime, speed, support, and cost. A reliable host makes your site easy to manage. Your choice affects your site’s success and visitor experience.
Compare Hosting Options
Start by checking different hosting companies. Look at shared, VPS, and dedicated hosting types. Each type offers different speed and control levels. Shared hosting is cheap but slower. VPS gives more power and space. Dedicated hosting is best for big sites but costs more.
Read reviews and ratings from other users. Check if they offer good customer support. See if the host supports the website platform you use. Also, check the storage, bandwidth, and security features they provide.
Sign Up For A Hosting Plan
After choosing a host, pick a plan that fits your needs. Start with a basic plan if your site is small. You can upgrade later as your site grows. Make sure the plan allows domain transfers and has easy setup.
Fill out the sign-up form with your details. Choose the payment method that suits you. Keep your account information safe for future use. Once signed up, you can start the domain transfer process.
Initiate The Transfer Process
Initiating the transfer process is the first step to move your domain from Wix to another host. It involves starting the transfer with your new hosting provider, entering an authorization code, and confirming the transfer request. Each step is important to ensure a smooth and successful domain transfer. Follow these steps carefully to avoid delays or errors.
Start Transfer With New Host
Begin by logging into your new host’s control panel. Look for the option to transfer a domain. Enter your domain name to start the process. The new host will check if your domain is eligible for transfer. Most domains are eligible if they have been registered for more than 60 days.
Enter Authorization Code
Next, you need an authorization code, also called an EPP code. This code is a security key for your domain. Get it from your Wix account in the domain settings. Copy the code exactly. Paste it into the transfer form on your new host’s site. This confirms you own the domain and approve the transfer.
Confirm Transfer Request
After entering the code, the new host will send a confirmation email to the domain’s registered email address. Check your inbox and open the email. Click the confirmation link inside to approve the transfer. This step finalizes your request and starts the domain move. Watch for emails from both Wix and your new host during the process.

Credit: ecommerce.folio3.com
Monitor Transfer Status
Monitoring the transfer status is a key step when moving your domain from Wix to another host. This helps avoid delays and ensures the process runs smoothly. Stay alert and keep track of every update. Your domain will soon be ready on the new platform.
Track Progress
Check the transfer status regularly on your new host’s dashboard. It shows the current step and any issues. Keep an eye on the estimated time for completion. Sometimes, the transfer can take up to seven days. Early tracking helps you spot problems fast.
Respond To Confirmation Emails
Look for emails from both Wix and your new host. These often ask you to confirm the transfer. Respond quickly to avoid delays. Sometimes, you must approve the transfer through a link. Missing these emails can pause or cancel the process.
Update Dns Settings
After transferring your domain from Wix to another host, updating your DNS settings is essential. DNS settings tell the internet where to find your website and email services. Incorrect settings can cause downtime or lost emails. Follow these steps carefully to keep your website live and functional.
Access New Dns Management
Log in to your new hosting provider’s control panel. Look for the section called “DNS Management” or “Domain Settings.” This area lets you change DNS records for your domain. If you cannot find it, check the help section or contact support.
Configure Dns Records
Enter the DNS records provided by your new host. These usually include A records, CNAME, MX, and TXT records. A records point your domain to your website server. MX records handle your email service. Make sure to copy all records exactly as given.
Verify Domain Resolution
After updating, check if your domain points to the new host. Use online tools like DNS checkers or simply visit your website. It may take up to 48 hours for changes to spread worldwide. During this time, some visitors might see the old site.
Troubleshoot Common Issues
Transferring a domain from Wix to another host can face some common issues. Knowing how to fix these problems saves time and stress. This section helps you solve typical troubles during domain transfer. Clear steps make the process smoother and faster.
Transfer Delays
Transfers can take up to seven days to complete. Delays happen due to domain registrar rules. Make sure your domain is older than 60 days. Check your email for transfer approval requests. Respond quickly to avoid hold-ups. Avoid making changes to domain details during transfer.
Authorization Code Problems
The authorization code is needed to start the transfer. Get the code from your Wix account. Sometimes, the code expires or is incorrect. Request a new code if your transfer fails. Enter the code carefully, without spaces. Keep the code private to avoid security risks.
Domain Locking Issues
Domains are locked to prevent unauthorized transfers. Unlock your domain in Wix settings before starting. If the domain stays locked, the transfer will fail. Confirm the domain status shows as “unlocked.” Lock the domain again after the transfer finishes. This protects your domain from theft.

Credit: support.wix.com
Frequently Asked Questions
How Do I Unlock My Wix Domain For Transfer?
To transfer your Wix domain, first unlock it in your Wix dashboard. Go to Domains, select your domain, and disable the lock. This step allows the domain to be transferred to another host smoothly and securely.
What Is The Epp Code For Domain Transfer?
The EPP code, or authorization code, is a unique key needed for domain transfer. You can get it from Wix in the domain settings. This code verifies your ownership and authorizes the new host to accept the domain.
How Long Does A Wix Domain Transfer Take?
A Wix domain transfer usually takes 5 to 7 days. The process depends on the new registrar’s policies and domain extension. You’ll receive confirmation emails throughout the transfer process.
Will My Website Go Down During Domain Transfer?
Your website may experience downtime if DNS settings are not updated promptly. To avoid this, update DNS records with the new host before completing the transfer. This ensures a smooth transition without interrupting your site’s availability.
Conclusion
Transferring your domain from Wix to another host is straightforward. Follow the steps carefully to avoid any issues. Keep your domain unlocked and get the authorization code. Choose a reliable new host for smooth transfer. Remember to update your DNS settings after moving.
This helps your website work correctly on the new host. Take your time and double-check each step. Moving your domain can improve your site’s control and flexibility. A well-planned transfer ensures your online presence stays strong.


