
Have you been thinking about moving your domain from Namecheap but aren’t sure where to start? You’re not alone.
Navigating the process of transferring a domain can seem complicated, but it doesn’t have to be. You’re about to discover a straightforward guide that will make this task feel manageable and stress-free. Whether you’re seeking better hosting services, looking for more features, or simply want a change, transferring your domain can open up new opportunities for your online presence.
By the end of this article, you’ll have the confidence and knowledge you need to successfully transfer your domain. Keep reading to unlock the secrets of a smooth transition and ensure your online identity remains intact. Your journey to mastering domain transfer starts here.
Preparing For Domain Transfer
Transferring a domain from Namecheap involves several important steps. Preparation is key to a smooth process. Before starting the transfer, ensure everything is ready. Check domain eligibility, back up important data, and disable domain privacy. Each step plays a crucial role in ensuring success.
Check Domain Eligibility
First, verify if your domain is eligible for transfer. Ensure it’s registered for over 60 days. It should be unlocked and free of any restrictions. Confirm it’s not involved in any disputes. These checks prevent transfer issues later.
Back Up Important Data
Next, safeguard your data by backing up important files. This includes website files, databases, and email records. Use a reliable storage solution. Having backups ensures no data is lost during the transfer.
Disable Domain Privacy
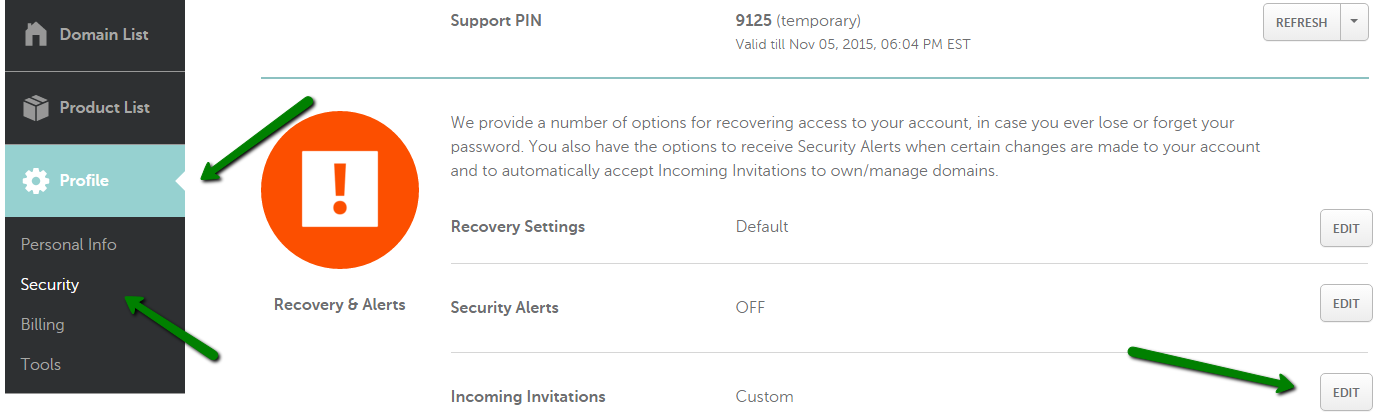
Domain privacy protection should be disabled before transferring. It hides personal information from WHOIS records. Disabling it makes the transfer process smoother. Access your Namecheap account settings to turn it off. Confirm that your contact details are up to date.
Credit: www.namecheap.com
Unlocking Your Domain
Transferring your domain from Namecheap involves several important steps. One crucial step is unlocking your domain. This process ensures your domain is ready for transfer. Without unlocking, the transfer cannot proceed. It’s like opening a gate for the journey. Let’s explore how to unlock your domain for a smooth transfer.
Access Domain Settings
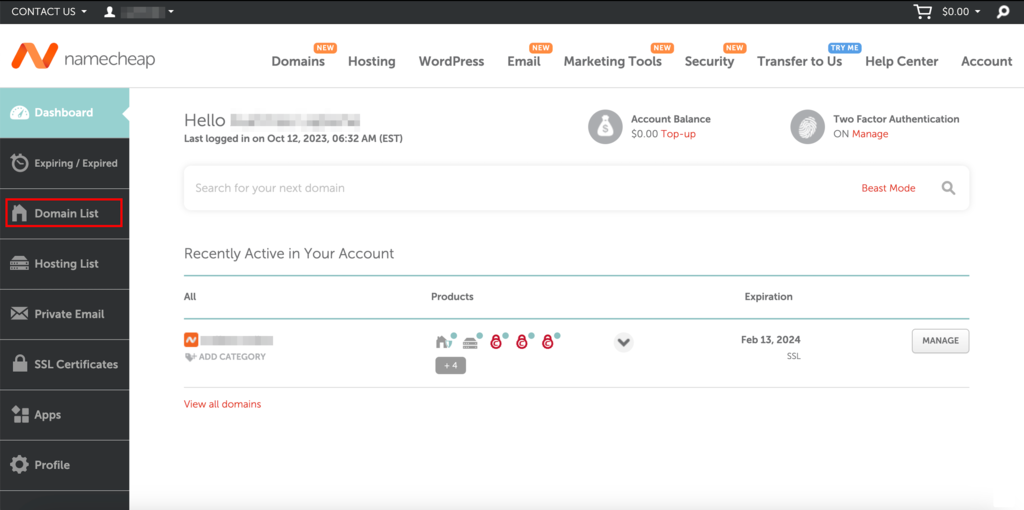
First, log into your Namecheap account. Locate the dashboard and find the list of your domains. Click on the domain you wish to transfer. This will open the domain settings. Here, you can adjust various domain options. Ensure you are in the domain management section. This is where you’ll make necessary changes for the transfer.
Turn Off Registrar Lock
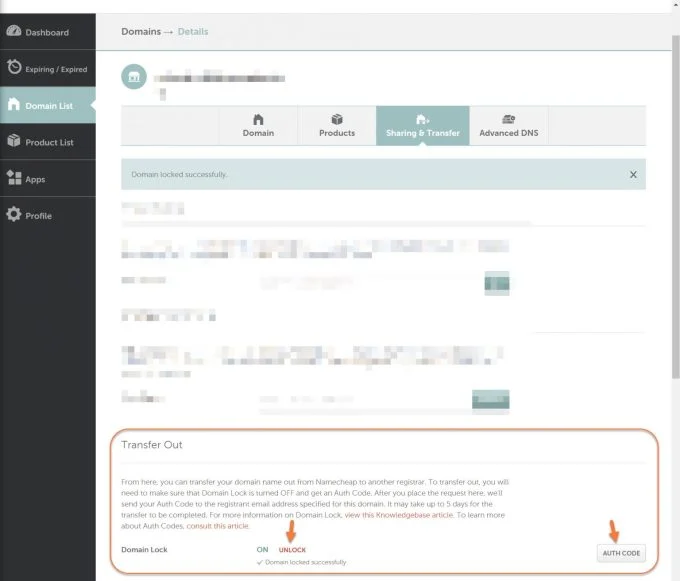
Next, find the registrar lock option in your domain settings. This lock prevents unauthorized domain transfers. To transfer your domain, you need to turn off this lock. Look for a toggle or button labeled “Registrar Lock.” Click to disable it. Once the lock is off, your domain is ready for transfer. Be sure to save your changes.
Obtaining Authorization Code
Transferring a domain from Namecheap involves several steps. One crucial step is obtaining the authorization code. This code, also known as an EPP code, is essential for domain transfer. It’s a security measure to protect domain ownership. Without it, transferring your domain is impossible.
Request Epp Code
First, log into your Namecheap account. Navigate to the “Domain List” section. Find the domain you wish to transfer. Click on “Manage” beside the domain. Look for the “Sharing & Transfer” tab. Here, you will find the option to request the EPP code. Click on it to proceed.
Receive Code Via Email
After requesting, the EPP code is sent to your registered email. Check your inbox for an email from Namecheap. This email contains the EPP code for your domain. Ensure the email address is up-to-date. If not, update it before requesting the code.
Initiating Transfer With New Registrar
Transferring your domain from Namecheap might seem daunting. It’s a simple process if broken down into steps. The key step is initiating the transfer with your new registrar. This involves choosing a reliable registrar and starting the transfer process smoothly.
Choose A New Registrar
Selecting a new registrar is crucial. Consider factors like pricing and customer support. Review their domain transfer policies carefully. Compare features that each registrar offers. Security features should be top-notch. Ensure they have a user-friendly interface. Check if they provide 24/7 support. A registrar with positive reviews is ideal.
Start Transfer Process
Initiate the transfer by logging into the new registrar’s site. Look for the domain transfer section. Enter your domain name to begin. Follow their specific instructions. You will need an authorization code. Obtain this code from Namecheap. Unlock your domain for transfer in Namecheap’s settings. Confirm the transfer request on the new registrar’s site.
Once confirmed, the transfer process begins. Expect to receive emails for verification. Respond promptly to expedite the process. The transfer may take a few days to complete. Monitor the status regularly. Ensure all information entered is accurate. Enjoy smoother management with your new registrar.
Confirming Transfer
Transferring a domain from Namecheap involves unlocking the domain and obtaining the authorization code. Ensure your domain is eligible for transfer, and confirm your email with the new registrar for a smooth transition.
Transferring a domain from Namecheap can feel like a daunting task, especially if it’s your first time. But confirming the transfer is a crucial step that ensures the process goes smoothly. Once you’ve initiated the transfer, you’re not quite done yet. You need to stay alert and proactive to ensure your domain moves as planned. Here’s how to tackle the confirmation phase effectively.Approve Transfer Request
Once you initiate the transfer from Namecheap, you’ll receive a confirmation email. This email is a key player in your transfer process. Open it and look for a clear option or link to approve the transfer. Without your approval, the transfer won’t proceed. Imagine missing this step and delaying your business plans—nobody wants that. So, check your inbox, including spam folders, and act swiftly.Monitor Transfer Status
After approving the transfer request, your job is not entirely done. You should actively monitor the status of the transfer. Most domain transfers take around five to seven days to complete, but it’s good to keep an eye on it. Log into your Namecheap account and check the transfer status periodically. This helps you catch any issues early, like authorization problems or incorrect details. You wouldn’t want to lose your domain due to a small oversight. By staying vigilant, you ensure the process is seamless and stress-free. Have you ever realized how a simple check-in can save you from future headaches?Finalizing Domain Transfer
Transferring a domain from Namecheap involves a few straightforward steps. First, unlock your domain and obtain the transfer code. Next, initiate the transfer with the new registrar, ensuring all information is correct. Complete the process by confirming the transfer through email notifications.
Transferring a domain from Namecheap might seem daunting at first, but once you’ve initiated the process, you’re almost at the finish line. The final steps of domain transfer are crucial to ensure that your domain is successfully moved and fully operational. It’s like the final touches of a project; you need to ensure everything is in place. Here, we will cover how to verify the successful transfer and update DNS settings to complete the transition. ###Verify Successful Transfer
After initiating the transfer, patience is key. You should receive a confirmation email once the domain transfer is complete. This usually takes a few days, but can sometimes be faster. Once you get the email, log into your new registrar account. Check if the domain appears in your list of domains. If it does, congratulations! You’ve successfully transferred your domain. Have you ever waited for an important email and kept refreshing your inbox? This is similar, but remember, the wait is worth it. If you don’t see the confirmation within the expected timeframe, reach out to the customer support team of your new registrar. They can help resolve any issues. ###Update Dns Settings
With the transfer successful, it’s time to update your DNS settings. This step ensures that your domain points to the correct web hosting service. Log into your new registrar account and locate the DNS settings section. If you’re moving to a new hosting provider, you’ll need the nameserver details from them. Enter these details in the DNS settings. If you’re sticking with the same hosting service, your previous DNS settings should remain intact. It might seem technical, but think of DNS settings as the directions to your website’s new home. Would you move without telling anyone your new address? The same applies here. Once updated, it may take a few hours for these changes to propagate across the internet. During this time, your website might not be accessible. Keep a close eye on it, and don’t hesitate to contact support if things don’t seem right. Have you ever had an unexpected delay at a checkout line, even when you thought you were done shopping? This is similar. It requires patience, but knowing your domain is finally in its right place is rewarding.Troubleshooting Common Issues
Transferring a domain from Namecheap can sometimes face challenges. Understanding these common issues helps ensure a smooth transfer process. Domain transfers involve various steps and protocols. Errors might occur during these steps. Knowing how to troubleshoot can save time and reduce frustration.
Transfer Delays
Transfer delays often occur due to incomplete information. Ensure all details are accurate and complete. Check if the domain is unlocked. Locked domains can’t be transferred. Another reason for delays is pending payment. Verify that fees are settled before initiating the transfer.
Authorization Code Errors
Authorization code errors arise from incorrect codes. Double-check the code provided by Namecheap. Ensure there are no spaces or missing characters. If the code doesn’t work, request a new one. Sometimes codes expire. Requesting a fresh code solves this issue.
Credit: www.hostinger.com
Credit: chemicloud.com
Frequently Asked Questions
How Do I Transfer A Domain From Namecheap?
Unlock your domain at Namecheap. Obtain the EPP code from your account. Initiate the transfer with your new registrar. Approve the transfer via email confirmation. Wait for the transfer to complete within 5-7 days.
How Long Does It Take To Transfer A Domain From Namecheap?
Transferring a domain from Namecheap typically takes 5 to 7 days. This timeframe includes receiving authorization codes and completing verification steps. Ensure all domain information is accurate to avoid delays.
Is Namecheap Domain Transfer Free?
Namecheap offers free domain transfers for most extensions. You only pay for the renewal fee. Transferring extends your domain registration by one year, ensuring continued ownership. Always check the specific extension’s transfer policy for detailed information.
How Do I Transfer My Domain From Namecheap To Microsoft?
To transfer your domain from Namecheap to Microsoft, unlock your domain and obtain the authorization code. Initiate the transfer request on Microsoft’s platform, entering the code. Approve the transfer via confirmation emails. Ensure your domain is eligible for transfer and meets Microsoft’s requirements.
Conclusion
Transferring a domain from Namecheap is straightforward. Follow the steps carefully. Double-check your details to avoid errors. Remember to unlock your domain first. Then, obtain the EPP code. Choose a new registrar and initiate the transfer. Each step matters in ensuring a smooth process.
Need help? Contact customer support for guidance. They can assist with any questions. With patience, your domain will transfer successfully. Keep track of the process to ensure everything goes smoothly. Happy transferring!


