
Are you planning to move your domain from Namecheap to Squarespace? This process might seem daunting at first, but it can be surprisingly straightforward once you know the steps.
You might be looking for a seamless website experience or simply want to consolidate your digital assets. Whatever your reason, transferring your domain doesn’t have to be a headache. With clear guidance, you can ensure your domain transition is smooth and stress-free.
Imagine the satisfaction of completing this task with ease, freeing up your time for what truly matters—building a stunning website on Squarespace. Dive in to discover how you can make this move effortlessly and efficiently, and transform your online presence today.

Credit: www.youtube.com
Preparation Steps
Start by unlocking your domain at Namecheap. Then, get the transfer code. Update your DNS settings. Finally, initiate the transfer to Squarespace. Follow these steps for a smooth transition.
When you’re ready to transfer your domain from Namecheap to Squarespace, taking the right preparation steps can save you time and frustration. It’s like packing for a trip—forgetting something important can turn a smooth journey into a bumpy ride. By ensuring all bases are covered, you can make the transition seamless and stress-free. ###Check Domain Eligibility
Before anything else, make sure your domain is eligible for transfer. Domains typically need to be registered for at least 60 days before they’re transferable. This is a rule set by ICANN, the organization that manages domain registrations globally. You should also ensure your domain is unlocked. Domains are usually locked by default to prevent unauthorized transfers. You can unlock it in your Namecheap account settings. Is your domain contact information up to date? Squarespace will send important transfer information to the email address listed in your domain’s WHOIS information. Make sure this is accurate to avoid missing out on crucial steps. ###Backup Important Data
Backing up your data might feel like an extra chore, but it’s crucial. Imagine losing valuable data, emails, or website files during the transfer process. This step ensures you have a fallback plan if something goes awry. Export all essential files, databases, and emails associated with your domain. Use Namecheap’s export tools or third-party services for a comprehensive backup. This way, you won’t lose anything important when you start fresh with Squarespace. Have you considered writing down all your current website settings? This can be a lifesaver. Knowing your DNS settings, email configurations, and other critical settings means you can quickly set them up again on Squarespace without any hassles. Preparing for a domain transfer doesn’t have to be overwhelming. By checking eligibility and backing up crucial data, you set yourself up for a hassle-free transition. What steps will you prioritize to ensure a smooth domain transfer?Unlocking Domain
Transferring a domain from Namecheap to Squarespace involves a few straightforward steps. Start by unlocking your domain in Namecheap settings. Then, obtain the transfer authorization code and enter it in your Squarespace account. Follow the prompts to finalize the transfer process seamlessly.
Unlocking Domain: A Seamless Transition from Namecheap to Squarespace Transferring your domain from Namecheap to Squarespace might seem daunting, but it’s simpler than you think. It’s all about understanding the process and taking it step by step. Imagine the satisfaction of seeing your domain seamlessly fit into your new Squarespace website. You’re not just moving a domain; you’re setting the stage for a polished online presence. How do you make sure your domain transfer goes off without a hitch? Let’s break it down.Access Namecheap Account
First things first, you need to access your Namecheap account. It’s like walking into a store to pick up something you already paid for. Log in using your credentials and make sure you have everything in order. Once inside, navigate your dashboard and look for your domain list. It’s usually a straightforward path. This is where all the magic begins. Have you ever felt that thrill of knowing you’re about to accomplish something important?Locate Domain Settings
Next, you need to locate your domain settings. This is where you’ll unlock the potential for your domain transfer. Find the domain you want to transfer and click on it. Look for the option marked as “Manage” or “Domain Settings”. This is where you’ll find various options related to your domain. Keep an eye out for the “Transfer Out” or “Authorization Code”. This code is crucial for your transition. Pro Tip: Make sure your domain isn’t locked. A locked domain can’t be transferred, so double-check this setting. Once you’ve obtained the authorization code, you’re one step closer to your goal. Isn’t it amazing how a simple code can open the door to new possibilities for your website? As you prepare for your domain transfer, consider the impact this move will have on your online presence. How does it feel to take control of your domain’s journey? Embrace this transition, knowing you’re building the foundation for a successful Squarespace site.Obtaining Authorization Code
To transfer your domain from Namecheap to Squarespace, first obtain the authorization code from your Namecheap account. This code is necessary to initiate the domain transfer process to Squarespace. Ensure your domain is unlocked and eligible for transfer before proceeding.
Transferring your domain from Namecheap to Squarespace can seem like a daunting task. However, once you understand the steps involved, the process becomes straightforward. One crucial step in this journey is obtaining the authorization code, a unique code that validates the transfer request. Think of it as your domain’s passport, granting it the freedom to move from one registrar to another. But how exactly do you get this key piece of information? Here’s a breakdown to guide you through this essential step.Request Transfer Code
To begin the transfer, you need to request the transfer code from Namecheap. Start by logging into your Namecheap account. Navigate to the “Domain List” section and locate the domain you wish to transfer. Next, click on “Manage” next to your domain. In the domain settings, look for the “Sharing & Transfer” tab. Here, you’ll find an option to “Get EPP code” or “Authorization Code.” Request this code, and it will be sent to your registered email address. Once you have requested the code, check your email. It might take a few minutes for the email to arrive, so be patient. If it doesn’t show up in your inbox, check the spam or junk folder.Save Authorization Code
Once you receive the authorization code, it’s crucial to save it securely. Consider copying it to a document or note-taking app where you can easily access it later. Ensure you don’t lose this code. Without it, you won’t be able to complete the transfer process to Squarespace. Think about this: what if you need to pause the process for any reason? Having the code saved means you can pick up where you left off without any hassle. Keeping your authorization code safe is like having a spare key to your car. You never know when you’ll need it, but it’s essential to have. So, don’t skip this step. Save it somewhere you’ll remember, and proceed confidently to the next stage of your domain transfer.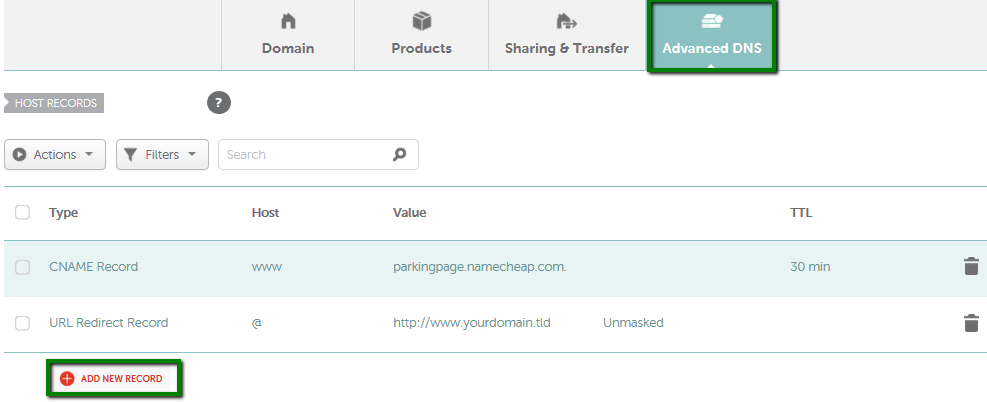
Credit: www.namecheap.com
Initiating Transfer On Squarespace
Transferring a domain from Namecheap to Squarespace involves a few steps. Start by unlocking your domain and obtaining the transfer code from Namecheap. Then, enter this code in Squarespace to initiate the transfer process.
Initiating the transfer of your domain from Namecheap to Squarespace is a crucial step. Squarespace provides an intuitive platform for managing domains. This process can be smooth with the right guidance. Follow these simple steps to get started.Log Into Squarespace
First, access your Squarespace account. Use your email and password to log in. If you don’t have an account, create one. Ensure your account is active and verified. Once logged in, navigate to the Home Menu. Look for ‘Domains’ in the sidebar. This section helps manage your domain settings. Prepare to enter domain details next.Enter Domain Details
Locate the ‘Use a domain I own’ option. Click on it to begin the transfer. Enter your domain name registered with Namecheap. Ensure the domain name is spelled correctly. Squarespace will check the domain for availability. Confirm that your domain is unlocked on Namecheap. If locked, transfer will not proceed. Enter the authorization code from Namecheap. This code is crucial for verification. Ensure you have this code handy. Follow the prompts to complete the process. Squarespace will guide you through each step. The transfer may take a few days. Monitor your email for updates from Squarespace. With these steps, your domain transfer begins. Squarespace makes this process straightforward. Enjoy managing your domain on a reliable platform.Confirming Transfer
Transferring a domain from Namecheap to Squarespace involves a few simple steps. First, unlock your domain at Namecheap and obtain the transfer code. Next, initiate the transfer on Squarespace and enter the code to complete the process smoothly.
Transferring a domain from Namecheap to Squarespace is a straightforward process, but confirming the transfer is a crucial step that ensures everything goes smoothly. This phase involves verifying that you’ve correctly initiated the transfer and are prepared for the transition. It’s like checking your bags before a trip to make sure you haven’t forgotten anything important. You want to be sure that everything is in order so that your domain seamlessly moves to its new home.Approve Transfer Request
Once you’ve initiated the transfer, you’ll receive an email from Namecheap. This email contains a transfer request which you need to approve. The approval is your green light for the process to begin. Check your inbox carefully. Sometimes these emails land in the spam folder, so it’s good to be thorough. Open the email and click the approval link. This step confirms to Namecheap that you indeed want to transfer your domain. By approving, you are giving Squarespace the go-ahead to start the transfer process. It’s an easy but essential step that sets everything in motion.Monitor Transfer Progress
After approving the request, it’s time to monitor the transfer progress. You can do this through your Squarespace account. Log into your Squarespace dashboard and navigate to the domains section. Here, you’ll find a status update on your domain transfer. Keep an eye on it to ensure everything is progressing smoothly. Typically, domain transfers take about 5-7 days. This timeline may vary, so it’s good to check periodically. Monitoring helps you stay informed and ready to tackle any issues that might arise. Have you ever waited anxiously for something important to arrive? Monitoring the transfer is somewhat like that, but with the reassurance of having control and updates at your fingertips. Transferring domains can seem daunting, but with the right steps, it becomes a manageable task. Are you ready to confirm your domain transfer and set your digital journey into motion?Post-transfer Checklist
Transferring your domain from Namecheap to Squarespace involves a few essential steps. First, unlock your domain at Namecheap. Then, get the authorization code. Next, initiate the transfer at Squarespace by entering the code. Lastly, confirm the transfer via email.
After transferring your domain from Namecheap to Squarespace, a post-transfer checklist is essential. This ensures everything functions smoothly and your website remains accessible. Missing a step might lead to issues like downtime or broken links. Let’s dive into the checklist to guarantee a seamless transition.Verify Domain Connection
First, confirm that your domain is linked to Squarespace. Log into your Squarespace account. Check the domain settings. Look for the status indicator. It should say “Connected.” If not, recheck the connection steps. A successful connection keeps your site live and reachable.Update Dns Settings
Next, update the DNS settings. Access your Squarespace domain panel. Ensure the DNS records match Squarespace’s requirements. This might include A records and CNAME records. Correct DNS settings ensure proper email and website functionality. Incorrect settings can disrupt access. Always double-check entries for accuracy.Troubleshooting Common Issues
Transferring a domain from Namecheap to Squarespace can sometimes bring challenges. Knowing how to troubleshoot common issues can save time and frustration. Whether it’s authorization code troubles or transfer delays, understanding these problems is key.
Resolving Authorization Code Problems
Authorization codes are essential for domain transfers. Without them, the transfer cannot proceed. If you don’t receive your code, check your email’s spam folder. Sometimes, emails end up there by mistake.
Make sure your domain is unlocked in Namecheap. Locked domains cannot be transferred. Log in to your Namecheap account and check your domain status. You might need to request a new authorization code.
Handling Transfer Delays
Transfer delays can be frustrating. They often occur due to incorrect domain settings. Verify your domain’s contact information. Incorrect details can halt the transfer process.
Ensure your domain is not expired. Expired domains cannot be transferred. Renew your domain in Namecheap if needed. Sometimes delays happen due to registrar issues. Contact Namecheap support for assistance if the delay persists.
Additional Tips
Consider checking domain settings thoroughly before initiating a transfer. Always ensure your domain is unlocked and acquire the authorization code. Double-check DNS settings to maintain website functionality during the transition.
Transferring your domain from Namecheap to Squarespace might seem daunting, but with the right guidance, it can be a smooth process. While the basic steps are straightforward, a few additional tips can ensure you’re not caught off guard. These insights will help you understand the nuances and prepare you for a seamless transition.Understanding Transfer Timelines
Domain transfers don’t happen instantly. When you initiate a transfer from Namecheap to Squarespace, it can take up to seven days. This waiting period is standard across many registrars. During this time, keep an eye on your email. You might receive confirmation requests that need a quick response to avoid delays. If you have a critical launch planned, consider this timeline. Plan your transfer well in advance to ensure everything is ready when you need it.Ensuring Security During Transfer
Security should be a top priority when transferring your domain. Make sure your email and account passwords are strong and updated. Enable two-factor authentication on both Namecheap and Squarespace. This adds an extra layer of security to your accounts. Check for any suspicious activity during the transfer. If something doesn’t feel right, don’t hesitate to reach out to customer support. Reflect on a time when you made a significant digital change. Were you prepared for unexpected challenges? Being proactive can save you from future headaches. What’s your backup plan if something goes wrong during the transfer? Consider creating one to safeguard your digital assets.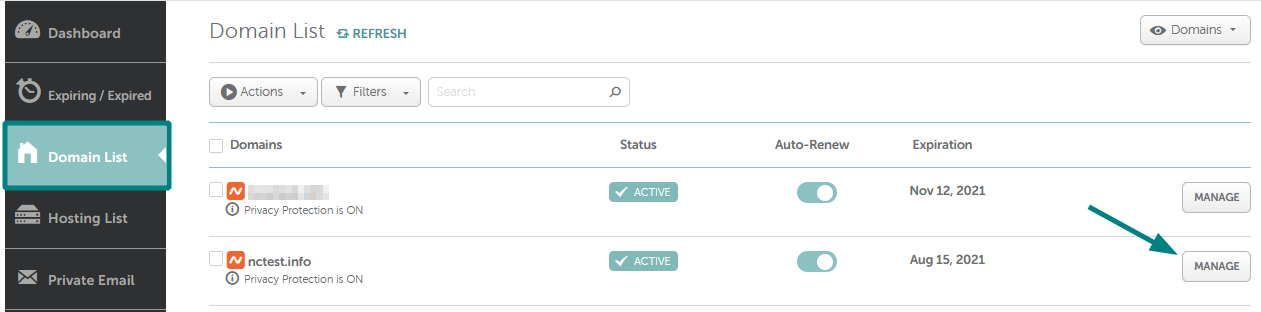
Credit: www.namecheap.com
Frequently Asked Questions
Can I Transfer My Domain From Namecheap To Squarespace?
Yes, you can transfer your domain from Namecheap to Squarespace. Follow Squarespace’s domain transfer instructions. Ensure your domain is unlocked and you have the authorization code from Namecheap. The process may take a few days to complete. Check Squarespace support for detailed guidance.
Can I Use A Namecheap Domain With Squarespace?
Yes, you can use a Namecheap domain with Squarespace. Connect your domain through DNS settings. Squarespace provides step-by-step guidance for easy integration. Ensure your Namecheap domain is active and properly configured. Your domain will seamlessly work with Squarespace’s platform once connected.
How Do I Transfer A Domain Out Of Namecheap?
To transfer a domain from Namecheap, unlock your domain in the dashboard. Obtain the authorization code. Initiate the transfer with your new registrar, using the code. Confirm the transfer request via email. Ensure domain privacy settings are disabled.
How Can I Transfer My Domain To Squarespace?
Log into your Squarespace account. Go to Settings, then Domains. Click “Use a domain I own,” and follow the prompts. Ensure your domain is unlocked at the current registrar. Enter the authorization code when prompted. Confirm the transfer and wait for completion.
Conclusion
Transferring your domain from Namecheap to Squarespace can be easy. Follow the steps carefully and ensure all details are correct. Double-check your domain settings on both platforms. Patience is key during the transfer process. It might take a few days.
Stay informed by checking your email for updates. Once complete, your domain will work seamlessly with Squarespace. Enjoy your new website setup. If you encounter issues, support teams are available to help. This transfer enhances your online presence. Take advantage of Squarespace’s features and grow your site effortlessly.


