
Transferring a domain from Namecheap to Hostinger might seem daunting at first, but it doesn’t have to be. If you’re considering making this move, you’re probably looking for a seamless transition to optimize your website’s performance.
Imagine having complete control over your online presence, with enhanced speed and reliable support. By taking this step, you’re opening the door to a world of opportunities where your website can thrive like never before. In this guide, we’ll break down the process into simple, easy-to-follow steps, ensuring you have everything you need to make the switch smoothly.
So, if you’re ready to empower your website, keep reading to discover how you can effortlessly transfer your domain and unlock its full potential.
Preparation Before Transfer
Before transferring a domain from Namecheap to Hostinger, ensure all settings are correct. Unlock the domain and disable privacy protection. Gather the authorization code from Namecheap.
Transferring your domain from Namecheap to Hostinger might seem like a daunting task. However, with the right preparation, it can be a smooth process. Before you begin, it’s crucial to lay the groundwork for a successful transfer. This preparation ensures you don’t hit any unexpected roadblocks along the way. Let’s dive into the essential steps you need to take before initiating the transfer.Check Domain Eligibility
First, verify if your domain is eligible for transfer. Domains need to be registered for at least 60 days before they can be transferred. This rule is universal across registrars. Check your domain’s registration date in your Namecheap account. If you’re nearing the 60-day mark, just be patient for a few more days. Also, ensure your domain isn’t locked due to a recent transfer or pending deletion. Make sure any outstanding issues are resolved before proceeding.Unlock Domain
Unlocking your domain is crucial. Namecheap keeps domains locked by default to protect against unauthorized transfers. You need to manually unlock it to initiate the transfer. Log into your Namecheap account and navigate to the domain list. Select the domain you wish to transfer and look for the option to unlock it. Once unlocked, you’ll receive an authorization code. This code is vital for completing the transfer to Hostinger. Keep it safe and handy. Have you ever wondered why domain security is so emphasized? Imagine losing access to your website overnight due to a transfer mishap. Preparation helps avoid such nightmares.
Credit: zonewebsites.us
Access Namecheap Account
Start by logging into your Namecheap account to initiate the domain transfer process. Navigate to the domain settings and unlock the domain you wish to transfer. Obtain the authorization code and follow Hostinger’s transfer instructions to complete the process smoothly.
Accessing your Namecheap account is the first step to transferring your domain. It’s a simple process, but crucial for a smooth transfer. Follow these easy steps to access your account and prepare your domain for transfer.Log Into Account
Begin by visiting the Namecheap website. Locate the “Sign In” option at the top of the page. Enter your username and password. If you forget your password, click “Forgot Password” for help. Ensure you have access to the email linked to your account. This email will receive important notifications. Once logged in, you’ll see your Namecheap dashboard.Locate Domain Settings
In the dashboard, find the “Domain List” tab. It’s usually on the left-hand side. Click on it to view all your registered domains. Find the domain you want to transfer. Click “Manage” next to it. This takes you to the domain settings page. Here, you’ll find all the options for managing your domain. Ensure your domain is unlocked and ready for transfer.Obtain Epp Code
Transferring a domain from Namecheap to Hostinger? You’ll need the EPP code. The EPP code is crucial for domain transfers. It ensures security and ownership verification. Obtaining this code is straightforward. Follow these steps to get your EPP code.
Request Epp Code
First, log into your Namecheap account. Locate the domain you wish to transfer. Click on the domain to view its details. Look for the option that says “Get EPP Code”. This is usually under the domain management section. Clicking this option will initiate the EPP code request. Namecheap will then process this request.
Verify Epp Code Receipt
After requesting, check your email. Namecheap sends the EPP code to your registered email. Ensure you check your inbox and spam folders. The email contains the EPP code needed for the transfer. Once received, store it securely for the next step. This code is vital for a smooth transfer to Hostinger.
Credit: www.hostinger.com
Initiate Transfer On Hostinger
Transferring your domain from Namecheap to Hostinger can be straightforward. Hostinger offers a user-friendly platform to help you initiate the transfer process smoothly. This section guides you through the necessary steps to begin transferring your domain to Hostinger.
Log Into Hostinger
First, access your Hostinger account. Use your credentials to log in. After logging in, navigate to the control panel. Here, you’ll find the domain transfer option. It’s easy to locate. This is where the transfer starts.
Enter Domain Details
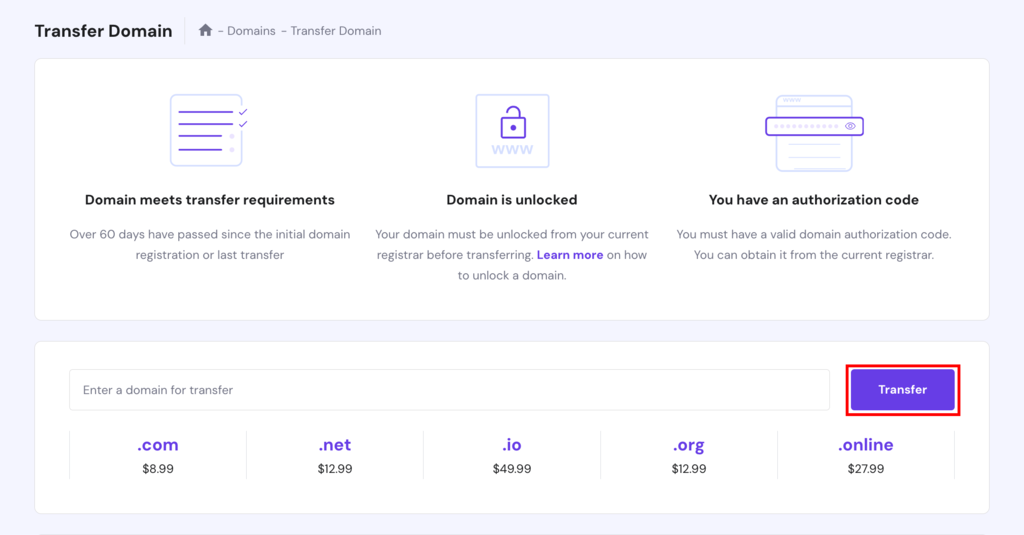
Once in the transfer section, enter your domain name. Ensure spelling is correct. Hostinger requires specific details. You might need the authorization code from Namecheap. This code is crucial for verification. Double-check before proceeding.
Complete Domain Transfer
Transferring your domain from Namecheap to Hostinger is straightforward. First, unlock your Namecheap domain. Then, obtain the EPP code. Next, initiate the transfer on Hostinger’s platform. Finally, confirm the transfer via email. This simple process ensures your domain moves smoothly between these providers.
Transferring a domain from Namecheap to Hostinger might sound challenging, but breaking it down into manageable steps can make the process smooth and straightforward. Whether you’re seeking better hosting features or simply consolidating your domains, understanding the complete domain transfer process is crucial. It’s not just about clicking a few buttons; it’s about ensuring your online presence remains uninterrupted.Confirm Transfer Request
Before initiating the transfer, ensure your domain is eligible. Check if it’s been registered for at least 60 days and isn’t locked or on hold. You’ll need an authorization code from Namecheap, often referred to as an EPP code. Once you have the code, log into your Hostinger account. Navigate to the domain transfer section and enter the code. This is your official transfer request.Monitor Transfer Progress
After confirming your transfer, patience is key. Transfers can take up to seven days. During this period, keep an eye on your email for any updates or required actions. Hostinger will notify you of each step. If there are any issues, you’ll be informed with clear instructions on what to do next. Staying proactive can save time and prevent potential hiccups. Have you ever waited anxiously for an important package? Think of this process similarly. Monitoring your domain transfer ensures it arrives safely and securely to its new home. Completing a domain transfer might seem like a hassle, but by following these steps, you ensure a seamless transition for your website. Have you started your transfer yet? If not, now’s the perfect time to dive in!
Credit: www.youtube.com
Post-transfer Steps
After transferring your domain from Namecheap to Hostinger, update DNS settings in Hostinger’s control panel. Ensure your domain points to Hostinger’s servers for proper functionality. Verify domain status to confirm successful transfer and smooth operation.
After completing the domain transfer from Namecheap to Hostinger, several steps remain crucial. These steps ensure your website functions smoothly and remains accessible. Properly configuring your domain settings is essential for optimal performance.Update Dns Settings
Once the transfer completes, update your DNS settings. This directs web traffic to Hostinger’s servers. Log into your Hostinger account and access the DNS settings. Input the correct nameservers provided by Hostinger. Save the changes. This process can take up to 48 hours to propagate. During this period, your website might experience downtime.Check Domain Status
Verify your domain status to ensure everything is correct. Log into your Hostinger dashboard. Navigate to the domain section. Check the status for any alerts or errors. Ensure the domain is active. This confirms successful transfer and setup. If issues arise, contact Hostinger support for assistance. They can help troubleshoot any problems.Frequently Asked Questions
How To Transfer Domain To Hostinger From Namecheap?
Unlock your domain at Namecheap and get the EPP code. Initiate the transfer on Hostinger’s platform using the code. Confirm the transfer via email. Wait for the domain transfer to complete. This process typically takes up to 7 days.
How Do I Transfer Domains Out Of Namecheap?
Log in to Namecheap, unlock the domain, and retrieve the transfer code. Provide this code to your new registrar. Complete the transfer process by following their instructions. Ensure your domain is eligible for transfer and verify contact information is accurate.
Transfers may take up to seven days to complete.
How To Transfer Website Domain To New Host Hostinger?
To transfer a domain to Hostinger, unlock the domain, obtain an authorization code, and initiate the transfer on Hostinger. Approve the transfer via email confirmation.
How Much To Transfer A Domain To Hostinger?
Transferring a domain to Hostinger costs $8. 99 for a one-year extension. The price includes domain privacy protection. Ensure your domain meets transfer requirements before proceeding.
Conclusion
Transferring your domain to Hostinger is simple and rewarding. Follow the steps carefully. Make sure your domain settings are correct. Double-check your Hostinger account details. Confirm the transfer process has started. Expect the transfer to take a few days. Patience is key during this time.
Once done, enjoy Hostinger’s excellent services. Keep your domain secure and updated. Regularly check for any issues. Now, your domain is ready for new possibilities. Happy hosting with Hostinger!


