
Are you ready to take control of your web hosting environment? Setting up a DNS server is a crucial step in managing your own web hosting.
Whether you’re a budding webmaster or a seasoned IT professional, understanding how to configure a DNS server can significantly enhance your website’s performance and reliability. Imagine the power of having your domain names seamlessly direct traffic to your web server with lightning-fast speed and precision.
In this guide, you’ll discover the step-by-step process to set up your DNS server, ensuring your website is both accessible and efficient. Stick around, and you’ll soon master the art of DNS configuration, unlocking a new level of control over your online presence.
Understanding Dns Basics
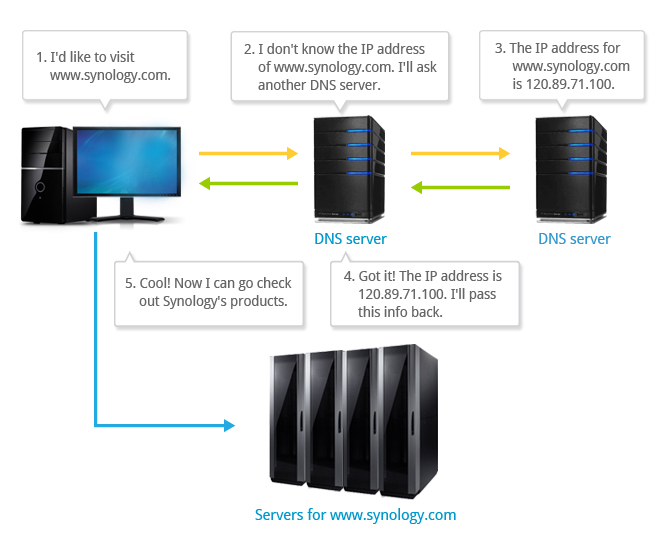
DNS stands for Domain Name System. It acts like a phone book for the internet. It helps computers find websites using names instead of numbers. Imagine searching for a friend’s name in a phone book. DNS does the same for websites. It converts website names into IP addresses. This is how computers talk to each other. Without DNS, browsing the web would be very hard.
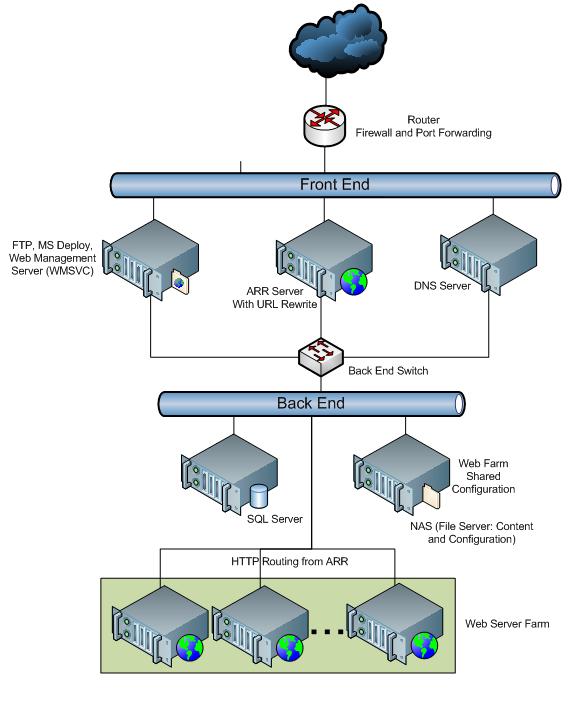
DNS has different parts. The DNS server stores data. The resolver finds the data. The domain is the name of the website. DNS records keep track of information. There are many types of records. For example, A record shows the IP address. MX record is for email. Each part plays a role. Together they make sure websites work smoothly.
Credit: www.namecheap.com
Choosing The Right Dns Server Software
There are many DNS software options to choose from. Some popular ones include BIND, PowerDNS, and Unbound. BIND is very common and has been around a long time. PowerDNS offers good performance and is easy to use. Unbound is known for being lightweight and fast. Each software has its own strengths and weaknesses. Consider what features you need. Then, pick the one that fits best.
Think about ease of use and performance. Some software is easier to set up. Others might offer better speed. Consider the support and updates each software gets. Check if it fits with your current systems. Security is another key factor. Make sure the software is secure and can protect your data.
Installing Dns Server Software
A DNS server needs a strong computer. It should have at least 2 GB RAM and 20 GB hard disk. A fast internet connection is also important. The operating system can be Windows, Linux, or macOS. Make sure to check the software’s compatibility with your system.
First, download the DNS server software. Then, open the installer file. Follow the instructions shown on the screen. Choose the installation directory. Click “Next” when prompted. The installation process will begin. Wait for the software to install completely. After installation, restart your computer. Finally, configure the DNS settings as needed.
Configuring Dns Zones
Zone files are very important for DNS. They tell the server how to handle domains. Each zone file has different records. These records direct traffic to the correct place. Creating a zone file is like writing a list of rules. These rules help computers find websites. Using a simple text editor, you can write these rules. Save the file with a .zone extension. Make sure to check for any errors. Errors can stop your website from working. Keep the file safe. Only trusted people should edit it.
Each DNS record type has a job. A records link names to IP addresses. CNAME records are for aliases. They point one domain to another. MX records handle email routing. Email goes to the right server. TXT records hold text information. Sometimes they verify domain ownership. Choose the right record type for each need. Set them up correctly. Wrong settings can cause problems. Always double-check your work.
Testing Dns Server Setup
Setting up a DNS server is crucial for web hosting. Begin by selecting a reliable server software. Configure domain settings to ensure accurate web traffic direction. Test the setup to verify connectivity and functionality.
Using Dns Tools
DNS tools help check if your server works. Tools like Dig and Nslookup show server info. They test the name resolution process. Use them to find errors fast. They show if the server is running. They also show if the server returns correct IP addresses.
Troubleshooting Common Issues
Issues can stop your DNS server. If the server is slow, check network settings. Wrong IP settings cause problems. Check if the firewall blocks DNS requests. If names don’t resolve, check your zone files. Make sure they have correct records. Always update them for accuracy. Restart your server after changes.
Credit: learn.microsoft.com
Securing Your Dns Server
Keep your DNS software updated to avoid risks. Updates often fix security holes. Use a firewall to protect your server. It blocks unwanted access. Limit who can change DNS settings. Only trusted people should have this power. Set up DNSSEC for added protection. It checks if data is safe and correct.
Check your server regularly. Look for anything odd. Use tools to watch server activity. These tools alert you to problems. Make backups of your DNS data. If something goes wrong, you can restore it. Train your team on DNS security. Everyone should know the basics. This keeps your server safe and sound.
Integrating Dns With Web Hosting
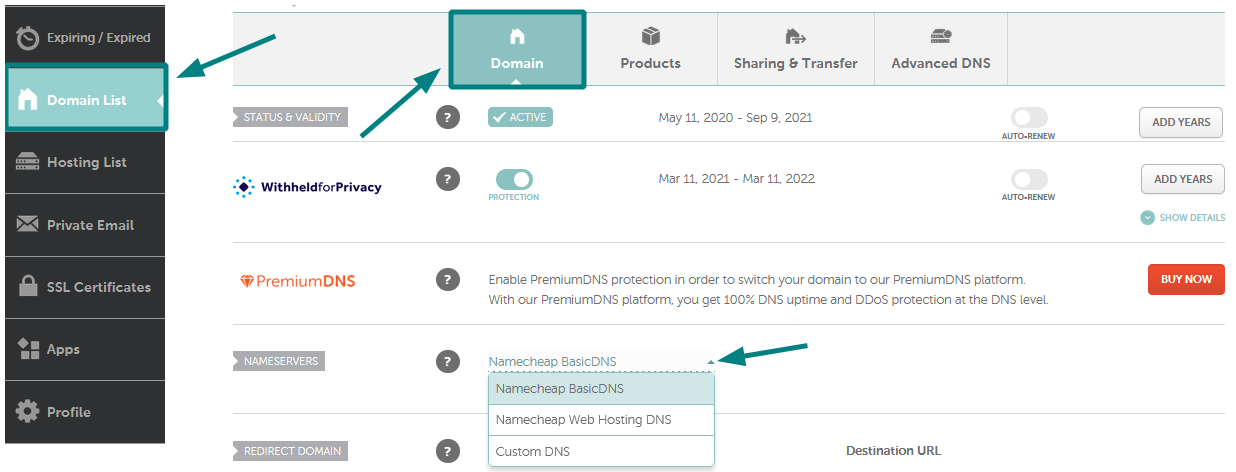
Setting up a DNS server is easy. First, you need a domain name. This is your web address. Next, find a DNS provider. Some are free, some cost money. You must link your domain to your web host. This tells the internet where your website is. Without linking, your site won’t show up.
Good DNS performance is key. It makes websites load fast. Use reliable servers. This helps with speed. Also, check DNS settings often. Update them if needed. A fast DNS helps users stay happy. Fast websites are more fun to use.
Credit: kb.synology.com
Frequently Asked Questions
How To Set Up Dns For Web Server?
To set up DNS for a web server, first access your domain registrar’s DNS settings. Add A records pointing your domain to your server’s IP address. Configure MX records for email and CNAME for subdomains. Save changes and allow propagation time for the DNS settings to update globally.
How Can I Setup My Own Dns Server?
Install DNS software like BIND on your server. Configure zone files for your domains. Update your network settings to use your DNS server. Ensure security with firewalls and regular updates. Test your setup to confirm it’s working correctly.
How To Host A Website On Dns?
To host a website on DNS, first register a domain name. Then, point the domain to your hosting provider’s nameservers. Add DNS records, like A, CNAME, and MX, in your hosting account. Ensure they correctly point to your website’s server IP address.
Save changes, and your website will be live.
Do I Need A Dns Server For My Website?
A DNS server is essential for your website. It translates domain names into IP addresses, enabling users to access your site easily. Without DNS, visitors must use IP addresses, making navigation difficult. Ensure your DNS settings are configured correctly for optimal website performance and accessibility.
Conclusion
Setting up a DNS server for web hosting is straightforward. Follow the steps carefully. Use the right tools. Ensure your DNS records are correct. This enhances website accessibility. It also improves loading speed. Your web hosting becomes more efficient. Troubleshooting becomes easier too.
Remember to test your configuration. It ensures everything works smoothly. With practice, the process gets simpler. You gain confidence in managing your DNS setup. Regular checks help maintain performance. Keep learning and stay updated. A well-configured DNS boosts your online presence.
Happy hosting!


