
Imagine you’ve purchased a domain from Namecheap, and now you’re eager to redirect it to a different website or platform. But where do you start?
Redirecting a domain might sound technical, but with the right guidance, it becomes a simple task. You’ll soon discover that mastering this process can open doors to new opportunities, whether you’re rebranding, expanding your online presence, or simply consolidating your web assets.
This guide is designed with you in mind, breaking down each step into easy-to-follow instructions. As you read on, you’ll gain the confidence and skills to seamlessly redirect your Namecheap domain, ensuring your online projects flow smoothly. Dive into this article and unlock the secrets to efficient domain management, enhancing your digital strategy and leaving no detail overlooked.
Domain Management Essentials
Managing your domain effectively is crucial for maintaining a professional online presence. Whether you’re a seasoned webmaster or just stepping into the world of website management, understanding the essentials of domain management is a must. Redirecting your Namecheap domain can seem daunting, but breaking it down into manageable steps can make the process smoother. Let’s dive into how you can efficiently manage your domain settings to redirect your Namecheap domain.
Accessing Your Namecheap Account
The first step in managing your domain is accessing your Namecheap account. This is where all the magic happens. Head over to the Namecheap website and log in with your credentials. If you’ve forgotten your password, don’t worry—there’s an easy reset option available. Once logged in, you’ll find yourself on the dashboard, your control center for all domain-related tasks.
Accessing your account regularly helps you stay on top of domain renewals and updates. You might even find it helpful to bookmark the login page for quick access. Have you ever noticed how easy it is to overlook domain expiration emails? Regular logins prevent that oversight, keeping your online presence uninterrupted.
Locating Domain Settings
Once inside your account, the next essential task is locating the domain settings. This is where you’ll configure the redirection. Look for the “Domain List” on the left sidebar and click on it. A list of your domains will appear. Click the “Manage” button next to the domain you wish to redirect.
Within the domain management page, you’ll find several tabs. Focus on the “Advanced DNS” tab. This is your gateway to redirecting your domain. It might seem overwhelming with all the options, but remember, you’re only a few clicks away from achieving your goal.
What specific challenges have you faced in managing domain settings before? Share your experiences in the comments below, and let’s learn from each other.
By mastering these domain management essentials, you’re not just handling a domain; you’re taking control of your online identity. With a few strategic clicks, your Namecheap domain can be redirected smoothly, ensuring your website remains accessible and professional.
Credit: www.namecheap.com
Dns Settings Configuration
Configuring DNS settings is crucial for redirecting your Namecheap domain. Proper DNS setup ensures your domain points to the right destination. It impacts how users access your website. Let’s dive into DNS settings configuration.
Understanding Dns Records
DNS records are like signposts for your domain. They direct traffic to your web server. Common types include A, CNAME, and MX records. A records point your domain to an IP address. CNAME records alias one domain to another. MX records manage email routing.
Each record has its specific function. Understanding these is key to effective DNS management. Knowing what each record does helps in proper configuration. It ensures your domain functions smoothly.
Modifying Dns Records
Modifying DNS records is simple with Namecheap. Log in to your Namecheap account. Navigate to your domain list. Click on the domain you want to update.
Find the DNS settings section. You can add, edit, or delete records here. To change an A record, update the IP address. For CNAME, adjust the alias. Ensure changes match your hosting provider’s requirements.
Save changes to apply new settings. DNS changes can take time to propagate. Usually, it takes 24 to 48 hours. Patience is key during this process.
Setting Up Domain Redirection
Setting up domain redirection is a vital task for website owners. It helps in directing users from an old web address to a new one. This ensures that your visitors find the right content. Namecheap offers a simple process for setting up domain redirection. It involves choosing the right type of redirection and configuring it correctly. Let’s dive into the steps you need to follow.
Choosing Redirection Type
Decide whether you need a permanent or temporary redirection. A permanent redirection, known as 301, tells search engines the move is permanent. Use this if you have permanently moved your site. A temporary redirection, or 302, is for temporary changes. Use this if your site will return to its original address. Understanding the difference is crucial for SEO purposes.
Configuring Url Forwarding
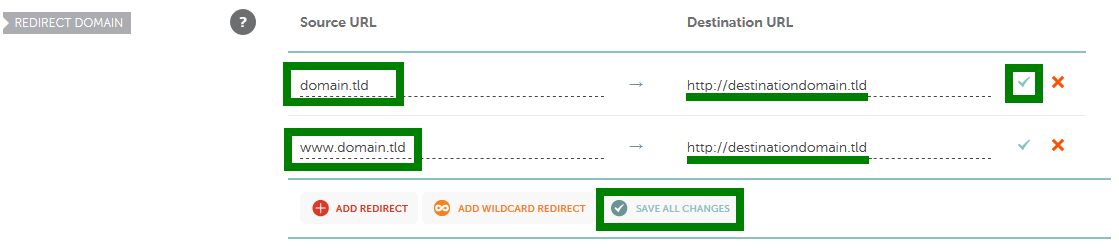
Log in to your Namecheap account. Navigate to the Domain List. Choose the domain you want to redirect. Click on the “Manage” button next to the domain. Find the “Advanced DNS” tab. Here, you can set up URL forwarding. Add a new record and choose “URL Redirect Record” from the dropdown. Enter the destination URL where you want visitors to land. Save the changes. Your domain will now redirect to the specified URL.
Credit: typedream.com
Testing Domain Redirection
Testing domain redirection ensures your Namecheap domain points correctly. It’s a crucial step after setting up a redirect. Without testing, errors might occur, affecting website accessibility. Follow these steps to verify redirection.
Verifying Dns Propagation
DNS changes can take time to propagate. Typically, it takes 24 to 48 hours. Use online tools to check DNS propagation status. Tools like WhatsMyDNS help verify DNS changes worldwide. Confirm your new settings are active globally.
Ensuring Successful Redirection
Test your domain redirection using web browsers. Type your domain in the address bar. Check if it redirects to the new URL smoothly. Use different browsers to ensure cross-browser compatibility. Tools like Redirect Checker are useful. They help verify if the redirect is functioning correctly.
Check for any errors during testing. Look for 301 or 302 status codes. These codes confirm a successful redirect. If errors persist, revisit your DNS settings. Ensure all configurations align with Namecheap’s guidelines.
Troubleshooting Common Issues
Redirecting a Namecheap domain requires adjusting DNS settings. Start by accessing your Namecheap account and locating the domain dashboard. Follow the step-by-step instructions to change the nameservers or add redirect settings for seamless domain forwarding.
Redirecting your Namecheap domain can be a straightforward process, but sometimes you might hit a few bumps along the way. Troubleshooting common issues is essential to ensure a smooth transition and keep your website accessible. By addressing potential roadblocks promptly, you can save time and avoid frustration. Let’s dive into some practical solutions to common problems you might encounter.Resolving Dns Conflicts
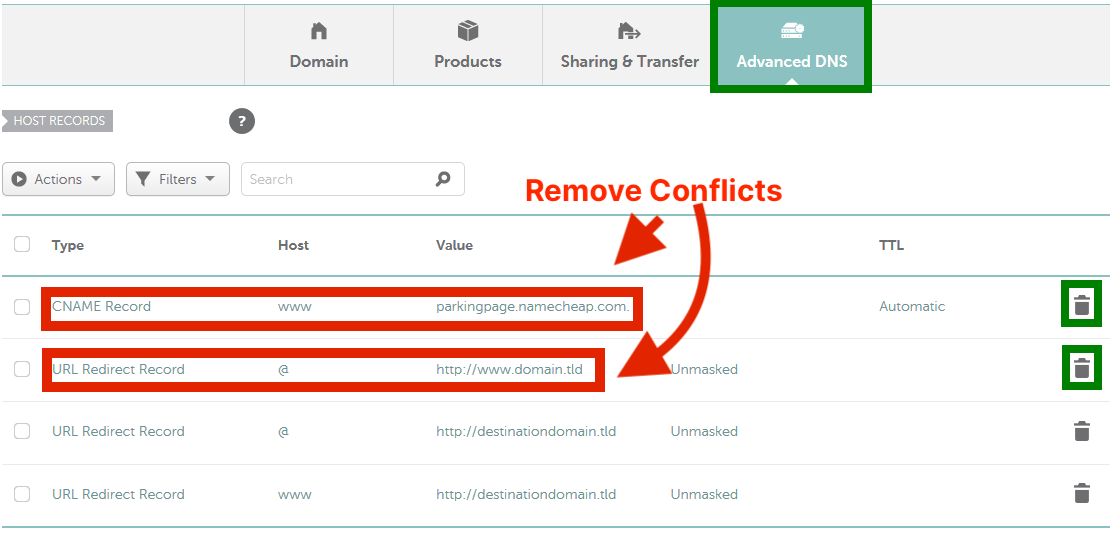
DNS conflicts can be a headache when redirecting your domain. A typical issue arises when multiple DNS records contradict each other, confusing your browser on where to direct traffic. To resolve this, check your DNS settings in the Namecheap dashboard. Ensure there’s only one “A” record pointing to the correct IP address. Don’t forget to remove any old or unnecessary records that may cause conflicts. Another tip: clear your browser’s cache after making changes. This ensures that your browser fetches the updated DNS information rather than relying on cached data.Addressing Redirection Errors
Redirection errors can occur if the URL settings are incorrect. Double-check if you’ve entered the correct destination URL in the Namecheap dashboard. Sometimes, a simple typo can lead to a frustrating error page instead of your desired site. It’s also worth considering whether your redirect type is set correctly. If you’re using a temporary redirect (302) when you intended a permanent one (301), this could affect SEO and user experience. Have you ever wondered if your redirection issues stem from a propagation delay? DNS changes can take up to 48 hours to propagate fully across the internet. Patience is key here—if you’ve checked everything and the issue persists, give it some time. If you’re still facing challenges after these steps, don’t hesitate to contact Namecheap support for expert assistance. They can provide insights tailored to your specific situation, helping you resolve issues efficiently.
Credit: www.youtube.com
Additional Resources
Redirecting a Namecheap domain can seem daunting. But don’t worry. There are plenty of resources to help. From support tools to community forums, you’ll find everything you need. Explore these resources to make the process simple and stress-free.
Namecheap Support Tools
Namecheap offers a range of support tools. Start with their comprehensive knowledge base. It contains step-by-step guides. These guides cover domain management and redirection. The Namecheap Help Center is another great resource. It provides detailed articles and FAQs. Use these resources to troubleshoot and learn.
Community Forums And Guides
Join Namecheap’s community forums. They are a treasure trove of information. Here, users share tips and experiences. Search existing threads for solutions. Or start a new thread with your questions. You’ll find helpful advice from other users.
Additionally, explore online guides. Many tech websites offer tutorials. They provide clear instructions on domain redirection. These guides often include screenshots. Making it easier to follow along. Use these additional resources to enhance your understanding.
Frequently Asked Questions
How To Redirect A Domain On Namecheap?
Log into your Namecheap account. Go to “Domain List” and select your domain. Click “Manage. ” Navigate to the “Redirect Domain” section. Enter your desired destination URL and save changes. Ensure DNS settings allow redirects.
How Do I Redirect A Domain To Another Domain?
Use a 301 redirect for permanent domain redirection. Access your domain’s DNS settings. Update the. htaccess file or use a web hosting control panel to set the redirect. Ensure the new domain is properly configured. Check the redirection works by visiting the old domain’s URL.
How Do I Transfer A Domain From Namecheap To Another Person?
Log in to your Namecheap account. Go to “Manage” for the domain. Choose “Sharing & Transfer. ” Click “Initiate Transfer” and follow prompts. Provide the recipient’s email for transfer approval.
How To Redirect Domain To Path?
Use a. htaccess file to redirect your domain. Add “Redirect 301 / http://example. com/path” to achieve this. Ensure your server supports. htaccess and Apache. Test the redirect to confirm it works correctly. Adjust the path as needed for your specific domain setup.
Conclusion
Redirecting your Namecheap domain is simpler than it seems. Follow the steps outlined above. You’ll soon have your domain pointing correctly. Remember, accurate information is key. Double-check each entry to avoid errors. This ensures a smooth transition. Need help? Namecheap support is available.
Don’t hesitate to reach out. They are there to assist. With patience, your domain will redirect successfully. Enjoy the benefits of an efficiently managed domain. Happy redirecting!


