
You’ve got a shiny new domain on Namecheap, and now you need to redirect it. But where do you start?
The process might seem daunting, but it’s actually quite straightforward once you know the steps. Imagine the convenience of guiding your visitors seamlessly to the right place without any hassle. Redirecting your domain can help you manage your online presence effectively, ensuring your audience finds what they’re looking for without unnecessary confusion or frustration.
You’ll discover how to easily redirect your domain on Namecheap. Get ready to unlock the power of smooth navigation and make your website management simpler and more efficient. Dive in to learn exactly what you need to do to achieve this.
Credit: www.namecheap.com
Domain Redirect Basics
Domain redirects are essential for managing web traffic. They ensure visitors reach the right destination. This process is crucial for maintaining user experience and SEO benefits. Namecheap provides an easy way to set up domain redirects. Whether you’re consolidating websites or changing domain names, understanding the basics of domain redirection is key.
Understanding Domain Redirection
Domain redirection sends web traffic from one URL to another. It’s often used when a website changes its domain name. This keeps visitors and search engines updated. Proper redirection prevents broken links and lost visitors. It ensures a seamless transition for users. Setting up a redirect on Namecheap is straightforward. With a few clicks, you can redirect one domain to another.
Types Of Redirects
There are several types of domain redirects. The most common are 301 and 302 redirects. A 301 redirect is permanent. It tells search engines to update their records. This type is preferred for SEO purposes. A 302 redirect is temporary. It signals a short-term change. Use it when content will return to its original URL. Each type serves a specific purpose in web management.
Preparing Your Namecheap Account
Setting up your Namecheap account for domain redirection is simple. Start by logging into your dashboard. Navigate to the domain list and select the domain you want to redirect.
Preparing your Namecheap account is the first step in redirecting your domain. Knowing how to navigate your account is essential. You will need to access specific settings. These settings help you manage your domain effectively. Let’s dive into the essentials to get you started.Accessing Your Account Dashboard
Log in to your Namecheap account. Your dashboard is your control center. It contains all your domain details. You can access settings from here. Look for the “Account” tab. This tab leads you to your domain list. Each domain you own is displayed here.Domain Management Essentials
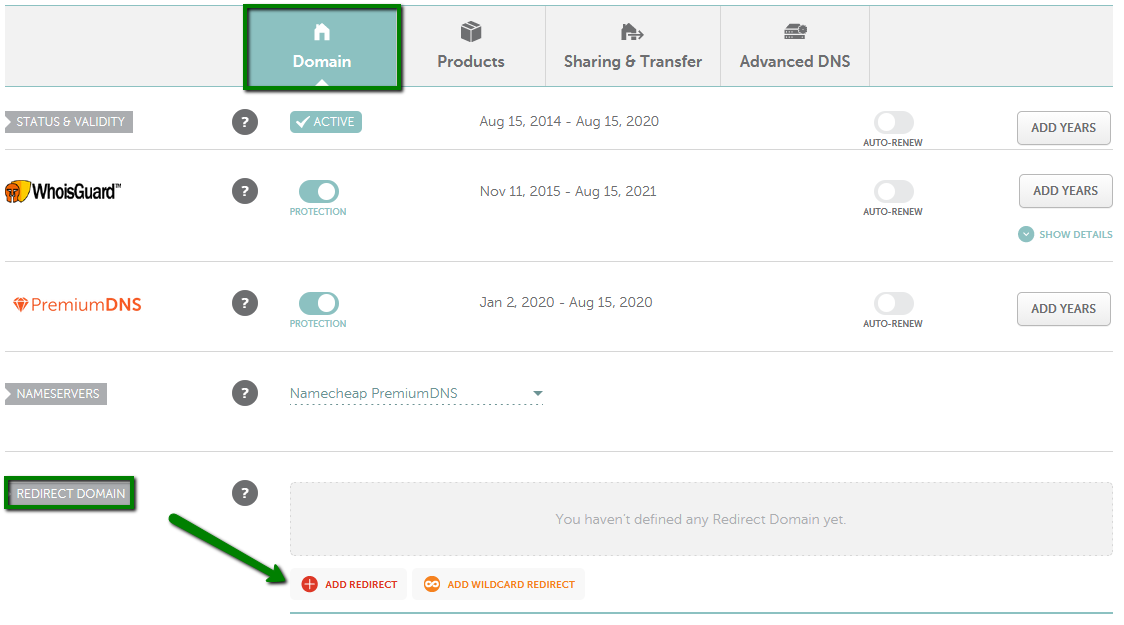
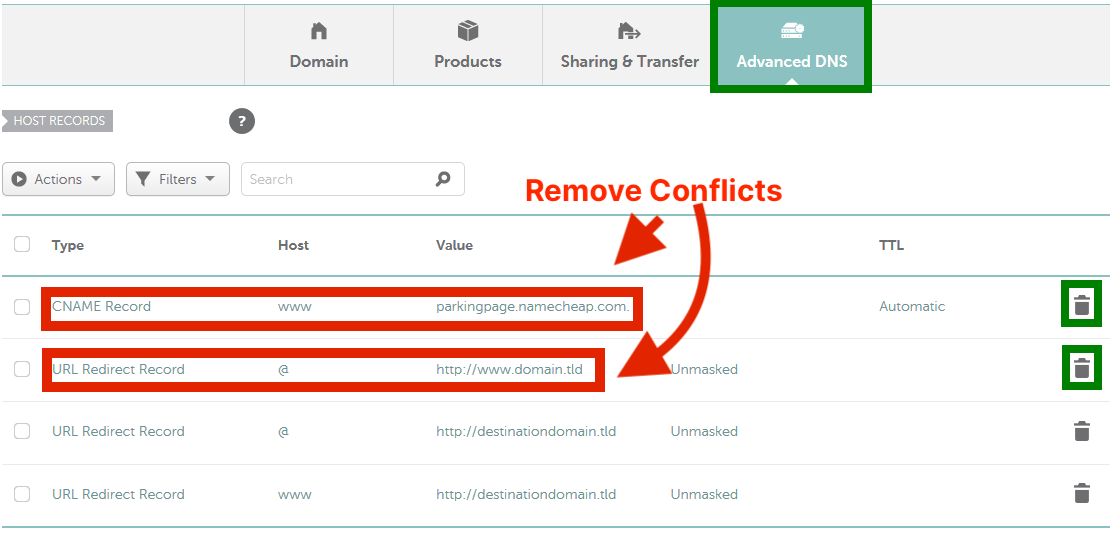
Select the domain you wish to redirect. Click on it to open management options. You will see various settings available. Focus on the “Advanced DNS” tab. This tab allows you to set redirects. Make sure your domain is unlocked. This is crucial for any changes. Follow the instructions for domain redirection. Save your settings once done.Setting Up Domain Redirect
Setting up a domain redirect in Namecheap can streamline your web traffic. It ensures that visitors land on the right site, even if they type an old URL. This process is straightforward and involves a few simple steps. Understanding how to redirect your domain is essential for maintaining your online presence.
Choosing The Right Redirect Type
First, decide on the redirect type. Namecheap offers several options. The most common are 301 and 302 redirects. A 301 redirect is permanent. It tells search engines the URL has moved forever. A 302 redirect is temporary. Use it if the URL will change back.
Choose the correct type to avoid SEO issues. A wrong choice can confuse search engines. It may affect your site’s ranking. So, select the type that fits your need.
Configuring Redirect Settings
Log into your Namecheap account. Access the Domain List. Find the domain you want to redirect. Click on “Manage” next to it. Go to the “Advanced DNS” tab. Here, you can add a new record. Choose “URL Redirect Record” from the dropdown menu.
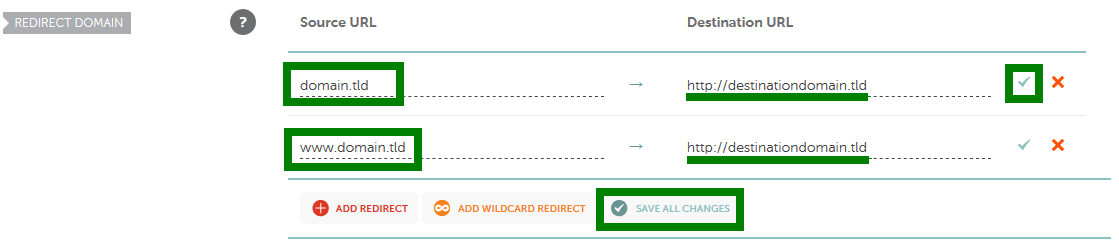
Enter the destination URL in the “Value” field. This is where users will be redirected. Set the redirect type you decided on earlier. Save your settings. Your domain redirect is now configured.
Testing Your Domain Redirect
After setting up a domain redirect in Namecheap, testing is crucial. It ensures the redirect functions as expected. A smooth redirect enhances user experience. It also boosts SEO efficiency. This section guides you through testing your domain redirect.
Verifying Redirect Functionality
Open a web browser. Type your old domain URL in the address bar. Press Enter. Observe the results. The browser should redirect to the new domain. Check different browsers. Ensure consistency across platforms. Also, test on mobile devices. It’s important for mobile users.
Troubleshooting Common Issues
Facing issues with your redirect? Check your DNS settings. Incorrect settings can cause problems. Ensure the correct IP address is used. Double-check the redirect type. Make sure it matches your needs. Clear your browser cache. Cached data can show outdated information. Still having trouble? Contact Namecheap support. They can provide assistance.
Additional Tips For Domain Management
Managing domains efficiently is crucial for smooth online operations. Namecheap offers tools for domain management. Following best practices ensures your site runs optimally. Here are some additional tips to help maintain your domain effectively.
Utilizing Namecheap Support
Get help from Namecheap’s support team when needed. They offer guidance for domain issues. Use their live chat feature for quick responses. Check their extensive knowledge base for tutorials. Stay informed about updates and changes. This keeps your domain management seamless.
Maintaining Seo Integrity
Redirects can affect SEO if not handled properly. Use 301 redirects for permanent moves. This tells search engines the page has moved. Avoid multiple redirects to maintain speed. Regularly monitor your site’s performance. Check for broken links that can hurt rankings. Keep content consistent to maintain SEO strength.
Credit: typedream.com
Credit: zonewebsites.us
Frequently Asked Questions
How Do I Redirect A Domain On Namecheap?
To redirect a domain on Namecheap, log into your account, go to the “Domain List,” select “Manage,” then navigate to the “Redirect Domain” section, and enter your desired destination URL. Save your changes to complete the redirection.
How To Redirect Domain Name To Ip Address?
Use DNS settings to redirect your domain to an IP address. Access your domain’s control panel, then update the A record with the desired IP address. Save changes to ensure proper redirection.
How Do I Redirect A Domain To A Path?
To redirect a domain to a path, use a 301 redirect in your server’s configuration file or. htaccess. Specify the domain and target path. Ensure DNS settings point to the correct server. This helps with SEO and ensures users and search engines access the correct content.
How Do I Redirect A Domain To Another Domain?
To redirect a domain, use a 301 redirect in your domain’s DNS settings or. htaccess file. Access your domain’s control panel, locate the DNS settings, and add a 301 redirect rule. For. htaccess, add “Redirect 301 / http://newdomain. com/”. Ensure the new domain is correctly configured.
Conclusion
Redirecting your domain on Namecheap is simple. Follow the steps carefully. Log into your account. Navigate to the domain list. Choose the domain you wish to redirect. Use the redirect option provided. Enter your destination URL. Save your changes. Wait for the DNS to update.
Usually, it takes a few hours. Now, your domain should redirect smoothly. Always check to ensure it works. This process helps in managing your website efficiently. Keep your domain management hassle-free with these easy steps. Happy managing!


