
Have you ever found yourself in a situation where your domain name just doesn’t cut it anymore? Maybe you’ve rebranded your business or found a more memorable domain.
Whatever the reason, redirecting your domain can be a smart move. If you’re using Namecheap, you might wonder how to make this transition smoothly without losing your visitors or hurting your SEO rankings. Picture this: You’ve got a shiny new domain that perfectly represents your brand, but your audience is still visiting the old one.
Frustrating, right? Redirecting your domain is not just a technical necessity; it’s a strategic move to guide your visitors seamlessly to your new online home. But how do you do it with Namecheap without tearing your hair out? In this guide, you’ll learn the step-by-step process of redirecting a domain using Namecheap. By the end of this article, you’ll have the confidence and know-how to redirect your domain effortlessly, ensuring your audience follows you wherever you go. Ready to make the switch and keep your visitors engaged? Let’s dive in and get started!
Domain Redirect Basics
Redirecting a domain on Namecheap is simple and straightforward. Access your account, select your domain, and choose the redirect option. Enter the new domain URL, save, and your domain will redirect seamlessly.
Redirecting a domain might sound technical, but it’s simpler than you think. Imagine changing your website address so it points to another site. Whether you’re rebranding or merging websites, understanding domain redirects is crucial. You don’t want your visitors lost in cyberspace, right? Let’s get into the basics so you can ensure a smooth transition for your audience.What Is A Domain Redirect?
A domain redirect is like a virtual traffic sign. It sends visitors from one web address to another. When you type a URL in your browser, you’re following this sign. It’s an efficient way to guide users without confusion.Why Would You Need To Redirect A Domain?
Think about when you move to a new house. You tell your friends your new address so they can find you. Similarly, a domain redirect updates your website’s address. Are you changing your brand or consolidating multiple sites? Redirecting ensures your visitors know where to go.Types Of Redirects
Redirects come in different flavors. The 301 redirect is permanent, signaling a change forever. The 302 redirect is temporary, useful for short-term moves. Ask yourself, how long do you need the change? Choose the right redirect type based on your needs.Setting Up A Domain Redirect On Namecheap
Namecheap offers a user-friendly way to set up redirects. Log into your account and find the domain you wish to redirect. Navigate to the “Redirect Domain” section. Follow the step-by-step guide they provide. It’s like setting up a new phone; follow the prompts and you’re ready to go.Common Mistakes To Avoid
Sometimes things go sideways, and redirects are no exception. Avoid redirect chains—they slow down your site and confuse visitors. Double-check your URLs for typos. Have you ever missed a letter in a web address? It’s frustrating, and it can lead to broken links.Benefits Of Domain Redirects
Redirects help maintain your SEO rankings. Google recognizes your new address, keeping your site visible. They also enhance user experience. Can you imagine landing on a blank page? Redirects prevent this, ensuring visitors reach your intended site.Checking Your Redirects
After setting up your redirects, test them. Type the old URL in your browser to see where you land. Use online tools to verify the redirect type and efficiency. Think of it as a quick safety check to ensure everything’s working smoothly. Redirecting a domain with Namecheap is like a seamless transition to a new digital home. Have you tried redirecting a domain before? How did it impact your site? Share your experiences and keep the conversation going.Choosing The Right Type Of Redirect
Selecting the correct redirect type is crucial for domain management with Namecheap. Opt for a 301 redirect for permanent moves, ensuring SEO benefits and user experience. Use 302 for temporary changes to preserve original rankings.
Redirecting a domain might seem like a technical task, but it’s simpler than you think. One key decision in this process is choosing the right type of redirect. Whether you’re moving to a new domain or just rebranding, the type of redirect you choose can greatly affect how your site is perceived by search engines and users alike. Understanding the difference between permanent and temporary redirects, and their SEO implications, is crucial.Permanent Vs Temporary Redirects
A permanent redirect, known as a 301 redirect, tells browsers and search engines that the move is definitive. This is ideal when your domain change is intended to last indefinitely. It helps in transferring the SEO value from your old domain to the new one, maintaining your site’s visibility. On the other hand, a temporary redirect, called a 302, signals that the move is not permanent. It’s perfect for situations like short-term promotions or testing new domains. However, it does not pass on SEO value, which might affect your rankings if used for long periods. Choosing between these redirects is like deciding whether to make a change in your life permanent or just an experiment. Are you ready for a long-term commitment, or do you just want to test the waters?Seo Considerations
Redirects can significantly impact your site’s SEO, and it’s not just about choosing between 301 and 302. A permanent redirect helps preserve your search engine rankings by passing on link equity, which is crucial for maintaining authority. Imagine you’ve spent years building your online presence. A 301 redirect ensures that your efforts aren’t lost in the shuffle of a domain change. However, a 302 can keep your options open, but at the cost of not transferring SEO benefits. Why not take a moment to assess your goals? Consider how each type of redirect aligns with your long-term SEO strategy. Are you prioritizing SEO or flexibility? Balancing these aspects can be like finding the sweet spot between stability and adaptability in any decision-making process. In the end, the choice is yours, but understanding these nuances can make a world of difference in how your site performs after a domain change.Accessing Your Namecheap Account
Redirecting a domain on Namecheap is simple. Log into your account and navigate to the Domain List. Select Manage next to your domain, find the Redirect Domain option, and enter the new destination URL. Save changes to complete the process.
Accessing your Namecheap account is the first step in redirecting a domain to another. If you’ve ever been caught in a whirlwind of tech jargon, fear not. This guide is designed to be straightforward and user-friendly. Whether you’re a seasoned domain owner or a newcomer, gaining access to your Namecheap account is simple and essential.Step-by-step Guide To Logging In
Begin by visiting the Namecheap website. You’ll find the login button conveniently positioned at the top right corner. Click on it and enter your username and password. If you’re anything like me, you might need to reset your password occasionally—Namecheap makes this a breeze.What To Do If You Forget Your Credentials
Forgetting your login details can be frustrating, but don’t panic. Simply click on the “Forgot Password?” link below the login fields. Follow the prompts to securely reset your password using your email.Ensuring Security While Logging In
Security is crucial. Always ensure you’re using a strong password to protect your account from unauthorized access. Enable two-factor authentication for an added layer of security. This small step can make a big difference in safeguarding your account.Managing Multiple Accounts
If you manage multiple domains, keeping track of different accounts can be overwhelming. Consider organizing your login details using a password manager. This tool helps streamline access, saving you time and reducing stress.What Happens After You Log In?
Once logged in, you gain access to a dashboard filled with tools and settings. Explore the domain list to locate the domain you wish to redirect. Feeling a bit adventurous? Tweak other settings to optimize your domain’s performance. Now, imagine you’re preparing for a big project, and suddenly, you can’t access your account. Wouldn’t it be reassuring to know that Namecheap offers prompt support? Their customer service is readily available to assist with any issues. So, tell me, are you ready to master the art of domain management with Namecheap?
Credit: www.youtube.com
Navigating To Domain List
Accessing the domain list on Namecheap is simple. First, log in to your account. Then, click on “Domain List” from the dashboard. This allows you to select the domain you want to redirect.
Navigating to the Domain List is a crucial first step. This process lets you manage your domain settings efficiently. Whether you’re redirecting a domain or adjusting DNS settings, accessing the Domain List in Namecheap is essential. This guide will help you understand how to get there with ease.Accessing Your Account
First, log into your Namecheap account. Use your credentials to gain access. Once logged in, your dashboard appears. This is where you’ll find all your domain details.Finding The Domain List
Look for the “Domain List” option in your dashboard. It is usually located on the left side. This section holds all your registered domains. Clicking on it reveals a list of domains you own.Selecting The Correct Domain
Review the list to find the domain you want to redirect. Ensure you select the correct one. Click on the domain name to access its settings. This is where you can make necessary changes.Understanding Domain Settings
Once inside, you’ll see various options. These include DNS settings and redirection tools. Familiarize yourself with these settings. They are key to successful domain management. Navigating through Namecheap’s Domain List is straightforward. Follow these steps to manage or redirect your domain. This process ensures your domain settings are always optimized.Setting Up A Permanent Redirect
Redirecting a domain with Namecheap is straightforward. Access your account, select the domain, and configure the permanent redirect settings. This ensures seamless traffic flow to the new domain, improving user experience and maintaining SEO rankings.
Redirecting a domain permanently can feel like a daunting task, especially if you’re not tech-savvy. However, Namecheap makes this process straightforward with its user-friendly features. Imagine finally having all your site traffic seamlessly redirected to your new domain—no more confusion, no more lost visitors. Let’s walk through the simple steps to set up a permanent redirect and make your domain transition smooth.Using The Domain Redirect Feature
Namecheap offers a handy domain redirect feature that simplifies the process. This feature allows you to reroute your domain effortlessly to another. You’ll find it in your Namecheap account dashboard, under the ‘Domain List’ section. To use this feature, start by selecting the domain you wish to redirect. Navigate to the ‘Manage’ button next to your domain name. Here, you’ll find the ‘Redirect Domain’ option. Simply enter the new domain where you want your traffic to go. Save your changes, and you’re done! Have you ever wondered how easy it could be to guide your visitors to the right place? This feature makes it possible without technical headaches.Configuring Dns Settings
Sometimes, you might need to configure DNS settings to ensure your redirect works seamlessly. DNS settings are like the address book of the internet, directing traffic where it needs to go. Accessing these settings is crucial for a successful domain redirection. In your Namecheap dashboard, go to the ‘Advanced DNS’ tab. Here, you’ll need to adjust the ‘A Record’ or ‘CNAME Record’ to point to your new domain. This ensures that all queries to your old domain are correctly routed to the new one. Are you ready to take control of your domain’s journey? Configuring DNS can sound tricky, but with Namecheap’s intuitive interface, it’s just a few clicks away. Redirecting a domain may seem complex, but with Namecheap, you have the tools to make it simple and effective. Embrace the change and guide your traffic confidently to its new home.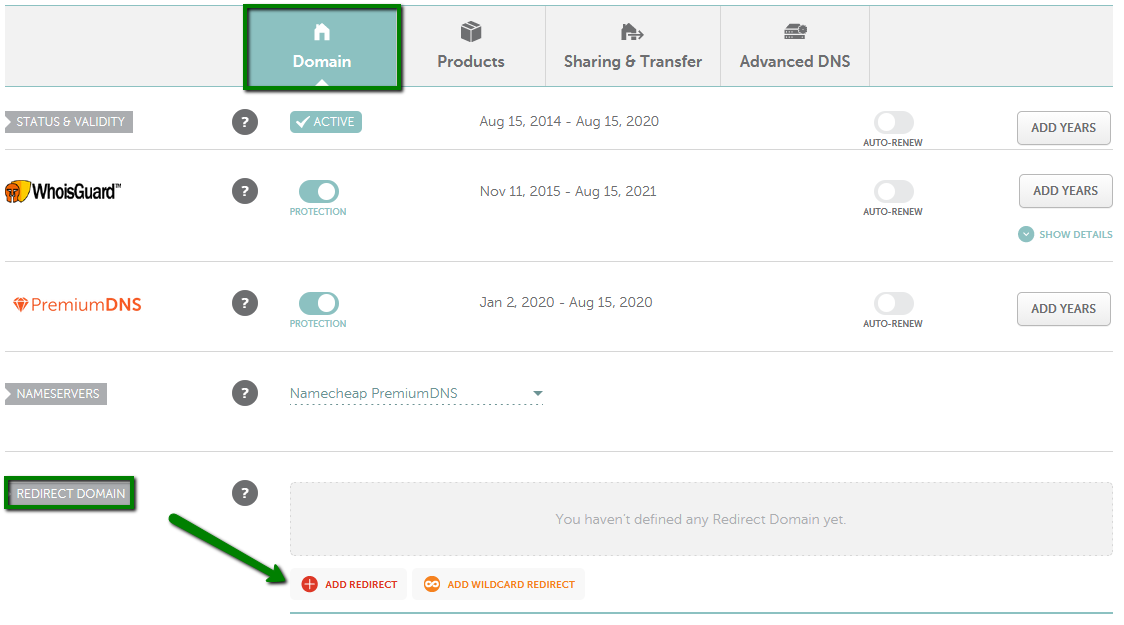
Credit: www.namecheap.com
Implementing A Temporary Redirect
Redirecting a domain temporarily can be crucial for website management. You might need to temporarily redirect traffic due to site maintenance or updates. Understanding how to implement a temporary redirect ensures users are directed seamlessly. Namecheap offers straightforward solutions for domain redirection.
Adjusting Domain Redirect Settings
First, log into your Namecheap account. Navigate to the “Domain List” section. Select the domain you want to redirect. Click on “Manage” next to the domain name. Find the “Redirect” section under the DNS settings. Choose “Temporary Redirect (302)” from the dropdown menu. Enter the destination URL in the provided field.
Save changes to apply the redirect. Ensure the URL is accurate. An incorrect URL can lead to errors. Double-check each entry before proceeding.
Testing The Redirect
Testing ensures your redirect works correctly. Open a web browser. Enter the original domain URL. Press “Enter” and observe the redirection. You should be directed to the new domain. If the redirect doesn’t work, revisit settings.
Check for typos or incorrect URLs. Ensure the browser cache is cleared. Sometimes, cache affects redirect testing. Clearing the cache can fix this issue. Verify all settings are correct to ensure seamless redirection.
Troubleshooting Common Issues
Redirecting a domain can sometimes bring challenges. Even with Namecheap’s user-friendly interface, issues may arise. Understanding these problems is key to a smooth domain transition. Below, we delve into common issues and how to resolve them.
Resolving Dns Propagation Delays
DNS changes don’t happen instantly. They can take up to 48 hours. This is due to DNS propagation. Your changes must spread to DNS servers worldwide. During this time, your domain might not redirect as expected.
Patience is crucial here. Regularly check your domain status. Use online tools to monitor propagation progress. If delays exceed 48 hours, verify your DNS settings. Ensure Namecheap’s nameservers are correctly set.
Fixing Incorrect Redirects
Incorrect redirects can confuse visitors. They might end up on the wrong page. Double-check your redirect settings in Namecheap. Ensure the destination URL is correct. Typos or misconfigurations can lead to errors.
Test your redirect after setting it up. Use different browsers for testing. Clear your browser cache to see changes. If issues persist, review Namecheap’s support documents. They offer detailed guidance on redirects.
Verifying Your Redirect
Ensure your redirect works by checking its functionality after setup. Use online tools to confirm the redirection is successful. This step ensures visitors reach the intended destination, maintaining a smooth user experience.
Verifying your domain redirect is crucial. Ensuring your visitors land on the correct page is essential. It also impacts your site’s SEO health. After setting up a redirect on Namecheap, confirm its effectiveness. This prevents errors and maintains user trust.Tools For Checking Redirects
Several tools can help verify your redirect. Online redirect checkers are useful. They show the path users take to your site. Enter your domain to see results instantly. Another option is browser extensions. These display redirect information directly. Choose tools that fit your needs.Ensuring Seo Impact
Redirects influence your site’s SEO. A proper setup maintains link equity. This helps preserve search engine rankings. Use 301 redirects for permanent changes. They inform search engines about new URLs. Avoid 302 redirects for long-term moves. They suggest temporary changes, affecting SEO negatively. Check if search engines recognize your redirects. This ensures your site retains its visibility.Best Practices For Domain Redirects
Redirecting a domain to another domain is a common task. It helps in preserving SEO value and ensuring smooth user experience. Following best practices guarantees that the transition is seamless. Below, we explore essential practices to adopt.
Maintaining Seo Value
SEO value is crucial during domain redirects. Use 301 redirects to keep search engine rankings. A 301 redirect tells search engines the move is permanent. This helps maintain your site’s authority. Ensure all important pages have redirects in place. Avoid redirect chains, as they slow down loading times. Use a clean redirect path for optimal performance.
Monitoring Redirect Performance
Tracking the performance of your redirects is vital. Use tools like Google Analytics to monitor traffic. Check for 404 errors regularly. Fix broken redirects promptly to avoid losing visitors. Pay attention to bounce rates and user behavior. These metrics give insights into redirect success. Adjust strategies based on data collected.

Credit: www.youtube.com
Frequently Asked Questions
How Do I Redirect A Domain To Another Domain Using Cname?
Redirecting a domain using CNAME involves updating DNS settings. Access your domain’s DNS management tool. Create a CNAME record pointing your domain to the desired target domain. Ensure the target domain is correctly set up to receive redirected traffic. Changes may take some time to propagate.
Always verify settings after updating.
How Do I Redirect A Domain To Another Domain?
To redirect a domain, use a 301 redirect in your hosting settings or update your. htaccess file. This tells search engines and browsers to permanently redirect traffic from the old domain to the new one. Ensure DNS settings are correctly configured for both domains to enable the redirection.
What Is The Difference Between Redirect And Forwarding A Domain?
Redirecting changes the URL in the browser’s address bar. Forwarding keeps the original URL visible. Redirects are often used for SEO purposes, while forwarding is typically for email or masking. Both serve different functions in web navigation.
How Do I Redirect A Domain To Another Domain On Namecheap?
Log into Namecheap, go to “Domain List”, click “Manage”, select “Advanced DNS”, and set up a URL Redirect Record.
Conclusion
Redirecting a domain with Namecheap is straightforward and efficient. Follow the steps carefully. Ensure all settings are correct. Confirm the domain change. This process helps in maintaining your online presence. Your website visitors won’t face any disruptions. Everything remains seamless and professional.
Namecheap provides user-friendly tools for this task. Remember to monitor the changes. Keep an eye on traffic and performance. Regular checks ensure everything runs smoothly. Stay informed and adapt as needed. This way, your online business remains consistent and accessible.
Happy redirecting!


