
Are you ready to take your website to the next level by combining the power of Namecheap and Bluehost? You’ve made a smart choice!
Namecheap offers affordable domain registration, while Bluehost provides reliable hosting services. But how do you connect the two? This crucial step might seem daunting, but it’s simpler than you think. In this guide, you’ll learn how to point your Namecheap domain to your Bluehost account seamlessly.
You’ll be equipped with all the tips and tricks to ensure your website is up and running without a hitch. Get ready to unlock the potential of your online presence and make the most of your digital assets. Let’s dive in and get your website fully operational in no time!
Domain Basics
Easily connect your Namecheap domain to Bluehost by updating the DNS settings. Access your Namecheap account, find the domain list, and change the nameservers to Bluehost’s details. This simple process ensures your domain points correctly, enhancing site management and performance.
When you’re starting a website, understanding the basics of domains is crucial. A domain is essentially your website’s address on the internet, guiding users to your content. It’s important to know how these domain names work and how they connect to web hosting services like Bluehost. ###Understanding Domain Names
Domain names are more than just a catchy title. They consist of two main parts: the name itself and the extension like .com, .net, or .org. This combination creates a unique address that directs users to your site. Have you ever wondered why some domains are pricier than others? It’s all about demand and memorability. A short, snappy name can be easier for users to remember, making it a valuable asset for your online presence. ###Role Of Namecheap And Bluehost
Namecheap and Bluehost play pivotal roles in your website’s journey. Namecheap is a domain registrar, meaning it’s where you purchase and manage your domain names. They provide you with the tools to secure and renew your domain. Bluehost, on the other hand, is a web hosting provider. This is where your website actually lives. Think of it as renting space on the internet to store your website files. Connecting your Namecheap domain to your Bluehost account is like bridging two worlds. It allows your domain to point to your hosting space, making your website accessible to everyone. Have you considered how seamless integration can save you time and headaches? By understanding these roles, you’re better equipped to manage your website effectively. Whether you’re a beginner or a seasoned pro, mastering these basics can give you a solid foundation for your online endeavors.
Credit: www.youtube.com
Preparation Steps
Preparing to point your Namecheap domain to Bluehost requires careful steps. Ensure seamless transition and avoid potential pitfalls. Follow these preparation steps for successful setup.
Gathering Account Information
Start by gathering essential account information. Log into your Namecheap account to find your domain details. Note down your domain name and DNS settings. Next, access your Bluehost account. Jot down your Bluehost nameservers. These details are crucial.
Checking Domain Compatibility
Verify your domain’s compatibility with Bluehost. Not all domains work with every hosting service. Ensure your domain extension is supported. Check Bluehost’s list of supported extensions. Confirm your domain is eligible for transfer. This step prevents issues later.
Accessing Namecheap
Pointing your Namecheap domain to Bluehost is simple. First, log in to your Namecheap account. Navigate to the Domain List and select your domain. Change the nameservers to Bluehost’s. Save changes to connect your domain.
Accessing Namecheap is the first step to point your domain to Bluehost. This process involves a few straightforward steps. Begin by logging into your Namecheap account. Then, navigate to the domain list. This ensures you can manage your domain settings efficiently. Let’s delve into these steps in detail to make the process simple for you.Logging Into Your Account
First, open your browser and visit the Namecheap website. Click on the ‘Sign In’ button at the top right. Enter your username and password. Once logged in, you will access your account dashboard. This is where you manage all your domains and services.Navigating To Domain List
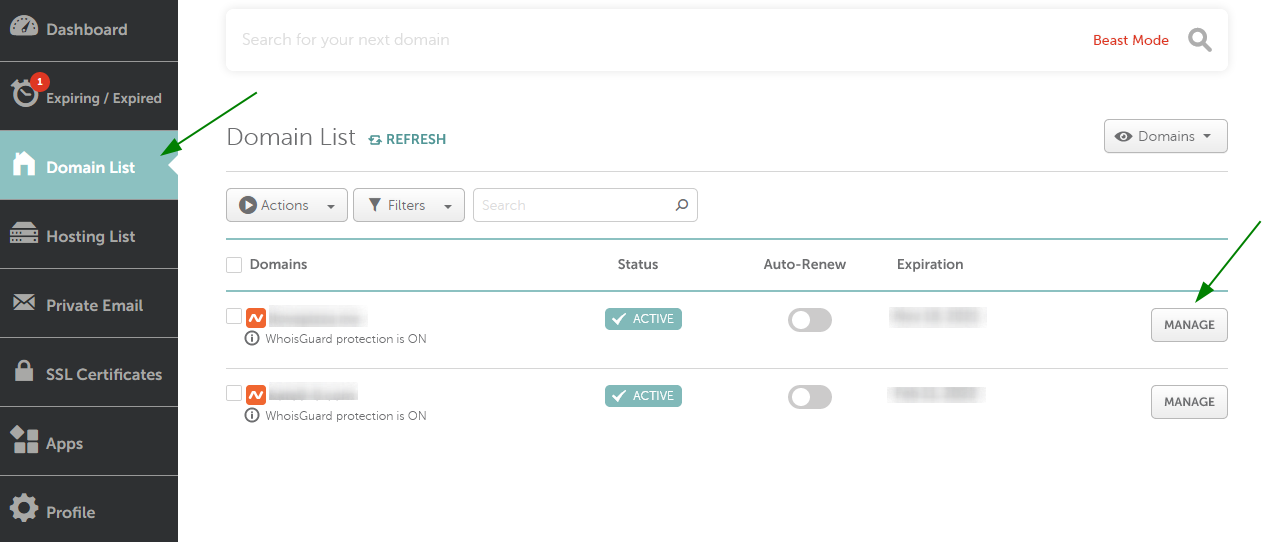
After logging in, look for the ‘Domain List’ option on your dashboard. You will find it on the left-hand side menu. Click on ‘Domain List’ to see all your registered domains. Here, you can select the domain you want to point to Bluehost. This section allows you to update DNS settings and manage other configurations.Updating Dns Settings
Updating DNS settings is an essential step when pointing your Namecheap domain to Bluehost. It ensures your domain directs visitors to your Bluehost-hosted website. This process might seem technical, but it’s straightforward. Follow the steps below to update your DNS settings effectively.
Locating Dns Settings
Log in to your Namecheap account. Go to the “Domain List” section. Find the domain you wish to update. Click the “Manage” button next to it. You will see a new page with several options. Look for the “Advanced DNS” tab at the top. Click it to access your DNS settings.
Entering Bluehost Nameservers
In the DNS settings, locate the “Nameservers” section. You might see default Namecheap nameservers here. Click the dropdown menu and select “Custom DNS.” Now, enter the Bluehost nameservers. Typically, they are ns1.bluehost.com and ns2.bluehost.com. Save your changes to apply the new settings. Your domain will now point to Bluehost.
Verifying Changes
Ensure your Namecheap domain points to Bluehost by updating DNS settings. After changes, verify them to confirm successful domain connection. This step ensures seamless website functionality and enhances user experience.
Verifying changes is crucial after pointing your Namecheap domain to Bluehost. This step confirms that the domain settings are correct. It ensures your website runs smoothly without issues. Let’s explore the key aspects of this process.Propagation Time
Changes to domain settings need time to take effect. This is known as propagation time. It usually takes between 24 to 48 hours. During this period, the updates spread across internet servers. Patience is key while waiting for changes to complete. Do not worry if your site doesn’t work immediately.Testing Domain Connection
Once propagation is complete, test the domain connection. Begin by entering your domain name in the browser. Check if your website loads correctly. Ensure all pages and features are functional. This confirms successful domain pointing. If issues arise, revisit DNS settings for errors. Proper testing avoids potential website downtime.Troubleshooting Tips
Connecting your Namecheap domain to Bluehost can sometimes be tricky. You might encounter issues that need troubleshooting. This section will guide you through common problems and how to get help.
Common Issues
One frequent problem is incorrect DNS settings. Ensure you have set the right nameservers. Check if the nameservers match those provided by Bluehost. If they differ, update them on Namecheap.
Another issue is propagation delays. DNS changes can take up to 48 hours to update. Be patient and check again later. If you still see errors, clear your browser cache.
SSL certificate errors are also common. Verify that the SSL is properly installed on your Bluehost account. Ensure that the domain points to the correct server.
Seeking Support
If issues persist, contact Namecheap support. They can verify your DNS settings. They can also check domain configurations.
Bluehost support is available for server-side problems. They can assist with SSL issues. They can also help with hosting-related errors.
Both Namecheap and Bluehost offer live chat support. Use this feature for quick help. Their teams are ready to assist you.
Benefits Of Integration
Seamless integration simplifies pointing a Namecheap domain to Bluehost, enhancing website management. Effortless navigation through settings ensures smooth domain connection. Improved accessibility boosts user experience and site efficiency.
Integrating your Namecheap domain with Bluehost offers a range of advantages that can significantly enhance your website’s functionality and management. If you’ve ever struggled with juggling multiple platforms, merging these two can be a game-changer. This seamless integration can boost your site’s performance, simplify management, and ultimately provide a better experience for your visitors.Improved Website Performance
Connecting your Namecheap domain to Bluehost can lead to noticeable improvements in your website’s performance. Bluehost’s robust infrastructure ensures faster loading times. This means your visitors won’t have to wait endlessly for pages to load. A speedy website can also positively impact your search engine rankings. Search engines like Google prioritize sites that offer quick and efficient user experiences. Plus, with Bluehost’s reliable uptime, your site remains accessible, minimizing disruptions and keeping your audience engaged.Streamlined Management
Managing a website can be cumbersome, especially when dealing with different service providers. Integrating your domain with Bluehost simplifies this process significantly. You can handle domain settings, hosting options, and site configurations all in one place. Think of it like having a well-organized digital workspace. You save time and reduce the chances of errors by having everything under one roof. Also, Bluehost’s user-friendly interface makes it easy for you to navigate through various functionalities. This setup can be particularly beneficial if you’re not a tech expert but want to maintain control over your website.Have you ever wished for a smoother management experience or better site performance? These benefits might be just what you’re looking for. By integrating Namecheap with Bluehost, you can tackle these challenges head-on and ensure your website runs efficiently.
Credit: www.namecheap.com

Credit: www.youtube.com
Frequently Asked Questions
How To Link Namecheap Domain To Bluehost?
To link your Namecheap domain to Bluehost, update the domain’s nameservers to Bluehost’s. Log into Namecheap, go to Domain List, select your domain, and click Manage. Under Nameservers, choose Custom DNS and enter Bluehost’s nameservers. Save changes to complete the process.
How Do I Point My Domain Name To Bluehost?
Log into your domain registrar account. Update the DNS settings to Bluehost’s nameservers: ns1. bluehost. com and ns2. bluehost. com. Save changes and allow up to 48 hours for propagation.
How Do I Redirect A Domain To Bluehost?
To redirect a domain to Bluehost, update DNS settings. Go to your domain registrar’s dashboard, enter Bluehost’s nameservers, and save changes. Allow up to 48 hours for propagation. Access Bluehost’s dashboard for further configuration. Ensure domain redirection by checking website status post-update.
How Do I Transfer Domains Out Of Namecheap?
Unlock your domain in Namecheap account. Obtain the EPP code. Initiate the transfer with the new registrar. Approve the transfer via email. Wait for the transfer to complete.
Conclusion
Following these steps, you’ve successfully pointed your Namecheap domain to Bluehost. It’s a straightforward process that enhances your website’s functionality. A smooth connection between domain and host is crucial. This ensures your site runs efficiently for visitors. Regular checks can help maintain this connection.
Technology sometimes changes, so stay updated with any new procedures. Now, your website is ready to grow and engage users effectively. Thank you for reading, and happy website managing!


