
Are you ready to make your website work exactly where you want it? Pointing your domain to another hosting service might sound tricky, but it doesn’t have to be.
Whether you’re switching hosts to get better speed, more features, or just a fresh start, this simple guide will walk you through every step. By the end, you’ll know exactly how to connect your domain to your new hosting without any stress or confusion.
Let’s get your site running smoothly where it belongs!
Choose Your New Hosting Provider
Choosing a new hosting provider is a key step in pointing your domain to another hosting. The right host keeps your website fast and secure. It also offers tools to manage your site easily.
Take time to compare different providers. Focus on what matters most for your website’s needs. This helps avoid problems later and ensures smooth website operation.
Understand Your Website Needs
Think about your website size and traffic. Small blogs need less space than online stores. Choose hosting that fits your current and future needs. This prevents paying for unused features or running out of resources.
Check Hosting Speed And Reliability
Your hosting should load pages quickly. Visitors leave slow sites fast. Look for hosts with strong uptime records. Uptime means your site stays online without interruptions.
Review Customer Support Options
Good support helps solve problems fast. Choose hosts with 24/7 support through chat, phone, or email. Quick help reduces website downtime and stress.
Look For Security Features
Security protects your site from hackers. Pick hosting with SSL certificates and regular backups. These features keep your data safe and recoverable.
Consider Pricing And Renewal Terms
Compare initial prices and renewal fees. Some hosts offer low first-year rates but higher renewals. Understand terms before committing to avoid surprises.
Access Your Domain Registrar Account
Start by logging into your domain registrar account. Find the DNS settings or name server section. Change the name servers to those provided by your new hosting provider. Save the changes and wait for the update to take effect, usually within a few hours.
Log Into Your Domain Registrar
Start by visiting the website of your domain registrar. This is the company where you bought your domain name. Enter your username and password to log in. Keep your login details safe and ready. Without access, you cannot change your domain settings.
Navigate To Your Domain Management Area
Once logged in, find the section labeled “Domains” or “My Domains.” This area lists all domains you own. Select the domain you want to point to another hosting. This step is crucial to manage your domain’s settings.
Locate The Dns Or Name Server Settings
Look for options like “DNS Management,” “Name Servers,” or “DNS Settings.” These control where your domain points on the internet. You need to update these settings to connect to your new hosting provider. Save your changes carefully.
Locate Dns Settings
Locating the DNS settings is the first step to point your domain to another hosting. These settings control where your domain directs visitors. You must find them to change your hosting provider.
DNS settings are usually found in your domain registrar’s control panel. This is where you registered your domain name. Knowing how to access these settings saves time and confusion.
Start by signing in to your domain registrar account. Use the username and password you created during registration. This is the gateway to managing your domain.
Find The Domain Management Section
Look for a section named “Domains,” “My Domains,” or “Domain Management.” This area lists all domains you own. Select the domain you want to point to new hosting.
Locate Dns Or Name Server Settings
Within the domain management area, find “DNS Settings” or “Name Servers.” This is where you edit the domain’s destination. Some registrars call it “Manage DNS” or “DNS Zone.”

Credit: www.exabytes.com
Update Nameservers
Updating nameservers is a key step to point your domain to a new hosting provider. Nameservers tell the internet where to find your website. Changing them ensures visitors reach your new hosting space. This process usually takes a few hours to a day to fully update worldwide.
Make sure to get the correct nameserver details from your new host. Then, replace the old nameservers at your domain registrar. This update directs traffic to the new hosting without losing your domain ownership.
Find New Hosting Nameservers
Your new hosting provider will give you specific nameservers. They look like this: ns1.example.com and ns2.example.com. Check your hosting account dashboard or welcome email for these details. Keep them handy for the next step.
Replace Old Nameservers
Log in to your domain registrar’s control panel. Find the section called “DNS” or “Nameservers.” Delete the old nameservers listed there. Enter the new nameservers provided by your hosting company. Save your changes to update the domain settings.
Modify Dns Records
Modifying DNS records is a key step to point your domain to another hosting service. DNS records tell the internet where to find your website and email. Changing them carefully ensures your site and email work smoothly with the new host.
This process involves editing different types of DNS records. Each record has a specific role. Understanding each type helps you make the right changes.
Edit A Records
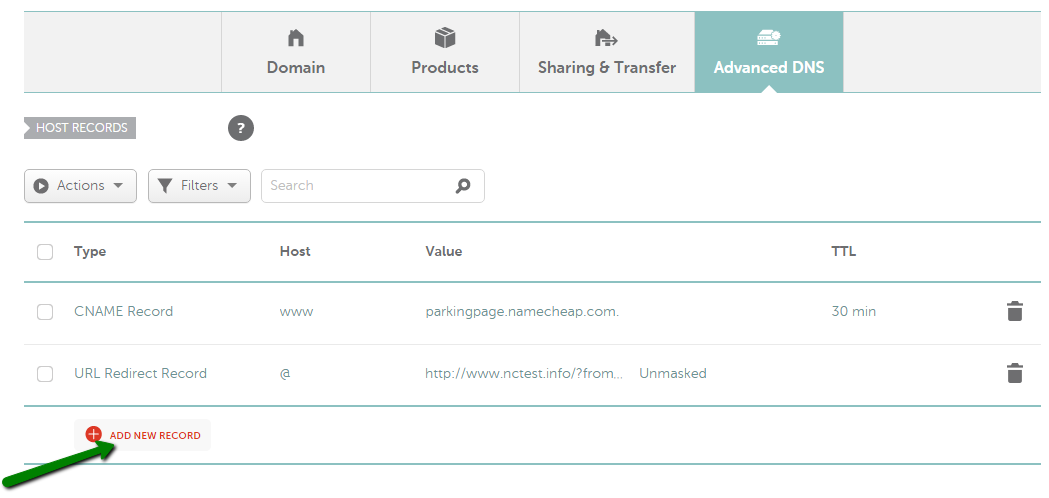
A records link your domain to an IP address. The IP address belongs to your new hosting server. To edit A records, log in to your domain control panel. Find the DNS settings or DNS management area. Replace the old IP address with the new one. Save the changes to update your domain’s connection.
Configure Cname Records
CNAME records point your domain or subdomains to another domain name. This is useful for services like www or blog subdomains. Change the CNAME to match the new host’s domain name. This keeps your subdomains working without changing IP addresses. Edit the CNAME in your DNS settings and save the update.
Set Mx Records For Email
MX records control where your email is delivered. Changing hosting might mean changing your email provider too. Update MX records to the new mail server addresses. This ensures your emails reach the right inbox. Check with your new host for correct MX values. Enter these in your DNS and save the changes.

Credit: www.youtube.com
Wait For Dns Propagation
After pointing your domain to a new hosting provider, the next step is to wait for DNS propagation. This process is essential because it allows internet servers worldwide to update and recognize your domain’s new location. Without waiting, visitors might still see the old website or get errors.
DNS propagation can take time. It depends on various factors like your domain registrar, hosting provider, and internet service providers. Usually, it finishes within 24 to 48 hours but can sometimes take up to 72 hours.
What Is Dns Propagation?
DNS propagation is the time it takes for DNS records to spread across the internet. When you change your domain’s hosting, DNS servers need to update their records. This update ensures users reach the right server.
Why Does Dns Propagation Take Time?
DNS information is stored in many servers worldwide. Each server updates at different speeds. Some update quickly, while others take longer. This delay causes propagation time.
How To Check Dns Propagation Status
You can use online tools to check DNS propagation. These tools show if your domain points to the new hosting. They check servers in different countries to give a full picture.
Tips During Dns Propagation
Do not make more changes during propagation. Avoid clearing your DNS cache often. Be patient and allow time for full propagation. Keep backups of your website just in case.
Verify Domain Pointing
Verifying domain pointing is a key step after changing your domain’s hosting. It confirms that your domain correctly directs visitors to the new hosting server. Without this check, your website might not load properly or visitors could see errors.
This process ensures your website is live and accessible from the new host. It also helps catch any mistakes in DNS settings early. Verifying domain pointing gives you peace of mind that everything is set up right.
Check Dns Propagation Status
DNS propagation shows how your domain updates spread across the internet. Use online tools to check if your domain points to the new host’s IP. Propagation can take a few hours to 48 hours to complete fully.
Use Command Line Tools
Simple tools like ping or nslookup help verify your domain’s IP address. These commands show where your domain is currently pointing. Run them from your computer to confirm the new hosting IP appears.
Verify Website Loading
Open your domain in a web browser. Check if the website loads from the new hosting server. Look for correct content and no error messages. This confirms your domain points and works as expected.
Clear Browser Cache
Sometimes your browser shows old pages from cache. Clear your browser cache before testing domain pointing. This ensures you see the latest version of your website from the new host.
Contact Hosting Support If Needed
If verification fails, reach out to your new hosting support. They can check DNS settings or server issues. Support teams help fix pointing problems quickly and correctly.
Troubleshoot Common Issues
Troubleshooting is a key step when pointing your domain to new hosting. Errors can stop your website from showing correctly. Fixing these problems fast helps your site run smoothly.
Common issues often come from small mistakes or delays. Knowing how to check and fix these saves time and stress. Here are three simple ways to troubleshoot your domain pointing problems.
Check For Typing Errors
Typing mistakes in DNS settings are very common. Double-check your domain name servers and IP addresses. Even one wrong letter or number can cause errors. Compare your entries with the hosting instructions carefully.
Clear Dns Cache
Your computer or browser might remember old DNS data. This can show the wrong website or no site at all. Clear the DNS cache on your device to refresh the data. You can also ask friends to check if they see the updated site.
Contact Support
Sometimes, the problem needs expert help. Contact your domain registrar or hosting provider support. Explain your issue clearly and share the changes you made. Support teams can check backend settings and guide you to fix the problem.
Credit: www.namecheap.com
Frequently Asked Questions
How Do I Point My Domain To A New Hosting Provider?
To point your domain to a new host, update the domain’s nameservers to the new host’s nameservers. This change is done in your domain registrar’s control panel. Allow 24-48 hours for DNS propagation worldwide.
What Is Dns Propagation And How Long Does It Take?
DNS propagation is the time required for DNS changes to update globally. It usually takes 24 to 48 hours, but can sometimes be faster or slower depending on the ISP and DNS cache.
Can I Point My Domain Without Changing The Nameservers?
Yes, you can point your domain by editing the A record to your new hosting IP. This method keeps your current nameservers but directs traffic to the new hosting server.
Will My Website Experience Downtime When Switching Hosting?
If you update DNS records correctly and keep old hosting active during propagation, downtime is minimal or none. Plan carefully to avoid interruptions during the DNS update process.
Conclusion
Pointing your domain to another hosting is simple with clear steps. Start by updating your DNS settings correctly. Check your changes after a few hours to ensure they work. This process helps keep your website live and accessible. Remember, patience is key as the update may take some time.
Follow the instructions carefully, and your domain will point to the new host smoothly. Keep your website running without interruptions by managing your domain and hosting well.


