
Are you looking to point your domain to an IP address using Namecheap but not sure where to start? You’re not alone.
Navigating the world of domain settings can feel like deciphering a foreign language. But don’t worry, you’re about to unlock the secret. In this guide, you’ll discover a step-by-step process that simplifies the task, saving you time and avoiding common pitfalls.
Imagine the satisfaction of seeing your domain successfully connected, knowing you’ve conquered yet another digital challenge. Ready to transform that domain into a powerhouse online presence? Let’s dive in and get started.

Credit: wpindigo.com
Setting Up Your Domain
Setting up your domain with Namecheap is straightforward. You can effortlessly point your domain to an IP address. Follow simple steps to connect your domain. This helps ensure a smooth digital presence. Your domain will be ready in minutes.
Accessing Namecheap Account
Log into your Namecheap account. Use your username and password. Find the login section on their homepage. Click the “Sign In” button. This grants access to your dashboard.
Ensure your credentials are correct. You don’t want login issues. Once logged in, you’ll see your account overview. This includes all your domains.
Locating Domain Management
Navigate to the domain list in your dashboard. Search for the domain you want to set up. Click on the domain name. This opens the domain management panel.
In this panel, you have various options. Look for “Advanced DNS” settings. This is where you can point your domain to an IP. The interface is user-friendly.
With these steps, setting up your domain is easy. Your domain will soon be linked to your desired IP.

Credit: m.youtube.com
Understanding Dns Basics
Understanding DNS is crucial when pointing a domain to an IP on Namecheap. DNS, or Domain Name System, translates domain names into IP addresses. This system allows users to access websites using easy-to-remember names instead of numerical IP addresses. By grasping DNS basics, you can efficiently manage your domain settings.
What Is Dns?
DNS stands for Domain Name System. It acts like a phonebook for the internet. DNS converts human-friendly domain names into IP addresses. This process helps computers communicate with each other. For instance, when you type a web address, DNS translates it to an IP. This allows your browser to find and load the website.
How Dns Works
DNS works through a series of steps. First, you enter a domain in your browser. The browser sends a query to a DNS server. This server looks up the domain’s IP address. It then sends the IP address back to your browser. Your browser uses this IP to connect to the website’s server. This all happens in seconds. DNS makes the web easily accessible for everyone.
Configuring Dns Settings
Pointing your domain to an IP address on Namecheap involves adjusting DNS settings. Begin by logging into your Namecheap account. Access the DNS settings, then enter the desired IP address in the ‘A Record’ section. Save changes, and your domain should connect to the IP shortly.
Configuring DNS settings is essential for directing your domain to the correct IP address. Namecheap provides an easy-to-use platform for this task. You can manage your domain’s DNS settings with a few clicks. This guide will walk you through the process.Navigating To Dns Settings
Start by logging into your Namecheap account. Once logged in, access the Dashboard. Locate your domain under the ‘Domain List’ tab. Click the ‘Manage’ button beside your domain. Now, look for the ‘Advanced DNS’ tab. This is where DNS settings can be configured.Adding A Records
To add an A record, first click the ‘Add New Record’ button. Choose ‘A Record’ from the dropdown menu. Enter the host name and IP address. Make sure to save your changes. The new A record will now point your domain to the specified IP.Updating Existing Records
To update an existing A record, locate it in the DNS settings. Click the ‘Edit’ button next to the record. Change the IP address to the desired one. Save the changes to update the record. Your domain will now redirect to the new IP address.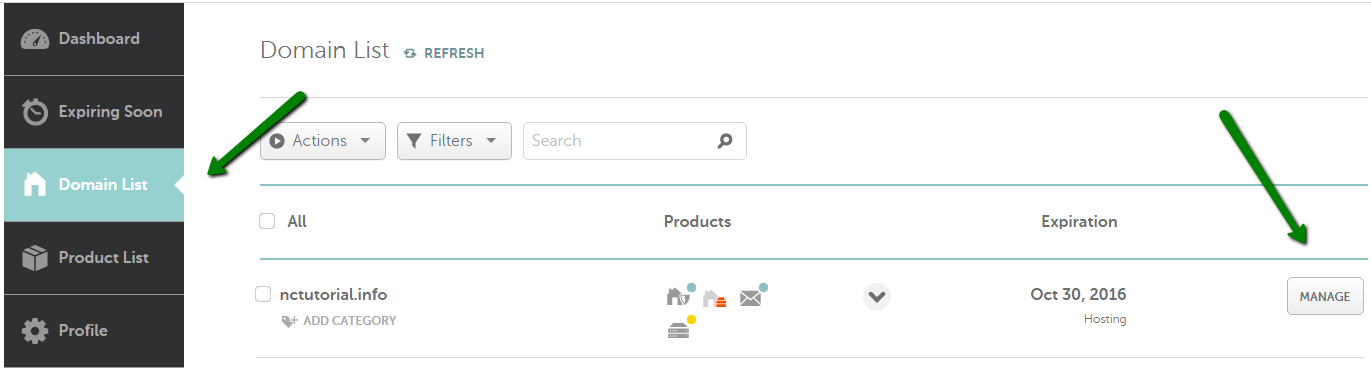
Credit: www.namecheap.com
Verifying Domain Configuration
After pointing your domain to an IP on Namecheap, verification is crucial. This ensures your domain properly connects to the intended server. Without verification, users may encounter issues accessing your site. Proper verification guarantees seamless user experience. Let’s explore how to confirm your domain configuration.
Checking Dns Propagation
DNS propagation can take up to 48 hours. During this period, DNS records update worldwide. Use online tools to check DNS changes. Look for tools like DNS Checker or WhatsMyDNS. These tools show if your DNS records have updated. Enter your domain name to see the IP address. Ensure it matches the intended IP.
Troubleshooting Common Issues
Sometimes, DNS changes may not reflect. First, clear your browser cache. Cached data might show old site information. Next, check your DNS settings. Ensure all settings are correct in Namecheap. Wrong settings can cause connection issues.
If problems persist, contact Namecheap support. They can help verify settings. Explain your issue clearly for a quick resolution. Often, simple mistakes can cause major problems. With correct settings, your domain connects without issues.
Advanced Domain Management
Advanced Domain Management is crucial for anyone looking to harness the full potential of their website. Whether you’re a beginner or a seasoned webmaster, mastering these concepts can elevate your online presence. Imagine the satisfaction of knowing your website is running smoothly and efficiently because you made the right configurations.
Let’s dive into some key components of advanced domain management, focusing on how to point your domain to an IP using Namecheap.
Using Cname Records
One of the essential tools in domain management is the CNAME record. CNAME stands for Canonical Name, and it allows you to alias one domain to another. This is particularly useful when you want multiple domains to point to the same website.
To set up a CNAME record in Namecheap, navigate to the domain list and select your domain. Click on ‘Advanced DNS’ and add a new record. Choose ‘CNAME Record’ from the dropdown and enter the alias and target domain. It’s as simple as filling out a form!
Think about the flexibility this offers. You could manage multiple brands under a single site infrastructure, saving time and resources.
Handling Mx Records
Email management can be a headache, but MX records simplify the process. MX stands for Mail Exchange, and these records direct your domain’s emails to the correct mail server.
In your Namecheap account, go to the ‘Advanced DNS’ settings of your domain. Add a new record, select ‘MX Record’, and fill in the mail server details. Ensure you set the priority correctly; lower numbers get higher priority.
Have you ever missed an important email due to misconfigured settings? Properly managing MX records ensures that never happens again.
Advanced domain management isn’t just about technical prowess; it’s about making your life easier and your website better. What changes will you make today to optimize your domain settings?
Tips For Successful Domain Pointing
Pointing a domain to an IP on Namecheap is simple and efficient. Access your Namecheap account, select your domain, and navigate to the Advanced DNS settings. Enter the correct IP address in the A Record field to complete the process.
Pointing your domain to an IP address on Namecheap might seem daunting, but with the right tips, you can manage it with ease. Whether you’re setting up a new website or moving to a different server, ensuring the domain points correctly is crucial for seamless user experience and SEO benefits. Let’s dive into some actionable tips that can make your domain pointing process successful and stress-free.Ensuring Ip Accuracy
Accurate IP entries are the backbone of successful domain pointing. Double-check the IP address you’re entering to avoid any downtime. A small typo can lead to hours of troubleshooting. Use reliable sources to verify the IP address. If your hosting provider sends an email, ensure it’s from an official address. Consider keeping a digital or physical note of all IP addresses used. This can be a lifesaver if you need to revert changes or troubleshoot issues.Monitoring Domain Performance
Once your domain is pointed, the job isn’t over. Regular monitoring of your domain’s performance ensures everything runs smoothly. Look for changes in load times or any access errors. Use tools like Google Analytics or Pingdom to track your site’s uptime and response time. These insights can highlight potential issues before they affect your audience. Ever wondered if your site’s performance impacts your SEO? It does. A faster, consistently available site often ranks better, offering a more reliable experience for your users. Have you checked your domain’s performance lately? If not, now’s the perfect time to start.Frequently Asked Questions
How Do I Point My Domain To A Specific Ip Address?
Access your domain’s DNS settings. Add an A record with the desired IP address. Save changes to update the domain pointing.
How Do I Redirect A Domain To An Ip?
To redirect a domain to an IP, modify your domain’s DNS settings. Create an “A” record pointing to the desired IP address. Access your domain registrar’s control panel for this. Changes usually propagate within 24-48 hours. Always back up existing settings before making changes.
How Do I Redirect A Domain In Namecheap?
Log in to your Namecheap account. Go to the “Domain List” section. Click “Manage” next to your domain. Select the “Advanced DNS” tab. Add or modify the CNAME or URL Redirect records for your desired destination. Save changes to complete the domain redirection process.
How To Convert Domain Name Into Ip Address?
Use a DNS lookup tool to convert domain names into IP addresses. Search “DNS lookup” online for free tools. Enter the domain name, and the tool provides the corresponding IP address. This process helps locate servers hosting websites.
Conclusion
Connecting your domain to an IP on Namecheap is simple. Just follow the steps outlined in this guide. Start by accessing your Namecheap account. Then, locate the DNS settings. Enter the correct IP address and save. Changes might take time to update.
Usually within a few hours. It’s crucial for your website’s performance and accessibility. A properly configured domain ensures visitors reach your site. Troubleshooting tips are available if issues arise. Patience and attention to detail are key. This process enhances your online presence.
Happy configuring!


