
Are you ready to help your client get their website live but unsure how to point their domain to the hosting service? You’re in the right place.
This step-by-step guide will make the process simple and clear. By the end, you’ll confidently connect any domain to a host without confusion or delay. Keep reading, and you’ll unlock the key to making your client’s site visible to the world—quickly and easily.
Credit: ncsu.service-now.com
Choosing The Right Domain
Choosing the right domain is the first step to build a strong online presence for your client. A good domain name reflects the brand well. It is easy to remember and type. Picking the right domain helps visitors find the website quickly.
Domains also affect search engine rankings. A relevant domain can improve visibility. It gives a professional look and builds trust. Take time to choose the best domain before pointing it to the host.
Selecting A Domain Registrar
Start by choosing a reliable domain registrar. This is where you buy the domain name. Choose registrars with good reviews and strong customer support. They should offer easy domain management tools. Prices should be clear with no hidden fees. Some popular registrars include GoDaddy, Namecheap, and Google Domains.
Checking Domain Availability
Check if the desired domain name is free. Use the registrar’s search tool to find available domains. If the name is taken, try variations or different extensions. Avoid names that are too long or hard to spell. Make sure the domain matches the client’s brand or business well.
Registering The Domain
Once you find an available domain, register it quickly. Enter accurate contact details for ownership records. Choose the registration period based on client needs, usually one year or more. Consider adding privacy protection to keep owner details private. Complete the payment process and get the domain under your client’s control.
Preparing The Hosting Account
Preparing the hosting account is the first step to point a domain for your client. It sets the foundation for a smooth website launch. You must handle this process carefully to avoid future issues. Proper preparation ensures the domain works well with the hosting service.
Selecting A Hosting Provider
Choose a hosting provider that fits your client’s needs. Check for reliability, speed, and customer support. The provider should offer easy domain management tools. Look for plans that match the website size and traffic.
Setting Up The Hosting Environment
Create the hosting account using your client’s details. Configure the server settings according to the website type. Install any required software or content management systems. Ensure the environment is ready to host the website files.
Gathering Dns Information
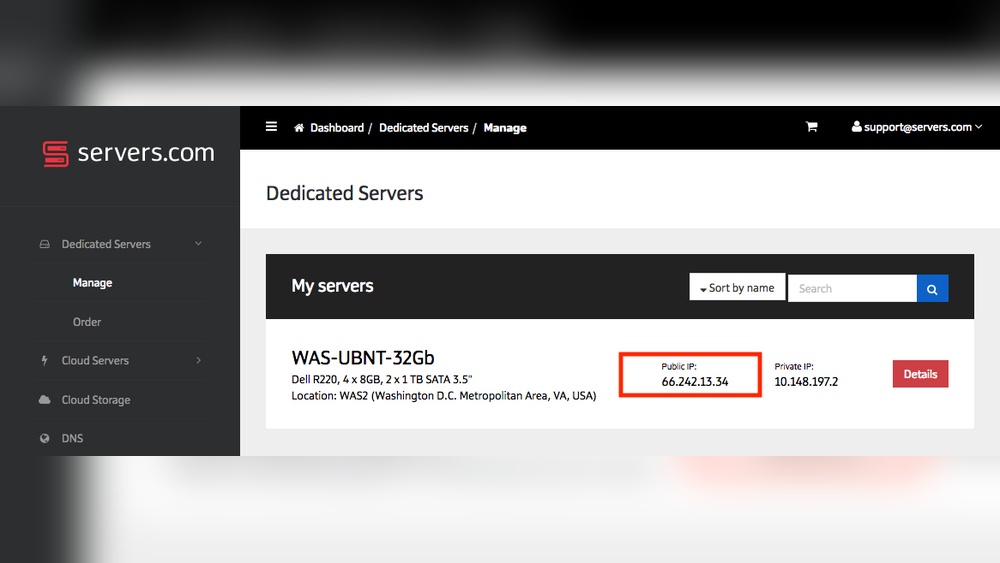
Collect the DNS details from the hosting provider. This usually includes nameservers or IP addresses. You will need this info to link the domain to the host. Keep the information handy for the next steps.
Accessing Domain Dns Settings
Accessing the domain DNS settings is the first step to point a domain to a hosting service. It allows you to control where the domain sends visitors. You can change records like A, CNAME, or MX here. These records tell the internet which server hosts your website or email.
Knowing how to access these settings is key for managing the domain effectively. The process usually involves logging into the domain registrar’s website. After login, you find the DNS management section. This area lets you update the domain’s records safely.
Logging Into The Domain Registrar
Start by visiting the website where the domain was purchased. Enter your username and password to log in. Sometimes, you may need to verify your identity with a code. This step keeps your domain secure from unauthorized access. After login, you see your account dashboard. Here you manage all domains linked to your account.
Locating Dns Management Tools
Find the list of your domains in the dashboard. Click on the domain you want to edit. Look for options such as “DNS Settings,” “Manage DNS,” or “Name Server Management.” These names may vary by registrar but mean the same. Inside this section, you see all DNS records. You can add, edit, or delete records as needed. Always save changes before exiting the page.
Credit: www.namecheap.com
Pointing Domain To Host
Pointing a domain to a host is essential to make a website accessible online. It connects the domain name with the server where the website files are stored. This process involves adjusting domain settings to match the hosting provider’s details. Doing it right helps the website load correctly and fast for visitors.
There are different methods to point a domain to a host. Some require changing nameservers, while others need editing DNS records. Each method has its uses depending on the hosting setup. Understanding these options helps in guiding clients properly.
Changing Nameservers
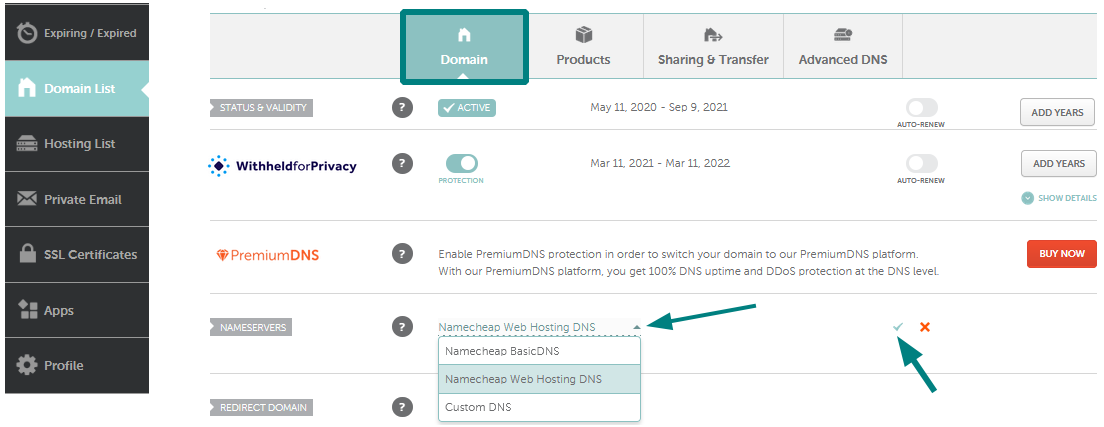
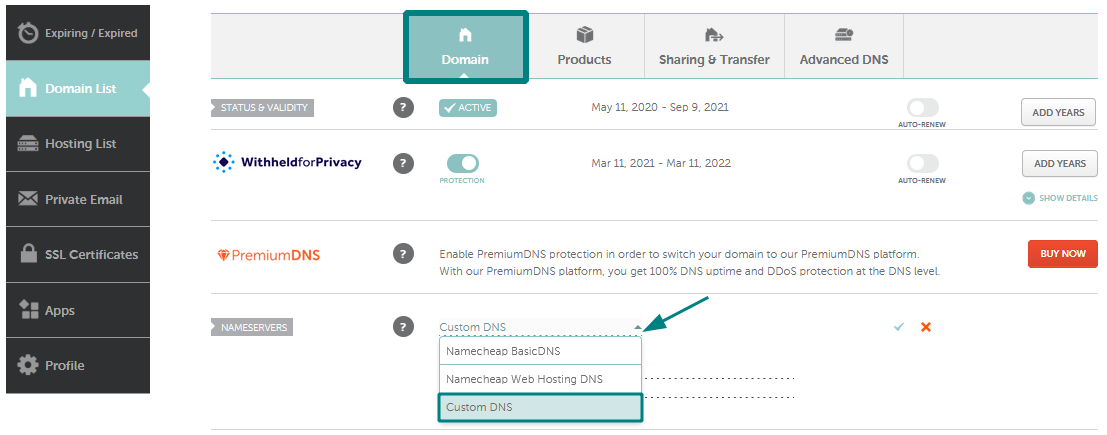
Nameservers tell the internet where to find your website. Changing nameservers means updating your domain registrar with the host’s nameserver addresses. This method directs all traffic to the new host automatically.
To change nameservers, log into the domain control panel. Find the nameserver settings and replace existing entries with the host’s nameservers. Save changes and wait for propagation, which may take up to 48 hours.
Editing A Records
A Records link your domain to an IP address. Editing A Records points the domain directly to the hosting server’s IP. This method is useful for keeping the domain registrar’s DNS while pointing to a new host.
Access the DNS management section at the domain registrar. Locate the A Record with the domain name. Replace the current IP with the host’s server IP address. Save and allow time for the update to take effect.
Updating Cname Records
CNAME Records alias one domain to another. Updating CNAME Records helps point subdomains to the hosting provider. For example, www or blog can be linked to the main domain or host.
Go to the DNS settings in the domain control panel. Find the CNAME record for the subdomain. Change the value to the host’s domain name or target URL. Save the record and wait for DNS propagation.
Verifying Domain Connection
After pointing a domain to a host, checking the connection is crucial. This step ensures the domain correctly links to the hosting server. Without verification, the website might not load properly. Verifying the domain connection helps avoid downtime and errors. It also confirms that DNS changes are effective worldwide.
Using Dns Propagation Checkers
DNS propagation checkers show how DNS changes spread across servers. They display if your domain points to the right IP address. These tools give real-time status for different locations worldwide. You enter your domain name and get a report fast. This helps confirm that DNS records update correctly.
Choose a reliable DNS checker online for accurate results. Wait at least a few hours after changes before checking. Some DNS updates take time to spread fully. Seeing the new IP address in many locations means success.
Testing Website Access
Test your domain by typing it in a web browser. The website should load without errors or redirects. If the site shows your hosting content, the connection works. Try accessing the site from different devices and networks. This checks if DNS changes affect users everywhere.
Clear your browser cache before testing to avoid old data issues. Use private or incognito mode for a fresh test. If the site does not load, recheck DNS settings or wait longer. Testing access confirms your domain points correctly and is live.
Credit: www.namecheap.com
Common Issues And Fixes
Pointing a domain to a host may seem easy but can bring some common problems. Knowing these issues helps fix them quickly. This saves time and keeps the website running smoothly. Below are usual troubles and how to solve them.
Dns Propagation Delays
DNS changes take time to spread worldwide. This delay can last from a few minutes to 48 hours. During this time, some users may see the old site or get errors. The only solution is patience. Avoid making more changes until propagation ends. Clear browser cache and use online tools to check DNS status.
Incorrect Dns Records
Wrong DNS records stop the domain from pointing to the host. Common mistakes include wrong IP addresses or missing records. Double-check the A, CNAME, and MX records. Make sure they match the hosting provider’s instructions. Correct any typo or wrong entry fast. Proper DNS records ensure the domain connects to the right server.
Ssl Certificate Setup
Without an SSL certificate, browsers show security warnings. This scares visitors away. Install an SSL certificate on the host after pointing the domain. Use free options like Let’s Encrypt or buy one from a trusted issuer. Check the certificate is active and linked to the domain. This protects user data and improves search rankings.
Tips For Smooth Client Communication
Clear communication is key to a smooth domain pointing process for your client. It builds trust and avoids confusion. Helping clients understand each step makes the whole experience better for both sides.
Sharing details clearly and simply keeps clients confident. Setting expectations about timing and support helps avoid frustration. Here are some tips to communicate well during this process.
Explaining The Process Simply
Use plain words to describe what pointing a domain means. Avoid technical terms or explain them briefly. Show the main steps without overloading details. For example, say, “We change where your website address points online.” This helps clients follow along.
Use examples or visuals if possible. Repeat key points to ensure understanding. Keep sentences short and clear. Ask if clients have questions to stay sure they understand.
Providing Timelines
Tell clients how long the process usually takes. Mention any waiting time for changes to spread across the internet. Explain that sometimes it might be faster or slower. This prepares clients for what to expect.
Give updates during the process. Let clients know when you start and when it finishes. Sharing progress reduces worry and builds trust. Confirm completion clearly so clients know the job is done.
Offering Post-setup Support
Let clients know you are available after setup. Offer help if the website does not show up right away. Provide contact details for quick support. This shows you care about their success.
Suggest basic checks clients can do themselves. For example, refreshing the browser or clearing cache. Reassure them that delays are normal and usually fix quickly. This keeps clients calm and satisfied.
Frequently Asked Questions
What Is The First Step To Point A Domain To Hosting?
First, obtain the hosting provider’s nameservers. Then, log in to the domain registrar’s dashboard and update the nameservers accordingly. This connects the domain to the hosting server effectively.
How Long Does Dns Propagation Take After Pointing A Domain?
DNS propagation typically takes 24 to 48 hours. During this time, changes spread across global servers. Patience is key, as the website may not be immediately accessible.
Can I Point Multiple Domains To One Hosting Account?
Yes, most hosting providers allow multiple domains on one account. You need to add each domain in the hosting control panel and update their DNS records accordingly.
What If My Domain Doesn’t Point To Hosting After Changes?
First, clear your browser cache and flush local DNS. Verify nameservers are correctly entered. If issues persist, contact your hosting or domain registrar support for assistance.
Conclusion
Pointing a domain to a host is a simple but important task. Follow each step carefully to avoid errors. Check settings twice to ensure everything works well. A correctly pointed domain makes your website live and accessible. Clients will appreciate your clear and smooth process.
Keep learning to improve your skills over time. This helps build trust and good results. Stay patient and take your time with each project. Success comes with practice and attention to detail.


