
Are you ready to take control of your website and make sure your domain points exactly where you want it? Whether you’re switching to a new hosting provider or managing multiple sites, knowing how to point your domain to different hosting is a skill you can’t afford to miss.
It might sound tricky, but with the right steps, you’ll have your site live and running smoothly in no time. Keep reading, and you’ll learn simple, clear instructions that anyone can follow—no tech jargon, no confusion. Your website’s success starts here.
Choose Your Hosting Provider
Selecting the right hosting provider is key to a smooth website experience. It affects speed, uptime, and support. Take time to find a host that fits your needs and budget.
Not all hosts are the same. Some offer shared hosting, others provide VPS or dedicated servers. Knowing what you need helps narrow choices. Focus on reliability and customer service too.
Compare Hosting Options
Look at different hosting types. Shared hosting is affordable but slower. VPS offers more power and control. Dedicated servers give full resources but cost more. Match hosting type to your website size and traffic.
Check features like storage, bandwidth, and email accounts. Some hosts provide free SSL certificates or daily backups. These extras improve security and data safety. Compare prices but watch for hidden fees.
Check Hosting Requirements
Know your website’s technical needs. Some sites need special software like WordPress or PHP. Make sure the host supports these tools. Confirm the server meets minimum version and memory needs.
Check if the host offers easy domain pointing and DNS management. This saves time when linking your domain to the hosting. Good support for domain setup is a plus.
Access Domain Registrar Account
Accessing your domain registrar account is the first step to point your domain to a different hosting. This account holds all the settings for your domain name. You need to log in to manage these settings safely. Without access, you cannot change where your domain points.
Make sure you have your username and password ready. Some registrars may ask for extra verification. This keeps your domain secure from unauthorized changes.
Locate Domain Settings
After logging in, find the section labeled “Domain Management” or “My Domains.” This area shows all domains you own. Select the domain you want to point to the new hosting.
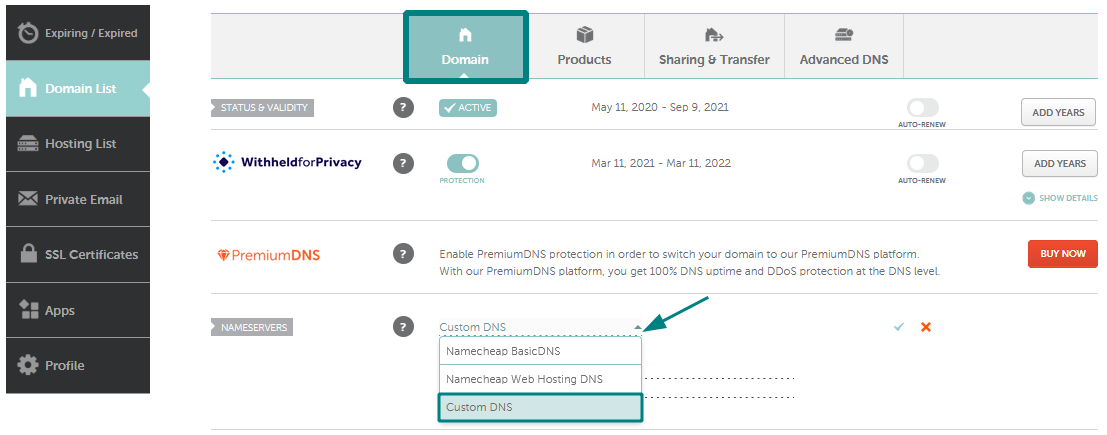
Look for options like “DNS Settings,” “Name Servers,” or “Domain Settings.” These control where your domain directs visitors. You will update these settings to link your domain to the new hosting.
Backup Existing Dns Records
Before making changes, save a copy of your current DNS records. These records include important details like A records, CNAME, and MX records. Saving them helps restore your site if something goes wrong.
You can usually find an export or download option in the DNS settings. Save this file to your computer. Keep it safe until you finish updating your domain settings.
Update Nameservers
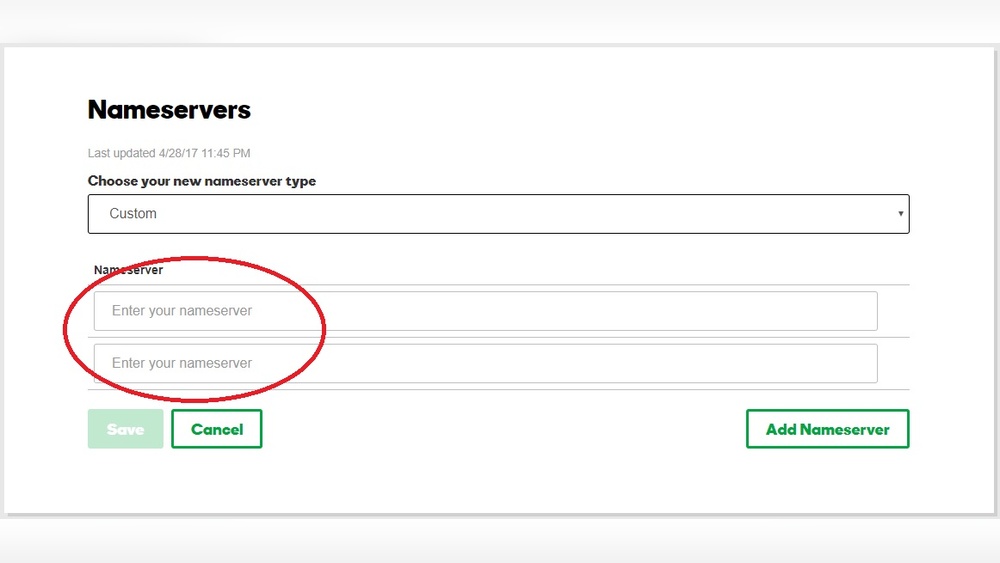
Updating nameservers is a key step in pointing your domain to a new hosting service. Nameservers tell the internet where to find your website. Without updating them, your domain will still show the old hosting site.
This process is simple but important. You need to get the correct nameserver details from your new hosting provider. Then, replace the old nameservers with the new ones in your domain settings. This change can take some time to take effect.
Find Hosting Nameserver Details
Start by logging into your new hosting account. Look for the section called “DNS Settings” or “Nameservers.” Here, you will find the nameserver addresses. They usually look like ns1.example.com and ns2.example.com.
Copy these nameserver details carefully. You will need them to update your domain. If you cannot find them, check your hosting welcome email or contact support.
Replace Old Nameservers
Next, log into your domain registrar account. Find the domain you want to point to the new host. Go to the nameserver settings area.
Remove the old nameservers and enter the new ones from your hosting provider. Save the changes. This action tells the internet to use the new hosting for your domain.
The update might take up to 48 hours to spread worldwide. During this time, your website may load from either old or new hosting. Be patient and check regularly.
Modify Dns Records Directly
Modifying DNS records directly is a key step to point your domain to a different hosting provider. It involves changing specific settings in your domain’s DNS management panel. These changes tell the internet where to find your website and email services. This method gives you control and accuracy over the connection between your domain and hosting.
Before editing, understanding the types of DNS records is important. Each record serves a different purpose. Correctly updating these records ensures your website loads properly and your emails work without issues.
Identify Required Dns Records
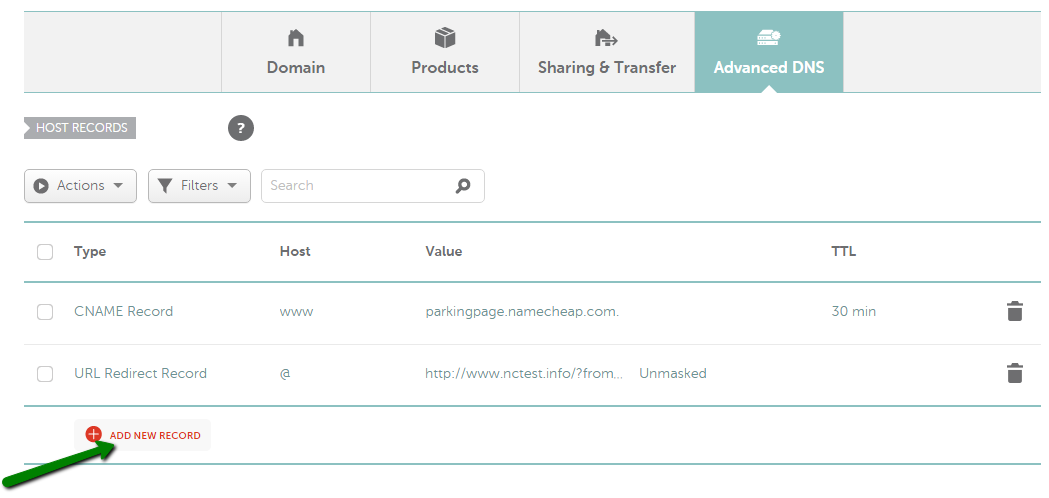
Start by identifying which DNS records need changing. Usually, these include A, CNAME, and MX records. The A record points your domain to the IP address of your web server. CNAME records link subdomains to other domain names. MX records direct your email to the correct mail servers. Check your new hosting provider’s instructions to find the exact values for these records.
Edit A, Cname, And Mx Records
Access your domain registrar’s DNS settings to edit records. For the A record, replace the old IP address with your new hosting IP. For CNAME records, update the target domain as provided by your host. Edit MX records to match your new email server settings. Save changes carefully. It can take several hours for DNS updates to apply worldwide. Avoid making multiple changes at once to reduce errors.
Verify Domain Propagation
After pointing your domain to a new hosting provider, you need to check if the change has taken effect. This process is called domain propagation. It means the internet updates with the new hosting details for your domain. Propagation can take time, so verifying it helps avoid confusion.
Use Propagation Checking Tools
Propagation checking tools show if your domain points to the new host worldwide. These tools check DNS servers in many locations. Enter your domain name, and the tool displays results from different countries. This helps you see where the change is active and where it is not yet.
Estimate Propagation Time
Propagation time varies from a few minutes to 48 hours or more. It depends on your domain registrar and DNS settings. Some changes update faster, while others take longer. Check your domain regularly with propagation tools to know when it fully updates.
Credit: www.namecheap.com
Troubleshoot Common Issues
Pointing your domain to a different hosting can cause some common problems. These issues often stop your website or emails from working correctly. Knowing how to fix these problems saves time and stress. Here are two frequent issues and how to solve them quickly.
Fix Dns Cache Problems
DNS cache stores old information about your domain. This can stop your site from showing the new hosting address. Clear your browser’s cache and DNS cache on your computer. Use the command prompt or terminal with “ipconfig /flushdns” for Windows or “dscacheutil -flushcache” for Mac.
Wait a few hours for DNS changes to spread worldwide. Check your DNS records on tools like “WhatsMyDNS” to see if they update. Restart your modem or router to clear network cache. This helps your device get fresh DNS information.
Resolve Email Delivery Errors
Email errors happen if MX records are wrong or not updated. Verify your domain’s MX records point to your new hosting provider’s mail servers. Check your SPF, DKIM, and DMARC settings to avoid spam issues.
Test sending and receiving emails after updating records. Remove old email accounts from your previous host to prevent conflicts. Contact your hosting support if errors continue for help with mail server settings.
Tips For Smooth Transition
Switching your domain to a new hosting provider needs careful planning. A smooth transition keeps your website live without problems. Simple steps help avoid downtime and loss of visitors. Follow these tips for a hassle-free move.
Schedule Changes During Low Traffic
Pick a time when fewer people visit your site. Late night or early morning usually works best. This reduces the chance of users seeing errors. It also gives you time to fix any issues fast. Plan the switch on weekends if your site is busy.
Keep Old Hosting Active Temporarily
Do not cancel your old hosting right away. Keep it running for a few days after the change. This allows time for DNS updates to spread worldwide. Your visitors might still reach the old server during this time. It helps avoid lost visitors and broken pages.
Credit: www.namecheap.com

Credit: www.hostinger.com
Frequently Asked Questions
How Do I Point My Domain To A New Hosting Provider?
To point your domain, update the domain’s nameservers to those of your new host. This directs traffic to the new server. Log into your domain registrar, find DNS settings, and replace the old nameservers with new ones provided by your hosting company.
How Long Does Domain Pointing Take To Propagate?
Domain pointing typically takes 24 to 48 hours to fully propagate worldwide. During this period, some users might see the old site while others see the new one. Propagation time varies based on DNS cache and geographic location.
Can I Point My Domain Without Changing Hosting Nameservers?
Yes, you can use A records to point your domain without changing nameservers. This method requires updating the domain’s DNS settings to the new hosting server IP address. It allows more DNS control but needs careful configuration.
What Is The Difference Between Nameservers And Dns Records?
Nameservers manage your domain’s DNS settings and direct traffic to correct servers. DNS records, like A or CNAME, specify server IP addresses or aliases. Changing nameservers transfers DNS control, while updating records modifies specific routing details.
Conclusion
Pointing a domain to a different hosting is simple with clear steps. Keep your domain and hosting details ready. Change the nameservers or DNS settings carefully to avoid downtime. Wait for the changes to fully update, which can take some time.
Test your website after the switch to confirm it works well. Following these easy steps helps keep your site live and accessible. Stay patient and double-check each step for smooth results. This way, you control where your site lives online.


