

Are you ready to make your website accessible from a new hosting provider? Pointing your domain name to another hosting might sound tricky, but it’s easier than you think.
Whether you’re switching hosts for better speed, reliability, or features, this step is crucial to ensure your visitors find your site without any hassle. You’ll discover clear, simple steps that anyone can follow to point a domain name to a different hosting service.
Stick with me, and by the end, you’ll have the confidence to make the switch smoothly and without any downtime. Let’s get started!
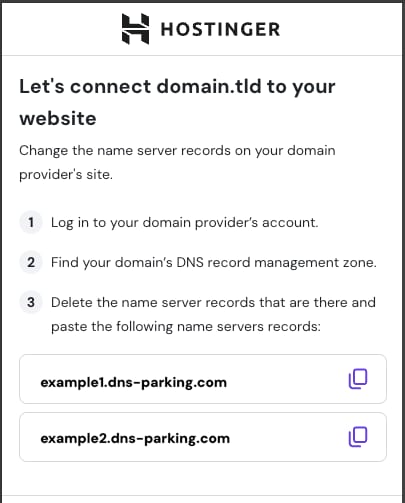
Credit: www.hostinger.com
Choosing A New Hosting Provider
Choosing a new hosting provider is a key step when pointing your domain to another host. The right hosting service affects your website’s speed, security, and uptime. It also impacts your visitors’ experience and your site’s growth. Picking a provider that fits your needs helps avoid future problems and saves time.
Factors To Consider
Start by checking server reliability. Your website should stay online without frequent downtime. Next, review the hosting speed. Fast loading times keep visitors happy and improve search rankings. Look at storage space and bandwidth limits to match your website size and traffic.
Customer support matters a lot. Choose a host with 24/7 help through chat, phone, or email. Security features like SSL certificates and daily backups protect your site. Also, consider the ease of use. A simple control panel helps manage your website easily.
Popular Hosting Options
Shared hosting suits small websites and blogs. It is affordable but may slow down with high traffic. VPS hosting offers more power and control. It fits medium-sized sites needing better performance. Dedicated hosting gives full server access. It works well for large websites with heavy traffic.
Cloud hosting spreads your site across multiple servers. It scales easily and handles traffic spikes well. Managed WordPress hosting focuses on WordPress sites. It includes updates, backups, and security optimized for WordPress.
Accessing Your Domain Registrar
Accessing your domain registrar is the first step to point your domain to another hosting. This process lets you manage where your website directs visitors. Your domain registrar holds control over your domain’s settings. You need to log in to their platform to make changes.
Understanding how to navigate your domain registrar’s interface saves time. It helps you avoid mistakes that could disrupt your website’s availability. Here, you will find tools needed to update your domain’s DNS records.
Locating Domain Settings
Start by logging into your domain registrar account. Look for sections named “My Domains” or “Domain Management.” This area lists all domains you own. Select the domain you want to point to new hosting.
Inside the domain details, find options like “Manage Domain” or “Settings.” This section lets you control important domain features. It is often where you can change your name servers or DNS records.
Understanding Dns Management
DNS management controls how your domain connects to hosting servers. It involves settings like A records, CNAME, and name servers. These records tell the internet where to find your website.
Changing your DNS records correctly points your domain to the new host. Your registrar usually provides a DNS management tool. Use this tool to enter the new hosting provider’s details.
Be careful to save any changes made. DNS updates might take time to apply, sometimes up to 48 hours. This delay is normal and expected.
Updating Nameservers
Updating nameservers is a key step when pointing your domain to a new hosting provider. It tells the internet where to find your website. Without updating nameservers, visitors cannot reach your site on the new host.
Changing nameservers is simple and takes just a few minutes. After the change, it may take some time to spread worldwide. This process is called DNS propagation.
What Are Nameservers?
Nameservers are special servers that control where your domain points. They link your domain name to your website’s hosting server. Every domain uses nameservers to guide visitors to the right place.
Each hosting provider has unique nameservers. You need to use the correct nameservers to connect your domain to your host.
How To Replace Existing Nameservers
Log into your domain registrar’s control panel first. This is where you bought your domain.
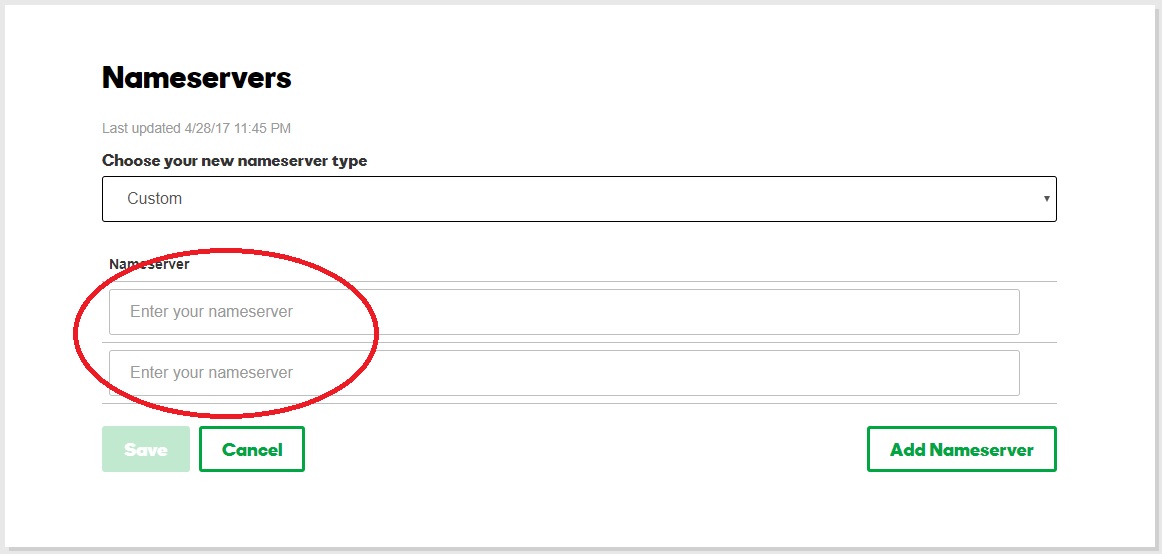
Find the section called “DNS settings” or “Nameservers.”
Delete the old nameservers listed there. Then, enter the new nameservers given by your hosting provider.
Save the changes. The update may take up to 48 hours to fully work.
Check your website after some time to confirm it loads from the new host.

Credit: www.youtube.com
Changing A Records
Changing A Records is a key step to point your domain name to a new hosting service. This process updates the address that links your domain to your website. It tells the internet where to find your site files on the new server. You must update these records carefully to avoid downtime or errors.
This guide helps you understand how to find the correct IP address and edit your DNS settings. Follow the steps to ensure your domain points to the right hosting smoothly.
Finding Your Hosting Ip Address
Start by logging into your new hosting account dashboard. Look for sections named “Server Information,” “Account Details,” or “Hosting Settings.”
The IP address is usually a series of numbers like 123.45.67.89. This is the address where your website files live.
If you cannot find the IP address, check your welcome email from the hosting provider. It often contains this detail. Alternatively, contact the hosting support team for help.
Editing A Records In Dns Settings
Next, log into your domain registrar account where you bought your domain. Find the DNS management or DNS settings area.
Look for the A Records section. It usually shows the current IP addresses linked to your domain.
Edit the existing A Record by replacing the old IP address with the new one from your hosting provider. Save the changes.
Wait for DNS propagation, which can take up to 48 hours. Your domain will start pointing to the new hosting once this completes.
Configuring Cname Records
Configuring CNAME records is an important step when pointing your domain name to another hosting. These records help direct your domain to the right server or service. They act as a pointer, telling the internet where to find your website or application.
Understanding CNAME records makes managing your domain easier. It also helps ensure your website loads correctly from the new hosting provider.
Purpose Of Cname Records
CNAME stands for Canonical Name. It links one domain name to another domain name. This lets you use different domain names for the same website or service.
CNAME records simplify domain management. They allow easy changes without updating the IP address. This is useful for services like content delivery networks or third-party hosting.
Steps To Update Cname
Log in to your domain registrar account. Find the DNS management or zone editor section.
Locate the existing CNAME record for your subdomain. Click to edit or add a new record if needed.
Enter the subdomain name in the Host field. In the Value field, type the target domain provided by your hosting provider.
Save the changes. Wait for DNS propagation, which can take up to 24 hours.
Test your domain by typing it into a browser. It should now point to the new hosting.
Verifying Dns Propagation
Verifying DNS propagation is a key step after pointing your domain name to another hosting. This process confirms that the changes you made are active across the internet. DNS propagation means the time it takes for the new DNS information to spread worldwide. Without verifying, you may not know if your website loads from the new host or the old one.
Checking DNS propagation helps avoid confusion and downtime. It ensures visitors reach your updated website. Let’s explore the tools you can use and how long the process usually takes.
Tools To Check Dns Status
Several free tools show DNS status clearly. These tools check if your domain points to the new host.
Popular tools include DNSChecker, WhatsMyDNS, and Pingdom. They display results from multiple locations worldwide. Enter your domain name, and they show the current IP address linked to it.
These tools help verify if the DNS change is complete or still in progress. They are simple to use and provide real-time updates.
Expected Time For Changes
DNS propagation time varies. It depends on your domain registrar and hosting provider.
Usually, changes take from a few minutes up to 48 hours. Some cases may take longer, but this is rare.
During this time, different users may see different versions of your site. Patience is important here. Regularly check the DNS status using the tools above.
Troubleshooting Common Issues
Troubleshooting common issues helps keep your website running smoothly. Pointing a domain to new hosting can cause some typical problems. Knowing how to fix these saves time and stress. Below are two frequent issues and ways to solve them quickly.
Dns Cache Problems
DNS cache stores website addresses to load sites faster. Sometimes, it holds old data after you change hosting. This can make your site show the wrong page or not load at all. Clear your browser’s cache to remove old DNS info. You can also flush DNS cache on your computer using simple commands. Waiting a few hours may also help, as DNS servers update over time.
Incorrect Dns Entries
Wrong DNS entries stop your domain from pointing to the right hosting. Check your domain’s DNS settings carefully. Make sure the IP address matches the new hosting provider’s details. Pay attention to A records, CNAME, and other important entries. Fix any typos or missing information right away. Saving changes correctly is crucial. Double-check with your hosting support if unsure about the settings.
Credit: www.godaddy.com
Ensuring Website Functionality Post-migration
After pointing your domain to a new hosting provider, confirming your website works properly is key. This step avoids downtime and user frustration. Testing every function ensures visitors see your site as intended. It also helps catch any issues early.
Testing Website Access
Check if your website loads on different devices and browsers. Use clear browser cache or open in private mode. Confirm that pages and images display without errors. Try navigating through menus and links. Any broken links or missing content need fixing quickly.
Checking Email And Other Services
Verify your email accounts linked to the domain work correctly. Send and receive test emails from multiple addresses. Confirm any other services like FTP or databases connect without issues. These checks keep your business communication smooth and uninterrupted.
Frequently Asked Questions
How Do I Point My Domain To A New Hosting Provider?
To point your domain to new hosting, update the domain’s nameservers to those of the new host. This change occurs in your domain registrar’s control panel. After updating, allow 24-48 hours for DNS propagation worldwide.
What Are Nameservers In Domain Pointing?
Nameservers are servers that translate your domain name to the hosting server’s IP address. They direct web traffic to your website. Changing nameservers points your domain to a different hosting provider.
Can I Keep My Email When Changing Hosting?
Yes, you can keep your email by updating MX records separately. Ensure your email hosting settings remain unchanged during the domain pointing process. Consult your email provider for specific DNS records.
How Long Does Domain Pointing Take To Work?
Domain pointing typically takes 24 to 48 hours to fully propagate worldwide. During this time, some users may see the old site. Be patient and avoid making further changes during propagation.
Conclusion
Pointing a domain name to another hosting is simple with clear steps. Start by changing your domain’s DNS settings at the registrar. Next, update the nameservers to match the new hosting provider. Wait for the changes to spread, which can take a few hours or days.
Check your website to ensure it loads correctly on the new host. Keep your login information safe for future updates. This process helps keep your website online without downtime. Following these steps makes the switch smooth and stress-free.


