
Imagine having instant access to your web host files right from your computer, just like you would with any regular folder. Mapping a network drive to your web host can make this a reality, and it’s easier than you might think.
If you’ve ever felt frustrated by the constant back-and-forth between your local files and your web server, mapping a network drive can streamline your workflow and save you precious time. In this guide, you’ll discover a step-by-step approach to seamlessly connect your computer to your web host, making file management a breeze.
Unlock the convenience of direct access and take control of your digital workspace. Are you ready to transform your web hosting experience? Let’s dive in and simplify the way you work with your web host.
Credit: www.webdavsystem.com
Understanding Network Drives
A network drive is like a folder. It is on another computer. This computer is part of a network. You can store files here. Access them from different places. It helps in sharing data. You don’t need to move files physically.
Sharing files is easy with network drives. Multiple people can access files. It saves storage space on personal devices. Data is backed up regularly. You can access files from anywhere. It helps in collaboration. Network drives are secure too. They can be password protected.
Prerequisites For Mapping
To map a network drive, install the right software. A good file transfer program is needed. FileZilla is a popular choice. It helps in connecting to your web host. Ensure you have the latest version. This makes it work better. Many find it easy to use. A reliable internet connection is also important. It ensures smooth file transfers. Check your connection speed. Slow speeds can cause problems.
Proper permissions are needed for access. Ask your web host for the details. They will give you a username and password. Keep these safe. You will need them every time. Access might be limited to certain files. Make sure you have the right permissions. This allows you to work freely. Without it, you can’t access important files.
Choosing A Web Host
Reliability is key when picking a web host. Hosts should keep your site up most times. Speed matters too. Fast sites make users happy. Security is very important. It keeps data safe. Support should be available 24/7. You might need help at odd hours. Cost is a factor to check. Some hosts are cheap. Others can be expensive. Compare prices and services. Storage space is also crucial. More space means more files. Bandwidth decides how much traffic your site can handle. High bandwidth is better for busy sites. Think about these factors when choosing a host.
Many people use Bluehost. It’s known for good support. HostGator offers affordable plans. SiteGround is praised for speed and security. GoDaddy is popular for domain names. DreamHost is favored for reliability. A2 Hosting offers high speed servers. InMotion Hosting provides excellent customer service. Each service has its strengths. Choose the one that fits your needs best.
Step-by-step Mapping Process
Begin by opening your computer’s network settings. Find the section for network drives. Ensure your internet connection is stable. This is very important. Adjust your settings to allow drive mapping. Save your changes. Close the settings window.
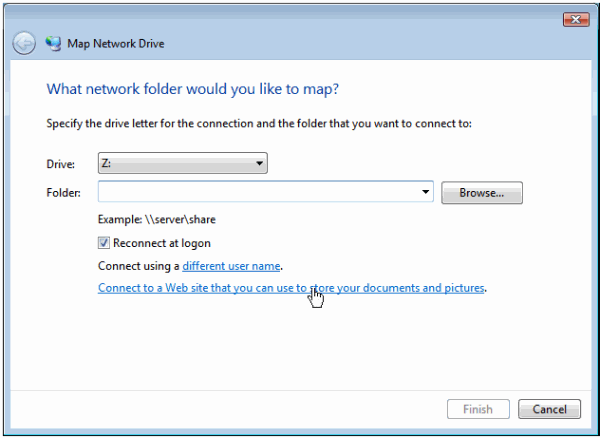
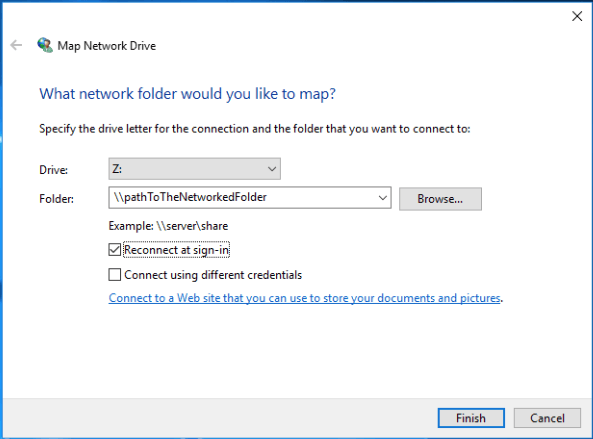
Open the file explorer on your computer. Click on “This PC” or “My Computer”. Look for the option to map a network drive. Enter the web host address in the address field. Select a drive letter for your new drive. Make sure to check the “Reconnect at sign-in” option. This helps in future connections.
Go back to your file explorer. Look for the new drive under “This PC”. Double-click on it. If you see your files, the connection is successful. If not, check your network settings again. Ensure all information is correct. Try to reconnect if needed.
Troubleshooting Common Issues
Mapping a network drive to a web host can sometimes be tricky. Ensure network settings allow access to the web server. Check permissions and correct the path to prevent connection errors.
Connection Problems
Connection issues can make you feel stuck. Sometimes the network drive doesn’t connect. Check if your internet is working. Try to restart your computer. This can fix many simple problems. Make sure the web host is online. If the host is down, nothing will work. Ask someone for help if you are unsure.
Access Denied Errors
Access denied errors are frustrating. This means you can’t see the files. Check your login details first. Are the username and password correct? Maybe you need permission from the web host. Contact the administrator for help. They can change settings to let you in. Always keep your login details safe.
Credit: docs.plesk.com
Security Considerations
Mapping a network drive to a web host requires careful attention to security settings. Ensure strong passwords and enable encryption to protect your data. Regularly update software to guard against vulnerabilities.
Protecting Data
Data safety is very important. Keep your files safe from unauthorized access. Use strong passwords for protection. Change passwords often. Never share your passwords with others. Always back up your data. Backups help recover data if lost. Keep backup files in a safe place.
Secure Access Protocols
Using secure protocols is key. Protocols like SFTP or FTPS keep data secure. They encrypt data during transfer. This makes it hard for hackers to read. Avoid using simple FTP. It is not safe. Always choose secure options.
Maintaining Your Network Drive
Backing up your network drive is very important. It protects your data from loss. Save copies of all files. This keeps them safe. Use a backup tool. There are many tools online. Choose one that suits you. Backups should be regular. Daily or weekly is best. Store backups in a secure location. A different drive or cloud storage works well. This way, your data is always safe.
Keep an eye on your drive’s space. It helps to avoid problems. Use tools to check space regularly. Free up space if it’s low. Move old files to another place. Delete files you don’t need. This keeps the drive running well. A full drive can slow down work. So, always monitor usage closely.
Credit: coehelp.uoregon.edu
Frequently Asked Questions
How To Map A Network Drive To A Website?
Open File Explorer, click “This PC,” then “Map network drive. ” Enter the website’s URL. Follow prompts to complete.
How To Map A Network Drive To A Server?
Open File Explorer. Select “This PC” and click “Map network drive”. Choose a drive letter and enter server path. Authenticate if needed. Finish setup to access the network drive.
How Do I Map A Network Drive Using Net Use?
To map a network drive using “net use”, open Command Prompt. Type “net use X: \ServerShare”, replacing “X” with the desired drive letter and “\ServerShare” with your network path. Press Enter to connect.
How Do I Map A Network Drive To A Virtual Machine?
To map a network drive to a virtual machine, open File Explorer. Click “Map network drive,” select a drive letter, and enter the network path. Ensure the virtual machine’s network settings allow access. Confirm the connection using the correct credentials.
This setup enables easy file sharing.
Conclusion
Mapping a network drive to a web host is straightforward. Follow the outlined steps, and soon you’ll access files easily. This process enhances efficiency and saves time. You no longer need to manually transfer files. Enjoy the convenience and simplicity it brings.
Now you can focus more on your projects. With practice, it becomes second nature. Troubleshooting is simpler with a mapped drive. So, give it a try today. Experience seamless connection and improved workflow. Happy computing!


