
Are you ready to take your online presence to the next level? Creating a subdomain with Namecheap could be your first step towards a more organized and professional-looking website.
Imagine having a specialized section of your site dedicated to a blog, a store, or a portfolio, all easily accessible and neatly organized. This not only enhances user experience but also boosts your credibility in the eyes of visitors. With Namecheap, setting up a subdomain is straightforward and efficient, even if you’re new to this.
Dive into this guide and discover how you can seamlessly expand your digital footprint with just a few clicks. Ready to elevate your website game? Let’s get started!
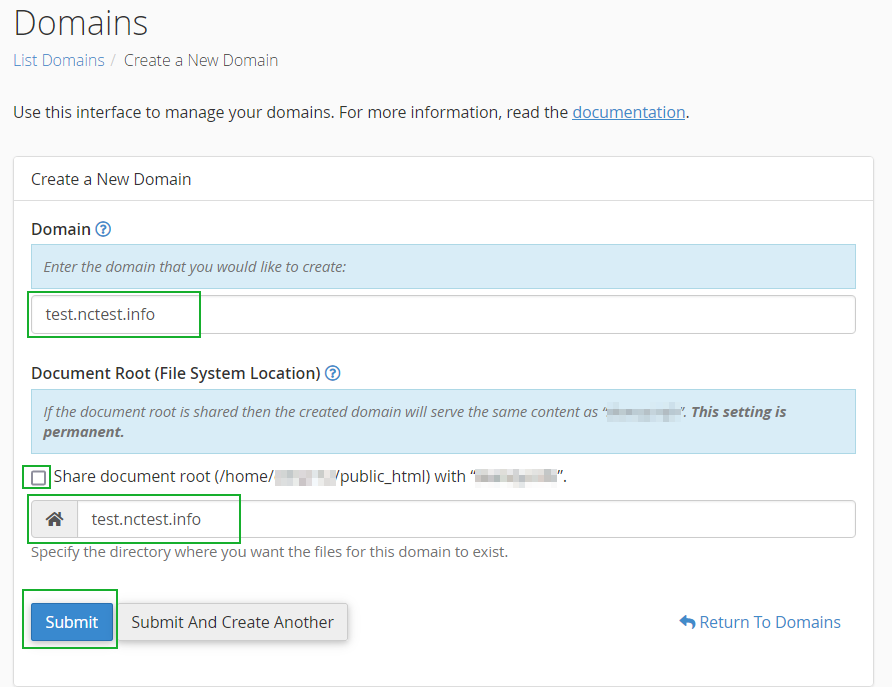
Credit: www.namecheap.com
Benefits Of Using Subdomains
Subdomains offer unique advantages for web management and SEO. They help organize content, improve site navigation, and enhance user experience. Choosing to use subdomains with Namecheap can streamline these benefits, making your online presence more efficient and effective.
Enhance Seo And Search Rankings
Subdomains can boost your search engine rankings. They allow you to target specific keywords. This helps in attracting niche audiences. Search engines treat subdomains as separate entities. This means you can optimize each for different keywords, increasing visibility.
Organize And Structure Content
Subdomains help in organizing content. They separate sections of your website. This makes navigation easier for users. It also keeps your main domain clean and focused. By using subdomains, you can create distinct areas for blogs, forums, or product pages.
Improve User Experience
Subdomains enhance user experience. They provide clear paths to specific content. Users can find what they need quickly. This reduces confusion and improves satisfaction. With Namecheap, setting up subdomains is simple, ensuring a smooth experience for visitors.
Facilitate Tracking And Analytics
Subdomains simplify tracking and analytics. They allow separate analysis for different sections. You can monitor traffic and engagement easily. This helps in understanding user behavior. It aids in making informed decisions for your website strategy.
Branding And Customization Opportunities
Subdomains offer branding opportunities. They enable customization for different sections. You can tailor each subdomain to fit specific themes. This strengthens your brand identity. It creates a cohesive look across your online presence.
Credit: docs.softr.io
Preparing Your Namecheap Account
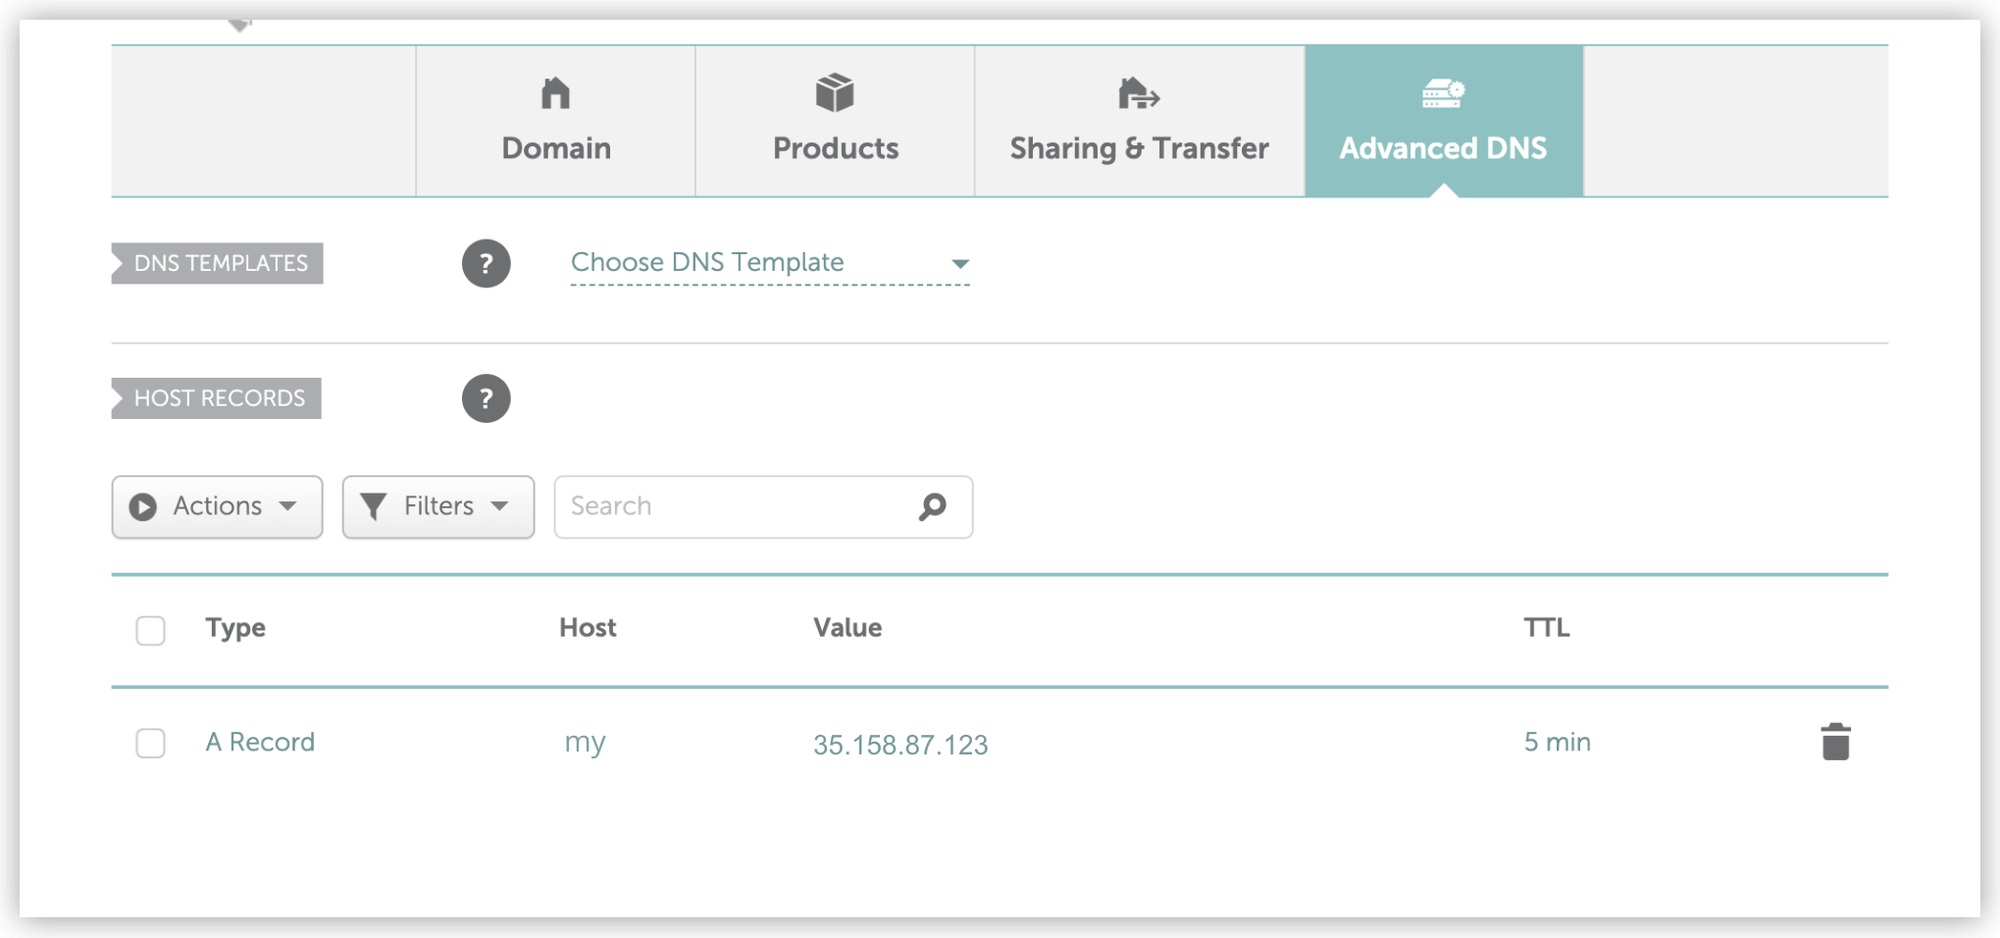
Setting up a subdomain on Namecheap is simple. First, log into your account. Navigate to the Domain List, then select “Manage” next to your domain. Click on “Advanced DNS” and add a new record. Choose “CNAME” for the type, enter your subdomain, and save changes.
Preparing your Namecheap account is a crucial first step in creating a subdomain. Having a well-organized account ensures a smooth process and saves you time. Let’s dive into the steps that will help you get ready. ###Verifying Domain Ownership
Before you can create a subdomain, it’s important to confirm that you have control over the domain. Log into your Namecheap account and navigate to the “Domain List” section. If you see your domain listed, you’re on the right track. If you’re unsure whether you own the domain, you can check the registration details. Look for your contact information in the WHOIS details. This confirms your ownership and allows you to proceed with confidence. ###Accessing Domain Settings
Once you’ve verified ownership, it’s time to access your domain settings. Click on the “Manage” button next to your domain in the Domain List. This takes you to the settings where you can make the necessary changes. Here, you’ll find various options like DNS settings, redirections, and more. Familiarize yourself with these settings, as they are essential for creating and managing your subdomain. Is there anything that looks unfamiliar? Don’t worry; each option comes with helpful tooltips. Have you ever felt overwhelmed by tech jargon? Remember, it’s all about breaking things down into manageable steps. By methodically preparing your Namecheap account, you’ll be ready to tackle creating a subdomain with ease.Navigating To Subdomain Options
Creating a subdomain on Namecheap is simple. Start by logging into your account. Navigate to the domain list. Select the domain you want. Click “Manage. ” Look for “Advanced DNS. ” Add a new record. Choose “Subdomain. ” Enter your desired name.
Save changes. Your subdomain is now ready.
Creating a subdomain on Namecheap might seem like a daunting task at first, but it’s actually quite straightforward once you know where to look. Navigating to the subdomain options is your first step in this journey. Whether you’re setting up a blog, an online store, or a separate section for customer support, finding the right settings is crucial. ###Locating Domain List
To begin, log into your Namecheap account. Once you’re in, head straight to the dashboard. The Domain List is your first destination. It’s where all your domains are listed, ready for you to manage. If you have multiple domains, you might feel overwhelmed. But don’t worry—each domain has clear options laid out for you. Click on the Domain List on the left-hand side of your screen. Here, you’ll see a list of all the domains you’ve registered with Namecheap. Select the domain for which you want to create a subdomain. It’s as simple as clicking on the domain name. ###Finding Advanced Dns Settings
After selecting your domain, look for the Manage button next to it. Clicking it takes you to the domain’s settings page. Here is where the magic happens. Scroll down until you find the Advanced DNS tab. This is where you’ll find the settings necessary to create a subdomain. It might seem a bit technical, but it’s essentially where you can add new DNS records to your domain. Click on Advanced DNS and you’ll enter a page with a variety of DNS settings. Look for the Add New Record button. This is your gateway to creating that subdomain. A simple click will prompt you to enter the details of your new subdomain. Have you ever wondered why businesses often have ‘blog’ or ‘shop’ subdomains? It’s because subdomains help organize content effectively. They can enhance user experience by directing traffic to specific areas of interest. As you go through these steps, think about what your subdomain could achieve. Is it for a new product line, a dedicated customer portal, or something else? The possibilities are endless, and Namecheap’s easy navigation makes it all possible.Creating Your Subdomain
Easily set up a subdomain with Namecheap by accessing your domain list. Use the ‘Manage’ button next to your domain. Then, navigate to the ‘Advanced DNS’ tab to add a new record.
Creating a subdomain with Namecheap is a straightforward process that can enhance your website’s organization and functionality. Whether you’re setting up a blog, a store, or a support page, creating a subdomain allows you to expand your online presence efficiently. Let’s dive into how you can create your subdomain step by step. ###Entering Subdomain Name
Begin by logging into your Namecheap account. Once you’re in, navigate to the “Domain List” section. This is where you’ll find all the domains you own. Select the domain for which you want to create a subdomain. Now, head to the “Manage” button next to your domain. Look for the “Advanced DNS” tab. This is where the magic happens. Here, you’ll see an option to add a new record. Click on it, and choose the “CNAME Record” type from the drop-down menu. In the “Host” field, enter the name of your subdomain. For instance, if you want a blog, you might enter “blog”. Make sure it’s relevant to the purpose of your subdomain. ###Configuring Dns Records
Once you’ve entered your subdomain name, it’s time to configure the DNS records. In the “Value” field, input the domain you want your subdomain to point to. This could be a specific page or directory within your website. Set the TTL (Time to Live) value. This determines how long the DNS information is cached. A standard setting like “Automatic” works well for most cases. Finally, click the green checkmark to save your changes. The DNS propagation may take some time, so be patient. Usually, it’s swift, but in some cases, it might take up to 48 hours. Creating a subdomain can seem daunting at first, but with these steps, you’ll find it’s quite manageable. Have you ever created a subdomain before? What did you use it for? Share your experiences or questions in the comments below!Testing Your Subdomain
Creating a subdomain on Namecheap involves a few simple steps. First, log into your Namecheap account. Navigate to the ‘Domain List’, select your domain, and choose ‘Manage’. Under the ‘Advanced DNS’ tab, click ‘Add New Record’, choose ‘CNAME Record’, and enter your desired subdomain.
Save the changes.
Testing your subdomain is a crucial step in ensuring its proper functionality. Once you’ve set up a subdomain with Namecheap, the next step is verification. This process guarantees that your subdomain is correctly configured and accessible. By thoroughly testing, you can identify and fix potential issues early. This ensures a smooth user experience on your subdomain.Checking Propagation Status
After setting up your subdomain, check its DNS propagation. DNS propagation is the time it takes for DNS changes to update across the internet. It can take up to 48 hours, but it’s usually quicker. Use online tools to check the propagation status. These tools help you see if your subdomain is live worldwide. Enter your subdomain URL in a propagation checker. It will display results for different global locations. If the status shows as “resolved,” your subdomain is accessible.Ensuring Functionality
Once propagation is complete, test the subdomain’s functionality. Open a web browser and enter your subdomain’s URL. The page should load without errors. Check for broken links or missing content. Ensure all features work correctly, like forms or interactive elements. Testing on different devices and browsers is beneficial. This helps confirm your subdomain is compatible with various platforms. If any issues arise, revisit your settings in Namecheap. Make necessary adjustments to fix these problems swiftly.Troubleshooting Common Issues
Troubleshooting common issues with subdomains on Namecheap can be daunting. Yet, resolving these problems is crucial for smooth operations. Subdomains often face issues like DNS conflicts and incorrect settings. Understanding these common problems helps in maintaining your site’s functionality.
Resolving Dns Conflicts
DNS conflicts occur when records clash. This can disrupt your subdomain. First, check the DNS records for duplicate entries. Remove any duplicates you find. Next, ensure each DNS entry points correctly. Incorrect pointing often causes conflicts. Also, verify the DNS propagation status. Sometimes, DNS changes need time to update globally. Patience helps here. Lastly, contact Namecheap support if conflicts persist. Their team can offer tailored solutions.
Updating Incorrect Settings
Incorrect settings often lead to subdomain issues. Begin by reviewing your DNS settings. Ensure each setting matches your desired configuration. Incorrect entries can mislead the system. Next, check your subdomain’s configuration in the control panel. Look for any discrepancies. Correct any mismatches you find. Ensure your hosting and domain settings align. Misalignment can prevent the subdomain from functioning. If unsure, seek guidance from Namecheap’s support team. They provide expert assistance.
Maintaining Your Subdomain
Creating a subdomain on Namecheap involves a straightforward process. Start by logging into your Namecheap account and selecting the domain you wish to modify. Navigate to the DNS settings, then add a new record with your desired subdomain name.
When you create a subdomain on Namecheap, your work doesn’t end there. Maintaining your subdomain is crucial for ensuring that it continues to serve its purpose efficiently. Whether you’re running a blog or an online store, regular upkeep can make a significant difference in performance and user experience.Regular Monitoring
Regular monitoring of your subdomain helps you stay on top of any issues that may arise. Use analytics tools to track traffic and performance metrics. This data can reveal patterns, such as peak usage times or unexpected traffic drops, which may require your attention. Checking your subdomain’s functionality is essential. Ensure that all links work and pages load quickly. A slow or broken site can drive visitors away, affecting your subdomain’s success. Consider setting up alerts for downtime. Instant notifications allow you to address issues promptly, minimizing disruptions for your users.Making Changes As Needed
Adaptability is key to maintaining a successful subdomain. As your goals evolve, your subdomain may require adjustments. This could mean updating content, design tweaks, or even restructuring navigation. Listen to user feedback to identify areas for improvement. Users are often the first to notice issues or suggest enhancements that can improve their experience. Stay updated with the latest trends and technologies. For example, ensuring your site is mobile-friendly is no longer optional. Regular updates keep your subdomain relevant and engaging. Have you ever noticed how quickly technology changes? A subdomain that was perfect a year ago might need a facelift today. Keep it fresh and functional to meet your needs and those of your visitors. By taking these practical steps, you ensure that your subdomain remains a valuable asset to your online presence. So, what are the next steps you’ll take to maintain your subdomain effectively?
Credit: www.youtube.com
Frequently Asked Questions
How Do I Create A Subdomain In Namecheap?
Log in to your Namecheap account. Navigate to the “Domain List” section. Click “Manage” next to your domain. Select the “Advanced DNS” tab. Add a new record under “Host Records” by entering your desired subdomain and pointing it to the correct IP address.
Save changes.
How Do I Create My Own Subdomain?
Log into your hosting account. Navigate to the domain management section. Select “Create Subdomain. ” Enter the desired subdomain name. Choose the domain and directory. Confirm creation. Your subdomain is ready for use.
Is A Subdomain Bad For Seo?
Subdomains aren’t inherently bad for SEO. They can impact SEO if not properly managed. Google treats subdomains separately from main domains, which may affect ranking. Proper optimization and clear content can help mitigate any negative effects. It’s crucial to maintain consistent SEO practices for both main and subdomains.
Is Creating Subdomains Free?
Creating subdomains is usually free. Most hosting providers include subdomain creation in their hosting plans. Always check with your specific provider for details, as policies can vary.
Conclusion
Creating a subdomain with Namecheap is simple and efficient. With these steps, you can easily manage your online presence. A subdomain helps organize your website content better. It’s great for blogs, shops, or portfolios. Remember to choose a clear and relevant name.
This enhances user experience and searchability. Practicing these steps will make the process smoother. Explore more features as you grow. The internet is vast, and managing subdomains effectively can boost visibility. You’re now equipped to create and manage subdomains. Enjoy the journey of expanding your digital footprint!


