
Are you eager to give your WordPress site a stunning makeover? Installing a theme demo is your golden ticket to achieving a professional-looking website without the hassle of starting from scratch.
Imagine your site transforming with the click of a button, instantly adopting the design, layout, and features of a carefully crafted demo. But here’s the catch: you need to know the right steps to make it happen smoothly. In this guide, you’ll discover how to install a WordPress theme demo effortlessly.
Unlock the potential of your site and captivate your visitors with a visually engaging experience. Ready to dive in and learn how? Let’s get started!
Choosing The Right Theme
Find themes that many people like. Explore online theme shops for ideas. Check user reviews and ratings. A theme with good reviews is a safe choice. Popular themes often have more updates. This means fewer bugs and better support. Many users can guide you if you have questions.
Look for themes with cool features. Some themes have custom colors. Others let you use special fonts. Think about what you need. Decide if you want extra widgets or plugins. Some themes offer free plugins. Make sure your theme has everything you need.
Your theme should work on phones and tablets. Many people browse on mobile devices. A responsive theme adjusts to screen size. This makes your site look good everywhere. Test the theme on different devices. If it looks nice, you’re good to go.
Preparing Your WordPress Site
Always make a backup of your website. This keeps your data safe. Use a plugin like UpdraftPlus. You can save your backup to the cloud. This way, you won’t lose any information.
Ensure your WordPress is up to date. Go to your dashboard. Click on Updates. This keeps your site secure. It also makes your site run better. Updates fix bugs and add new features.
Review all your plugins. They must work with your theme. Check each plugin’s details. Look for any conflicts. Disable plugins that don’t work well. This avoids problems on your site.
Installing Your Chosen Theme
First, log into your WordPress Dashboard. Then, go to Appearance and click on Themes. Click the Add New button at the top. Choose the Upload Theme option. Click Choose File and find your theme file. It should be a .zip file. Finally, click Install Now.
Connect to your site using an FTP client. Navigate to the wp-content/themes folder. Upload the unzipped theme folder here. After uploading, go back to the WordPress Dashboard. Go to Appearance and click on Themes. You should see your new theme listed.
In the WordPress Dashboard, go to Appearance and click on Themes. Find the theme you uploaded. Click the Activate button. Your theme is now active. Check your site to see the new look.
Importing Theme Demo Content
First, find the demo content files. These files come with the theme. They include images, posts, and settings. Check the theme’s folder. Look for a folder named demo or import. This folder has the files you need.
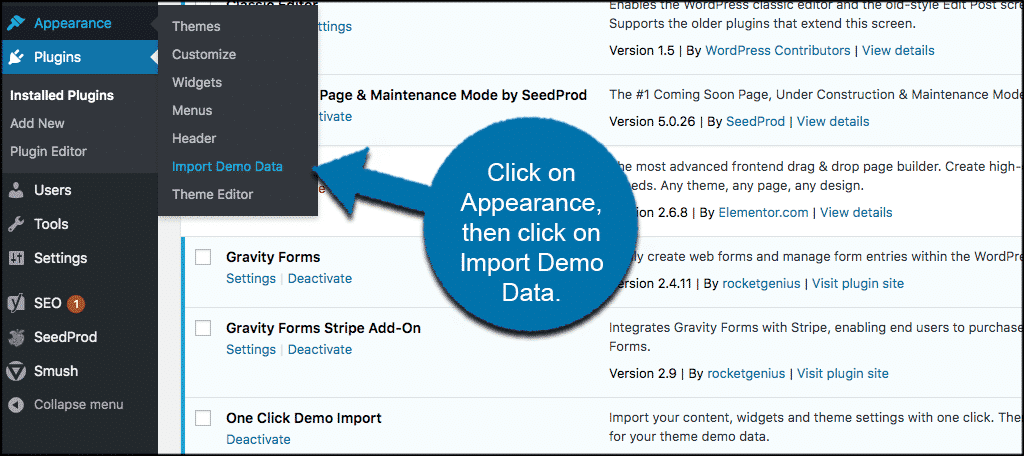
Some themes offer a One-Click Demo Import. This tool is easy to use. Go to your WordPress dashboard. Click on Appearance, then Import Demo Data. Choose the demo you like. Click Import. Wait for it to finish. Your site will look like the demo.
Sometimes you must import XML files manually. Go to your dashboard. Click Tools, then Import. Choose WordPress and install the plugin. Upload the XML file. Click Import. This process takes a few minutes. Now, your site has demo content.
Customizing Your Theme
Begin by opening your WordPress dashboard. Locate the Appearance tab. Click on it. Choose Customize from the menu. This opens the Theme Customizer. Here, you can see various options. Each option lets you tweak your theme. Explore each setting carefully. Make sure to save changes.
The layout defines your site’s look. Change it in the Theme Customizer. Find the Layout settings. Pick a design that fits your style. Adjust colors and fonts too. These changes make your site unique. Watch your site transform. Keep your design simple and clear.
Widgets add functionality to your site. Menus help with navigation. Configure them in the Customizer. Drag widgets to desired areas. Create menus for easy site access. Use the Menu option for setup. Arrange items in order. Ensure visitors find information easily.

Credit: www.youtube.com
Troubleshooting Common Issues
Installing a WordPress theme demo can sometimes be tricky. Start by checking your internet connection and ensure the theme’s compatibility with your WordPress version. If issues persist, verify server settings and adjust memory limits to facilitate smooth installation.
Resolving Import Errors
Import errors happen sometimes. Check your internet connection first. Poor connection causes issues. Also, ensure you have the right theme files. Only use files from trusted sources. Wrong files won’t work. Try importing again after checking these.
Fixing Broken Layouts
Broken layouts can be frustrating. Clear your browser cache first. Often, this solves the problem. Check for any plugin conflicts too. Disable all plugins and see if the layout fixes. Then, activate plugins one by one. This helps find the troublemaker plugin.
Addressing Compatibility Problems
Compatibility issues arise with outdated themes or plugins. Always update your theme and plugins. Newer versions fix many problems. If problems persist, contact theme support. They often provide solutions quickly. Remember to back up your site often.
Optimizing Theme Performance
Fast websites make users happy. To achieve this, reduce image sizes. Smaller images load quicker. Use a tool like TinyPNG. It helps make images smaller. Also, remove any unused plugins. They slow down websites. Fewer plugins mean faster load times. Lastly, choose a lightweight theme. Heavy themes can slow your site.
Better SEO gets more visitors. Use a plugin like Yoast SEO. It helps improve your SEO settings. Add keywords to your titles. Also, make sure to fill in the meta descriptions. These help search engines understand your page. They also attract clicks from users.
Updates are important. They keep your theme secure. New updates fix problems. They also add new features. Always update to the latest version. This helps keep your website safe. To update, visit the theme page. Click the update button. It’s that simple!
Credit: www.greengeeks.com
Credit: xpeedstudio.com
Frequently Asked Questions
How Do I Install A WordPress Theme Demo?
To install a WordPress theme demo, first, download the demo content. Go to your WordPress dashboard, navigate to Appearance > Themes, and upload your theme. Then, use the theme’s demo importer tool, usually found under Appearance or Tools, to import the demo content.
Why Use A WordPress Theme Demo?
Using a WordPress theme demo helps you visualize your site before finalizing. It ensures all design elements, layouts, and features are properly integrated. This saves time and avoids potential issues during customization. It provides a clear starting point for building your website.
Can I Customize After Installing A Demo?
Yes, you can customize after installing a demo. Most WordPress themes offer extensive customization options. You can change colors, fonts, layouts, and more through the theme customizer. This flexibility allows you to tailor the demo to your brand’s unique style and requirements.
What If The Demo Import Fails?
If the demo import fails, check your server limits and permissions. Increase PHP memory limit and execution time if needed. Ensure all necessary plugins are activated. If problems persist, consult the theme documentation or contact support for troubleshooting assistance.
Conclusion
Installing a WordPress theme demo can seem tricky. But with practice, it gets easier. Follow the steps carefully and take your time. Each theme might have unique steps. So, always read the instructions provided. Don’t hesitate to seek help in forums if needed.
Practice makes perfect, so try different themes. With each installation, your skills will grow. Soon, you’ll manage themes with ease. Your website will look professional and stunning. Remember, patience is key. Happy theming!


